
Email Address Import for Mail Delivery
There are three ways to link the email addresses of users you want to email to Repro. Please refer to the steps below according to your use case and link the email addresses.
Integration method |
Overview |
Usage |
|---|---|---|
Upload via dashboard |
Upload a list of email addresses as a CSV file from the Repro dashboard. |
Bulk import at the start of using Repro email, or import email addresses extracted from CDP or your own system. |
Upload to S3 |
You can register user profiles by uploading CSV files to the AWS S3 bucket provided by Repro. |
Continuous import of email addresses held in CDP or your own system |
Set via SDK (iOS/Android/Web) |
Set the email address as a user profile via SDK. |
Import when obtaining email addresses in your app or service |
Types of email addresses to import
Import type |
Description |
Deliverable or not |
|---|---|---|
Deliverable user |
Email addresses of users who can currently receive emails normally. These do not include unsubscribed, bounced, or suppressed addresses. |
Performed |
Optout user |
Email addresses of users who unsubscribed via website or app settings. |
Not performed |
Bounced user |
Email addresses or domains that do not exist or are in a permanent error state. |
Not performed |
Suppressed user |
Email addresses that should not receive emails for reasons other than the above. |
Not performed |
Note
Even if a user who has registered their email address in Repro has already withdrawn, emails will still be sent from Repro. For withdrawn users, we recommend adding a user profile indicating withdrawal via SDK or User Profile API and excluding them from the delivery target.
Import email addresses from the admin panel
Navigate to the user info import screen for mail delivery
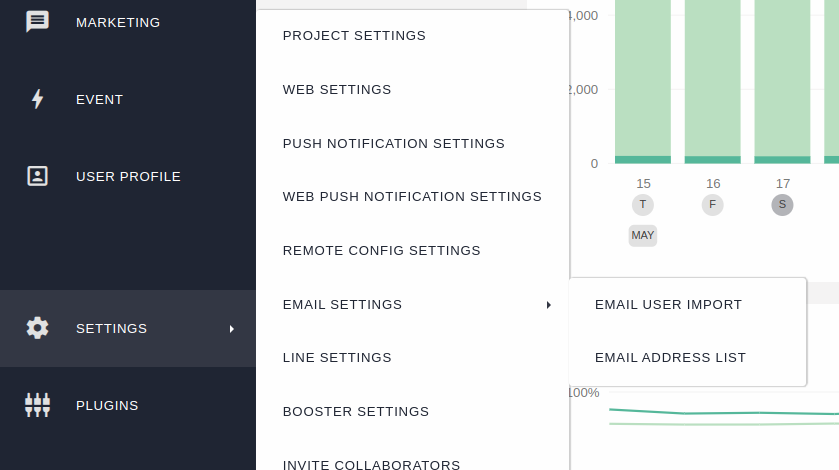
Go to Settings > Email Settings > Email Address Import for Mail Delivery.
Import email addresses
Click [Import CSV File] > [Select File] to choose a CSV file (only the .csv extension is accepted), select the channel to associate with it in [Select Email Channel], choose the import type in [Type of Email Address to Import], and click [Run Import]. Use a CSV file created according to the specification described below. Files exceeding the size limit (500MB) cannot be uploaded.
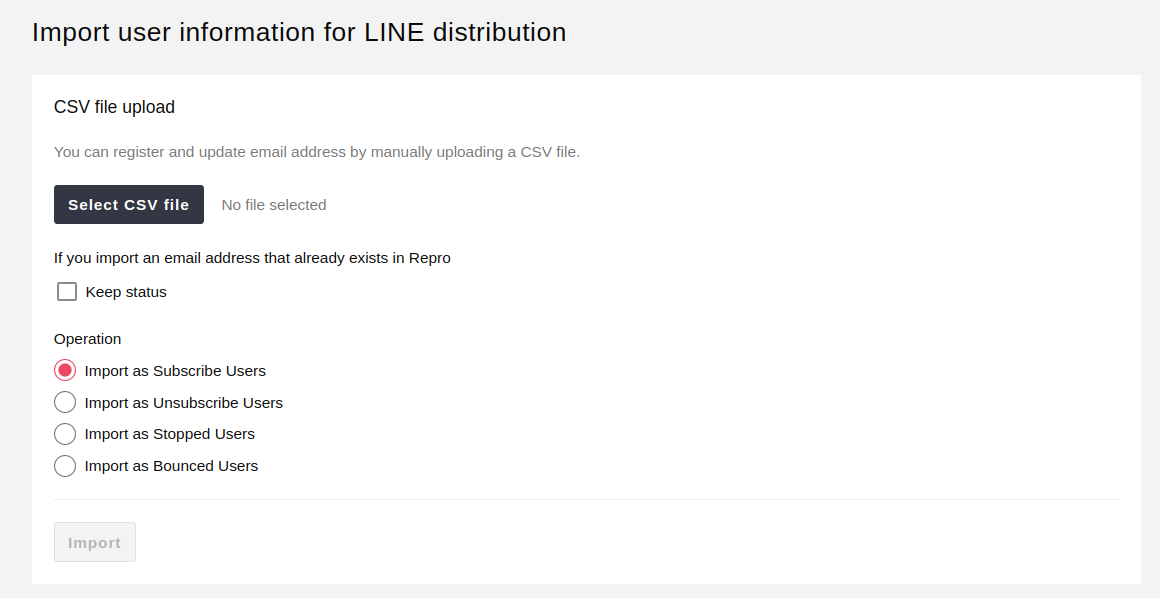
Import type |
Description |
Deliverable or not |
|---|---|---|
Import as deliverable user |
You can import opted-in email addresses as delivery targets. |
Performed |
Import as unsubscribed user |
You can import email addresses unsubscribed via website or app. |
Not performed |
Import as suppressed user |
You can import email addresses that should not receive emails for reasons other than unsubscribe or bounce. |
Not performed |
Import as bounced user |
You can import hard-bounced email addresses, such as those that do not exist. |
Not performed |
Select an email channel
Select a channel in [Select Email Channel] to specify which channel the email address and User ID should be associated with.
Note
When importing a CSV with a channel other than ‘All Users’ specified, the information is also associated with the ‘All Users’ email channel. However, this association with ‘All Users’ occurs only if the target user does not already have subscription information for the ‘All Users’ email channel.
If You Import a User ID That Already Exists in Repro
If a User ID that already exists in Repro is included in the email address list you are importing, use the [If You Import a User ID That Already Exists in Repro] checkbox to choose whether to keep the existing status in Repro or overwrite it with the status specified at import.
Example:
Keep Repro status |
Import type |
User’s status before import |
User’s status after import |
|---|---|---|---|
Check |
Import as deliverable user |
Suppressed user |
Suppressed user |
Do not check |
Import as deliverable user |
Suppressed user |
Deliverable user |
If you want to keep the existing status, check [Keep Repro’s Status]. When this is checked, only importing as a deliverable user can be selected.
Note
If the user’s status before import is bounced user, it cannot be overwritten with any other status.
Checking Import History
The [Import History (Last 7 Days)] table at the bottom of the screen shows the channel name, file name, import date and time, type of email address imported, status, and the user who uploaded the file for files imported in the last 7 days.
The status is shown as one of ‘Initializing’, ‘Uploading’, ‘Importing’, ‘Import Complete’, ‘Unavailable’, or ‘Error’. If an error occurs, you can download a CSV file describing the error from the Error Log column.
Warning
The status does not update automatically; please refresh your browser to check the latest status.
CSV specification
Details of the CSV to upload
CSV Format
user_id,email_address
123456,aaaa@example.com
234567,jjjj@example.com
Required columns vary by import type.
Import type |
Required columns |
Optional columns |
|---|---|---|
Deliverable user |
|
None |
Optout user |
|
|
Suppressed user |
|
|
Bounced user |
|
|
Warning
When registering a new email address, be sure to import it together with a User ID.
If you import an unregistered email address without a User ID, a user will be created internally without an assigned User ID.
If a User ID is subsequently assigned to that email address in a later import, the user records will not be linked; therefore, even if ‘Keep status’ is selected , the previous status cannot be correctly associated.
The maximum uploadable CSV file size is 500MB. Note that only CSV files without a BOM are supported.
Only UTF-8 encoding is supported for CSV files. If the file contains Japanese or other characters and is saved in an encoding other than UTF-8, an error will occur when uploading.
The following cases will result in an error as an ‘invalid CSV file’ during upload.
A file that is not a real CSV, just renamed with a .csv extension.
The file contains characters that cannot be interpreted as UTF-8
A required column is missing from the CSV header (first line)
The same column appears more than once in the CSV header
If the email address is empty or in an invalid format, the upload will succeed, but an error email will be sent afterward stating that the import failed.
The error log for the import can be downloaded as a CSV file with content like the following.
user_id,email_address
has_error_mail_address,CSVの書式が正しくありません、不正なダブルクォーテーションが使われています
S3 upload
You can register email addresses by uploading a CSV file to the AWS S3 bucket provided by Repro. The bucket name and path to use are shown on the Email Address Import for Mail Delivery screen, so you can use them as displayed.
Note
To use this feature, you need to obtain authentication credentials in advance for uploading objects to the AWS S3 bucket provided by Repro. For more details, please refer to this section.
Warning
CSV files for upload cannot contain
/or whitespace characters in their filename.The CSV file you upload must be 500MB or smaller.
For example, if you use the AWS CLI, you can upload a CSV file containing email addresses to S3 with a command like the following. For <EMAIL_CHANNEL_ID>, specify the channel ID shown for the relevant channel in Email Channel Settings. For <YOUR_APP_ID>, use the value shown in the dashboard. For (insert|subscribe|unsubscribe|stopped|bounced), specify only one import operation.
The import operations and their behavior are as follows. For the behavior when importing a User ID that already exists in Repro, also see the example here.
Import type |
Description |
If you import user_id(s) that already exists in Repro |
|
|---|---|---|---|
insert |
Deliverable user |
You can import opted-in email addresses as delivery targets. |
Keeps the status of users that already exist in Repro |
subscribe |
Deliverable user |
You can import opted-in email addresses as delivery targets. |
Deliverable user |
unsubscribe |
Optout user |
You can import email addresses unsubscribed via website or app. |
Optout user |
stopped |
Suppressed user |
You can import email addresses that should not receive emails for reasons other than unsubscribe or bounce. |
Suppressed user |
bounced |
Bounced user |
You can import hard-bounced email addresses, such as those that do not exist. |
Bounced user |
$ export AWS_ACCESS_KEY_ID=AKIAXXXXXXX
$ export AWS_SECRET_ACCESS_KEY=XXXXXX
$ aws s3 cp user_profiles.csv s3://repro-data-store/<YOUR_APP_ID>/email_address/:year/:month/:day/(insert|subscribe|unsubscribe|stopped|bounced)/<EMAIL_CHANNEL_ID>/mail_address.csv
FAQ
How can I know if the file upload is complete?
When the import process is complete, you will receive a notification email with details of the imported file. If there are errors, a download link for the error CSV will be included.
Are year, month, and day in the S3 path all required?
Yes, all of them are required. Please specify the file upload date in yyyy/mm/dd format (e.g., 2025/04/30).
Can I upload another file while uploading to S3?
Yes, you can upload multiple files in parallel. However, if the S3 path and file name are the same, the first uploaded data may not be processed, and the last uploaded data may be processed multiple times. If you want to upload files with the same name on the same day, we recommend changing each file name.
If different email addresses are set and imported for the same user, how is the user’s email address set?
The last imported email address takes effect. For example, if you import a file containing the following two lines, the email address for user-01 will become mail-address-02@example.com.
user-01,mail-address-01@example.com
user-01,mail-address-02@example.com
Set email address using SDK
You can set the user’s email address as a standard user profile via the iOS/Android/Web SDK, and use it for Broadcast mail delivery. See below for SDK setup details.