Get Started
Note
If you use Repro’s SDK on native app’s WebView, Please ensure to implement this, not Repro Web.
Implement/Install Repro Web
Steps
Log in to account
When you first apply for Repro Web, you will receive an invitation email to the email address you contacted with. Please log in to the Repro Web dashboard from the “Check now” link in the email.

If other members of the company are already using Repro Web, those who have administrator authority can also invite other members to the account with the following step. SETTINGS on left of the screen > INVITE COLLABORATORS
Choose the method of implementation
Repro Web can be implemented with Google tag manager(GTM)
Although It has validated the operation of Google Tag Manager (GTM) and Yahoo Tag Manager (YTM), there is still an issue which is “The execution order of tags can not be controlled”, so we recommend implementation with Google Tag Manager(GTM).
The operation with other measurement tag managers have been validated, but please use them with confirming operation.
This manual introduces two ways to implement Repro Web as below.
Also, please contact us when one of the below-mentioned requirements applies. We will guide give you an instruction for suitable implementations.
Measure across multiple domains
implement to websites which have ASP service or cart system
Implement with Google Tag Manager(GTM)
This is a setting process for using Repro Web via Google Tag Manager(GTM).
INDEX
Install/Implement Setup Measurement tag(GTM)
Prepare Set up measurement tag
Prepare a set up measurement tag to be placed on the site.
Please choose whether you collect user ID through the website using Repro.
Note
User ID is an identifier for identifying the user on Repro Web. Normally, Repro Web identifies users based on the browser (cookie), but in order to identify users across different browsers and platforms, it is necessary to set a unique ID such as a member ID on the DB for the user ID.
If you would like to realize the following cases, it is required to set up User ID.
Perform measurement or segment measures across devices such as PCs and smartphones
Perform measurement and segment measures across platforms such as the Web and App
Link server data, such as DB and DMP, directly with Repro Web using the member ID etc. as a key
Basic programming skills may be required when setting up. Please share this manual with an appropriate person, such as your website administrator, to proceed with the setup.
In the following, please use the tag with the user ID implemented if acquiring the user ID, and use the tag without the user ID implemented if not acquiring the user ID.
Setup Measurement tag(User ID implemented)
// SET_USER_ID の部分に貴社のユーザーIDが取得できる実装をしてください
<script>
    !function(o,e,n){var r=[];if(window.reproio)console.info("Repro Web SDK was loaded more than once");else{window.reproio=function(){r.push(arguments)};var i=o.createElement(e),t=o.getElementsByTagName(e)[0];i.src="https://cdn.reproio.com/web/v2/repro-sdk.min.js",i.async=!0,i.crossOrigin="",i.onload=function(){window.reproio("setSnippetVersion","2.1"),r.forEach(function(o){window.reproio.apply(window.reproio,o)})},t.parentNode.insertBefore(i,t)}}(document,"script");
    reproio("setUserID", "SET_USER_ID");
    reproio("setup", "YOUR_REPRO_SDK_TOKEN");
    reproio("track","PageView");
</script>
Setup Measurement tag (no user ID implemented)
<script>
   !function(o,e,n){var r=[];if(window.reproio)console.info("Repro Web SDK was loaded more than once");else{window.reproio=function(){r.push(arguments)};var i=o.createElement(e),t=o.getElementsByTagName(e)[0];i.src="https://cdn.reproio.com/web/v2/repro-sdk.min.js",i.async=!0,i.crossOrigin="",i.onload=function(){window.reproio("setSnippetVersion","2.1"),r.forEach(function(o){window.reproio.apply(window.reproio,o)})},t.parentNode.insertBefore(i,t)}}(document,"script");
   reproio("setup", "YOUR_REPRO_SDK_TOKEN");
   reproio("track","PageView");
</script>
Secondary, log in to the Repro Web dashboard you got a invitation and go to menu, PROJECT SETTINGS > Credentials and copy the SDK token.
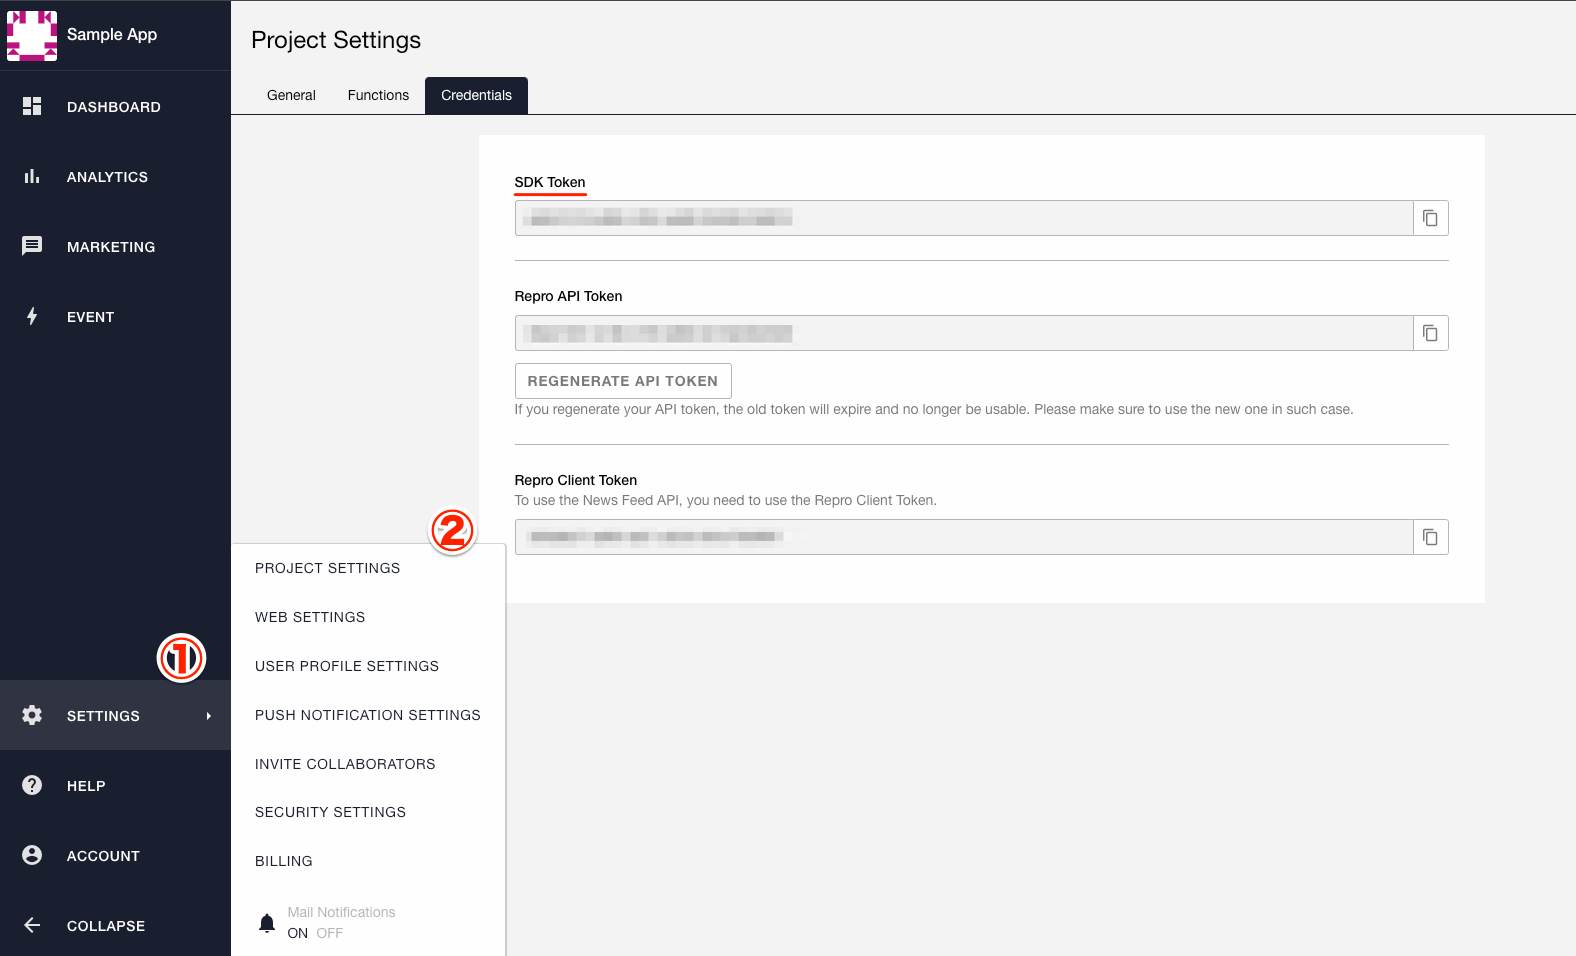
Paste the value of SDK token copied on YOUR_REPRO_SDK_TOKEN part in the setup measurement tag,the third line from the bottom
If SDK token is “asefpuh1jbnnvadi”, it will be like below. 
If your site where Repro Web is installed is built as an SPA, see Implement to SPA(Single Page Application) site .
Once you finish all above steps, the preparation for the set up measurement tag is completed.
If you do not collect user ID, please move to Place Setup Measurement tag .
Set the User ID
When setting up a setup measurement tag with a user ID implementation, dynamically embed values such as the member ID in the specified part ( SET_USER_ID ) in the setup measurement tag description
For more detailed information,please refer to GTM document.Here are some examples for implementation.
At first, please set to output member ID on the site with using tools such as Data Layer Variable when logging in
In case the member ID is not outputted, minor site renovation is required.
Please ask a person in charge who is well knowledgeable to programing for the renovation.
Secondary, register member ID of the site as User-Defined Variables of GTM. 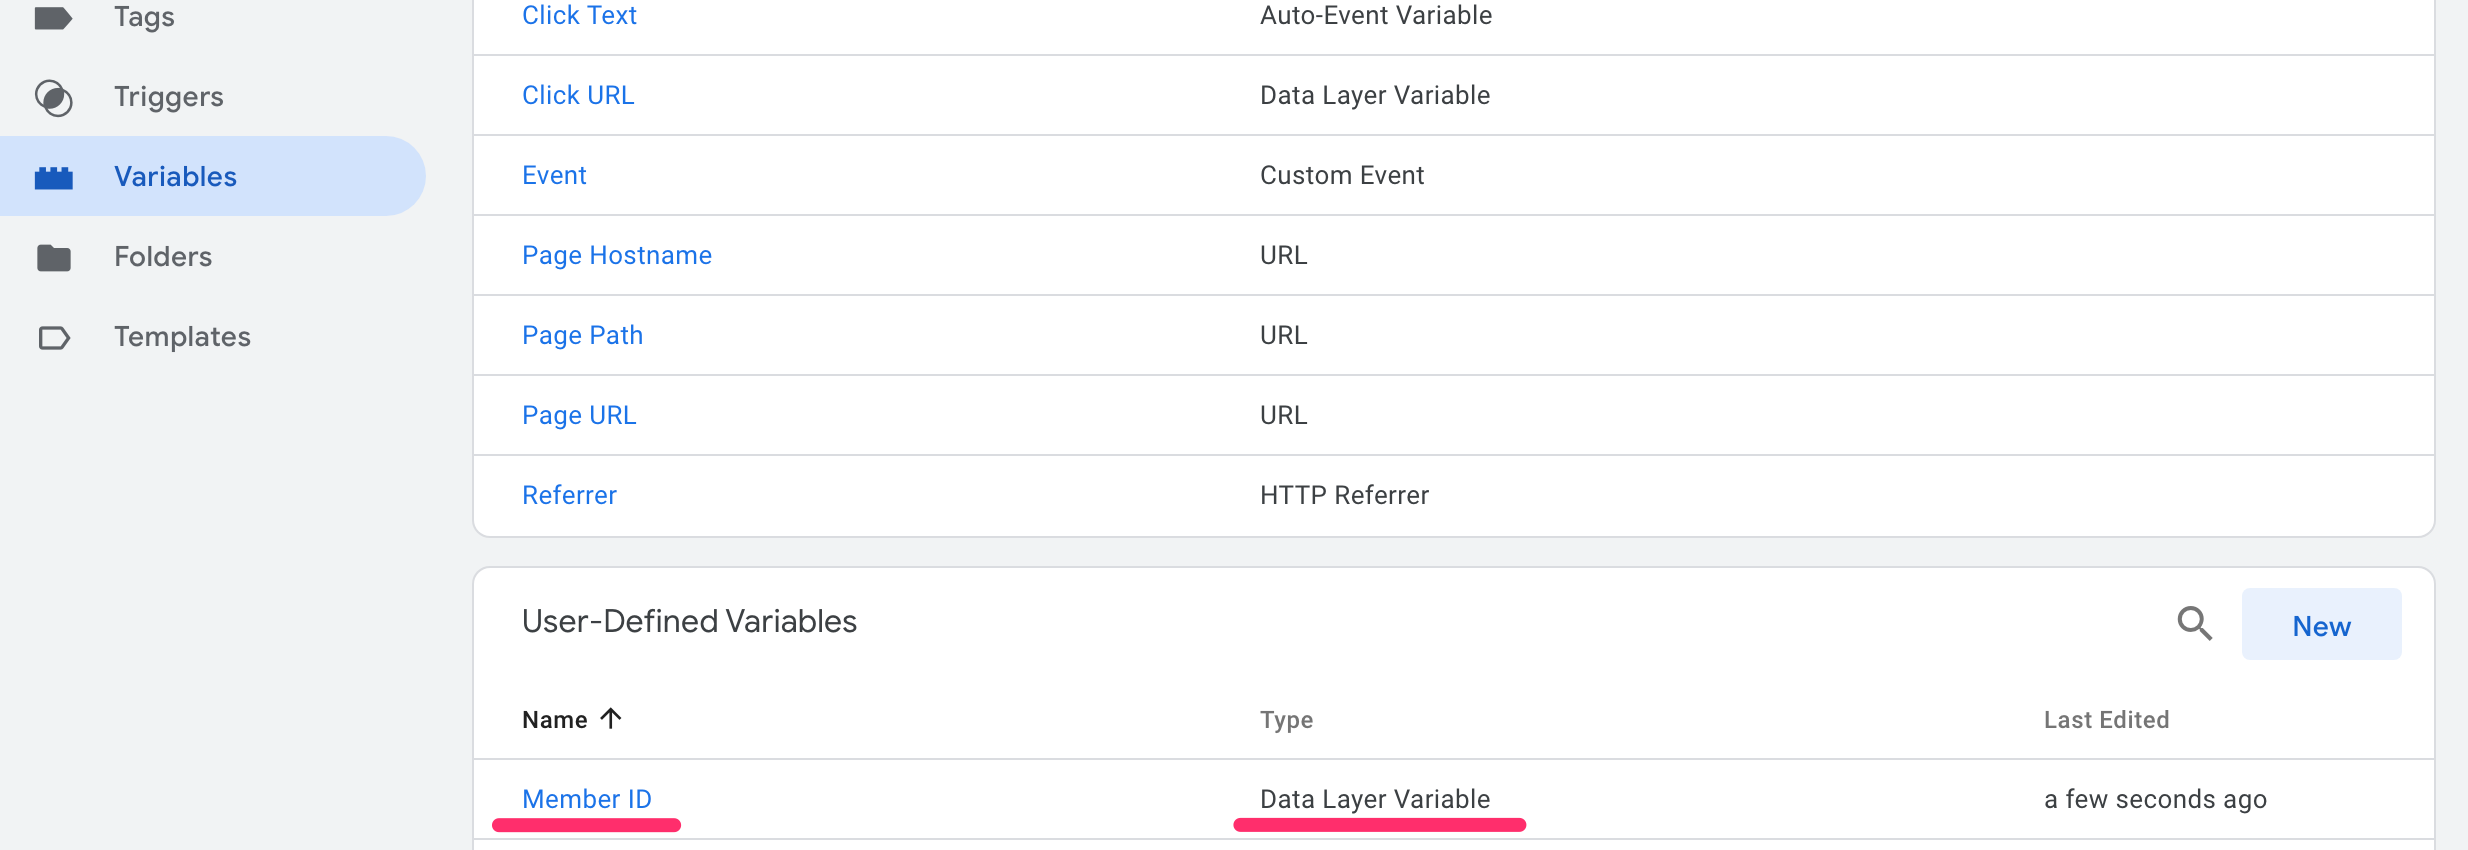
Lastly, embed {{ member ID}} to designated place of set up measurement tag. 
Place Setup Measurement tag
Place a set up measurement tag which is prepared with steps above on the site through GTM.
Please access the GTM dashboard and follow the steps below.
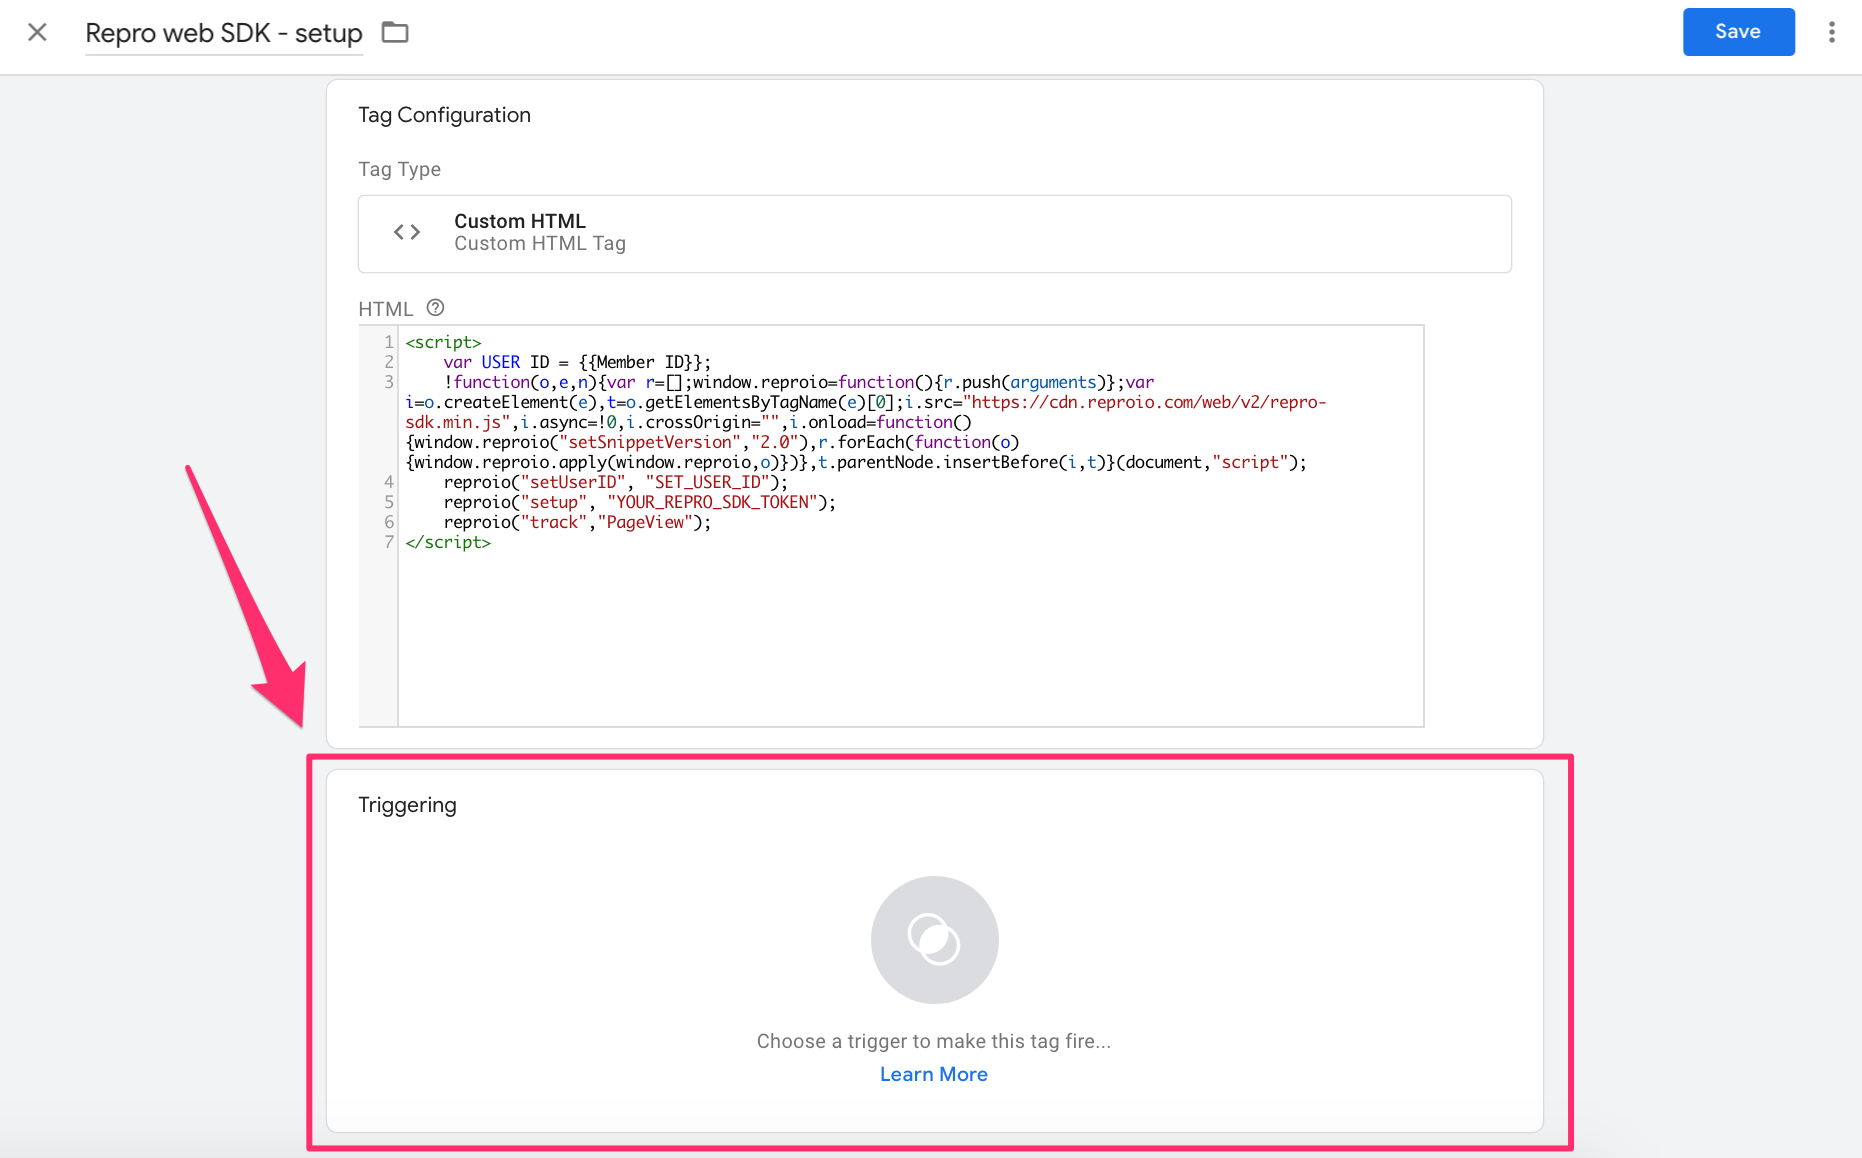
Go to “Menu” on left > “Tag”
Click the ”New” button
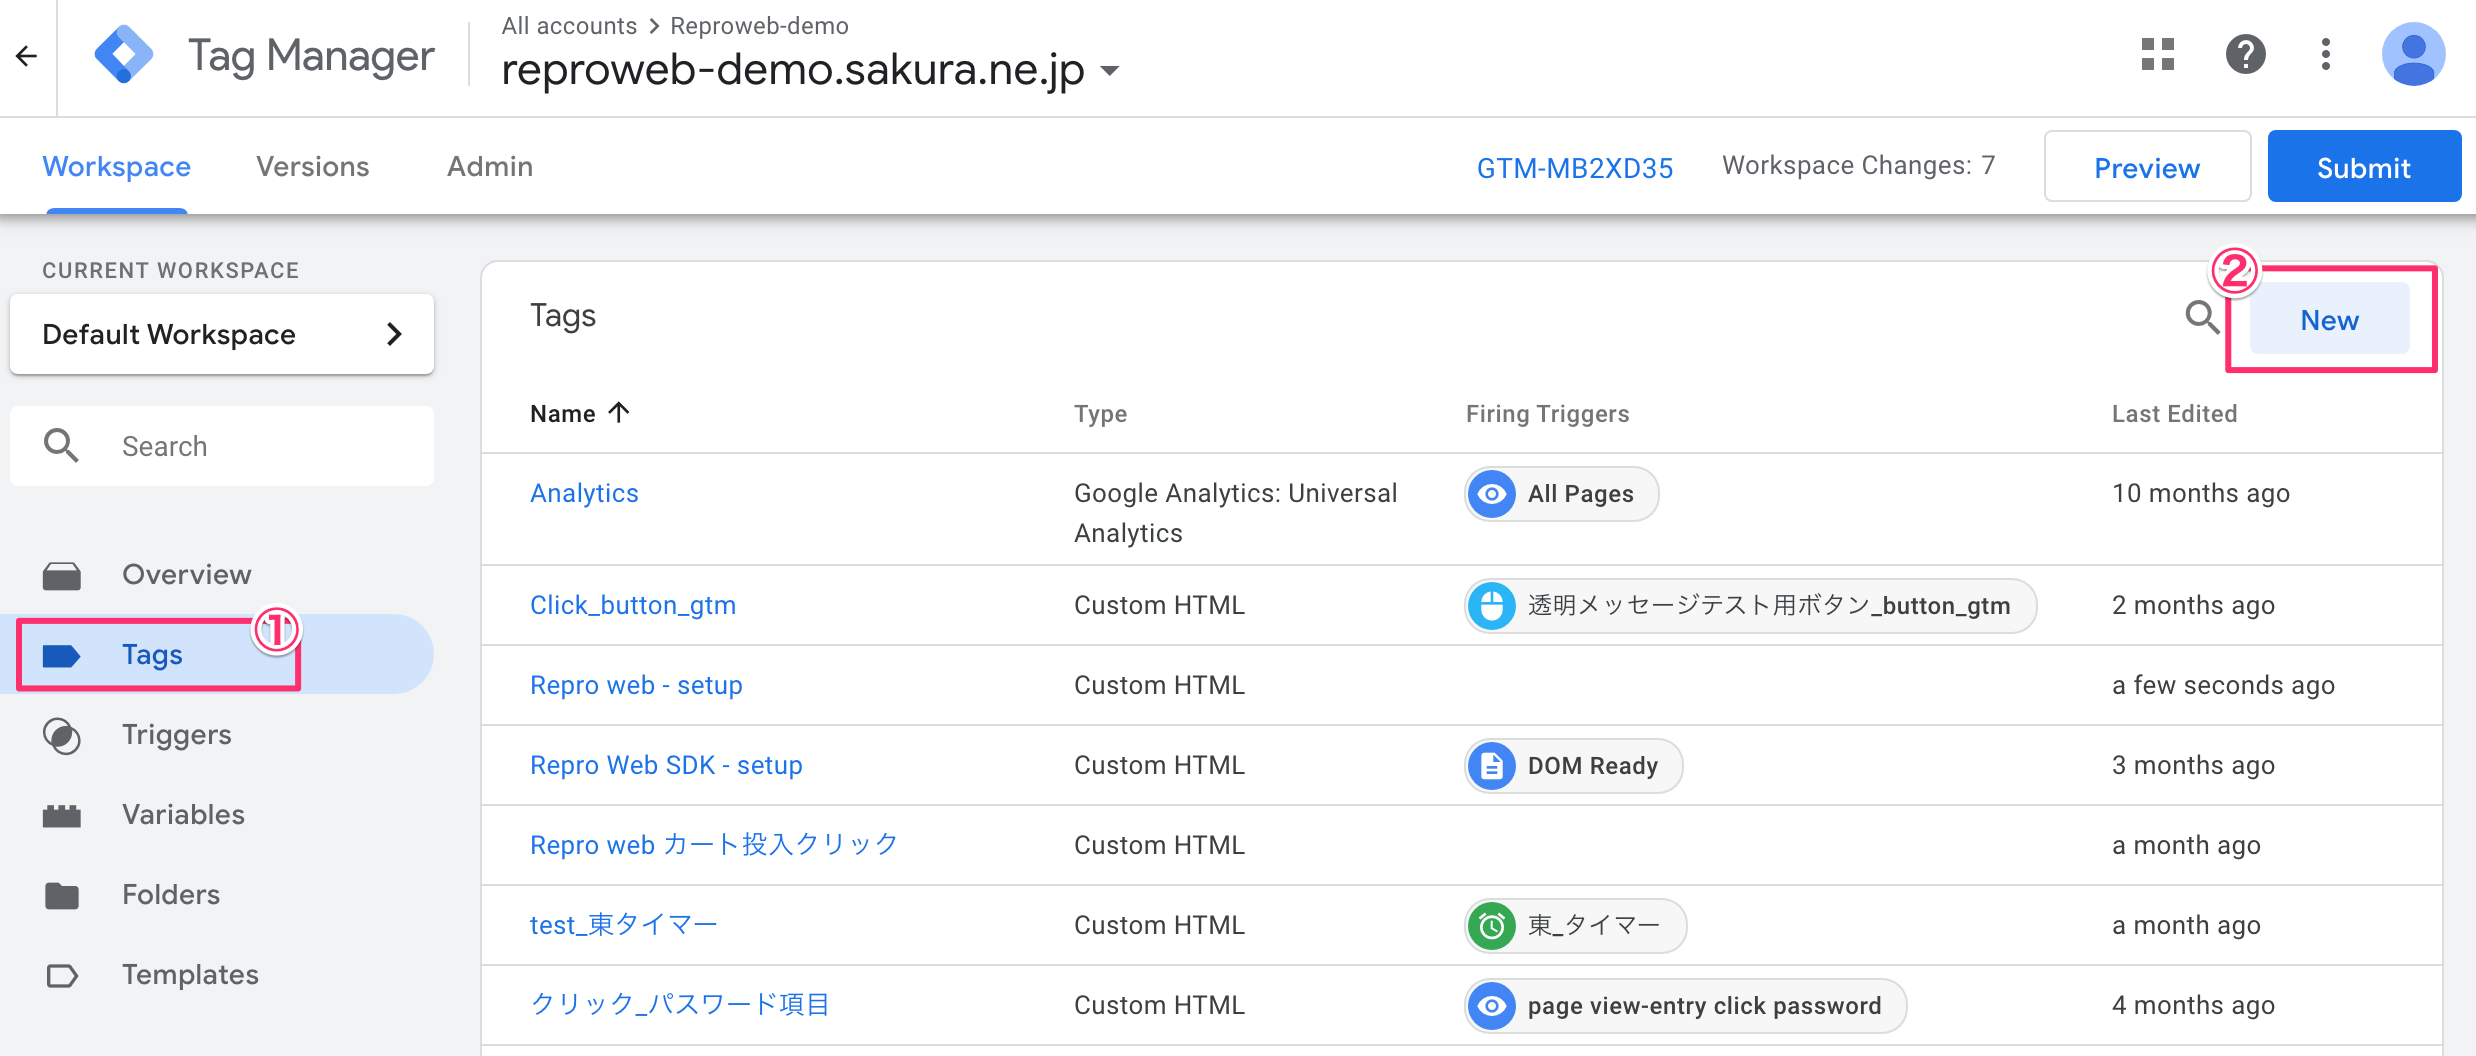
3.Please put an easy and simple name to the tag.This time, we use “Repro Web SDK - setup” as an example.
4.Please choose Custom HTML for type of tag.
5.For HTML part, please copy and paste the set up measurement tag which is prepared with steps of “Prepare Setup Measurement tag” .
Please set “Tag firing options” which is below “Advanced Settings”, as “once per page” .
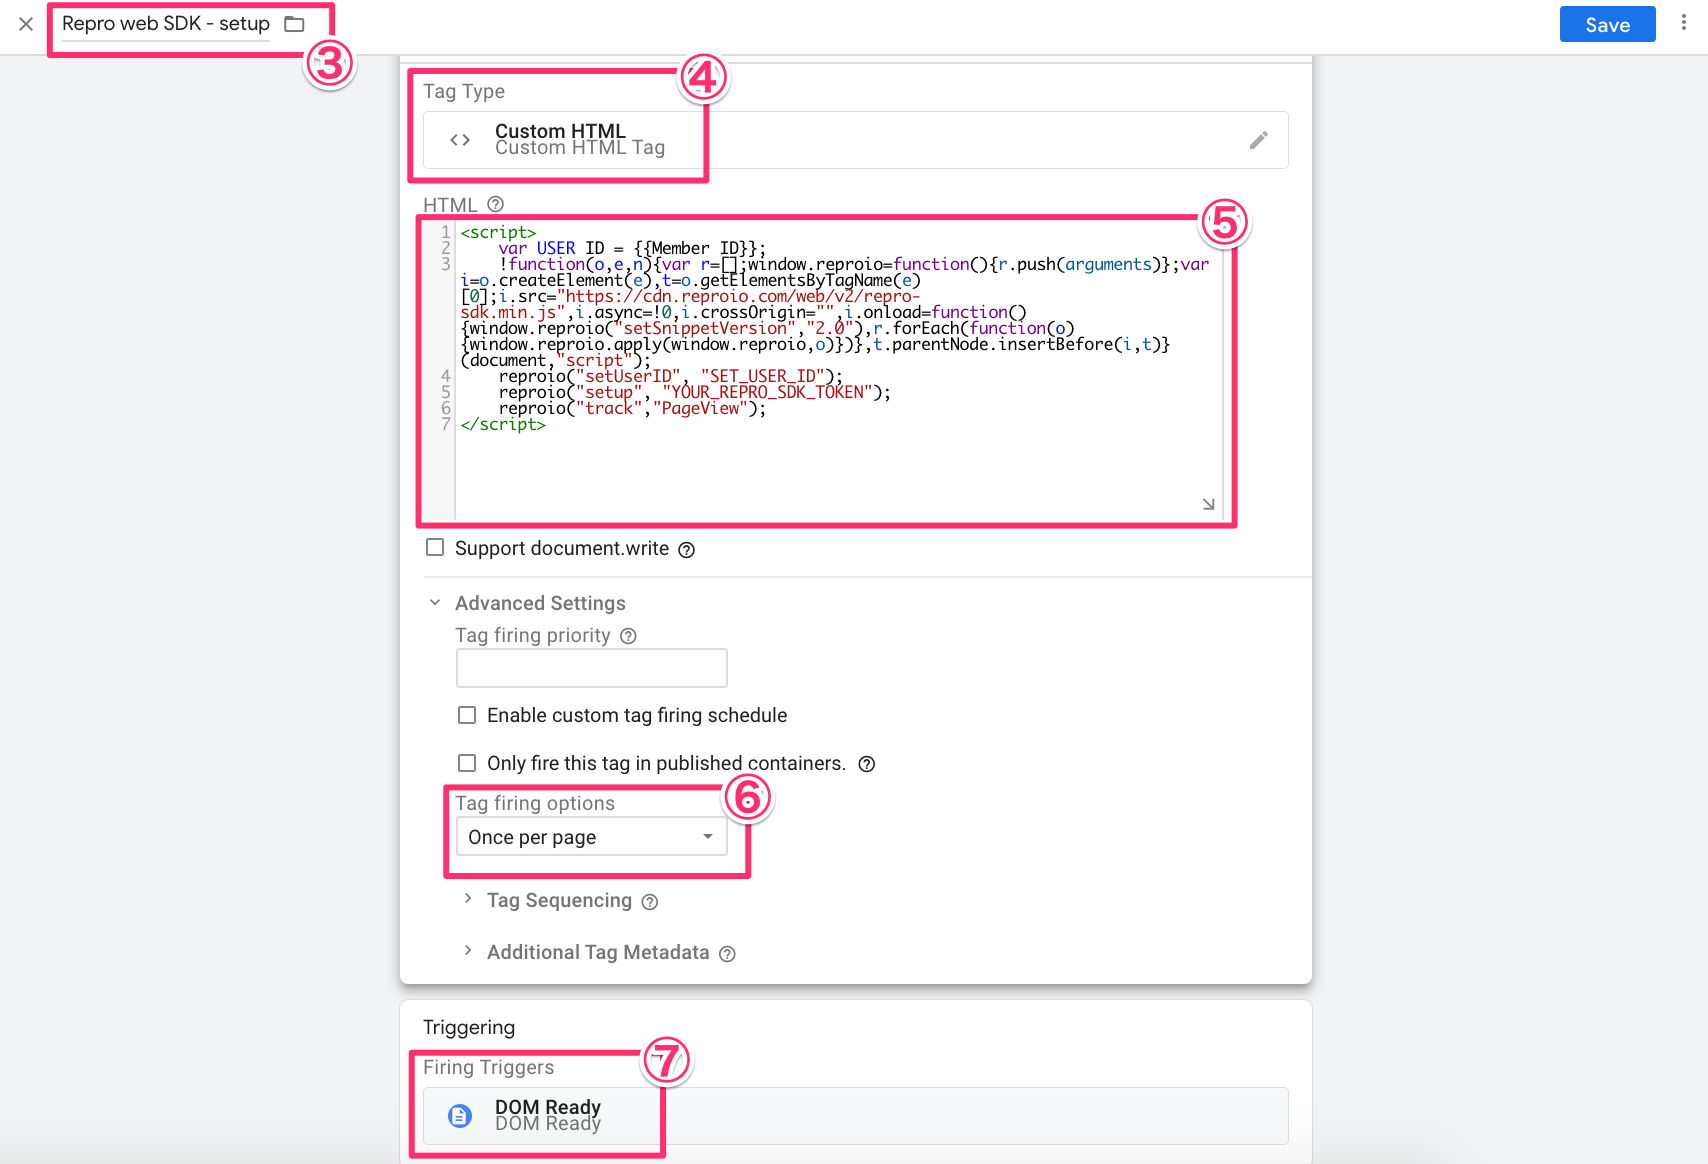
7.For the trigger, Please set up DOM Ready which is executed on all the pages which are measurement target.
If there is no trigger existing, please create a new trigger following the steps below.
1.Click the “Section” of triggers.
2.Click “+”button on right top of the screen.
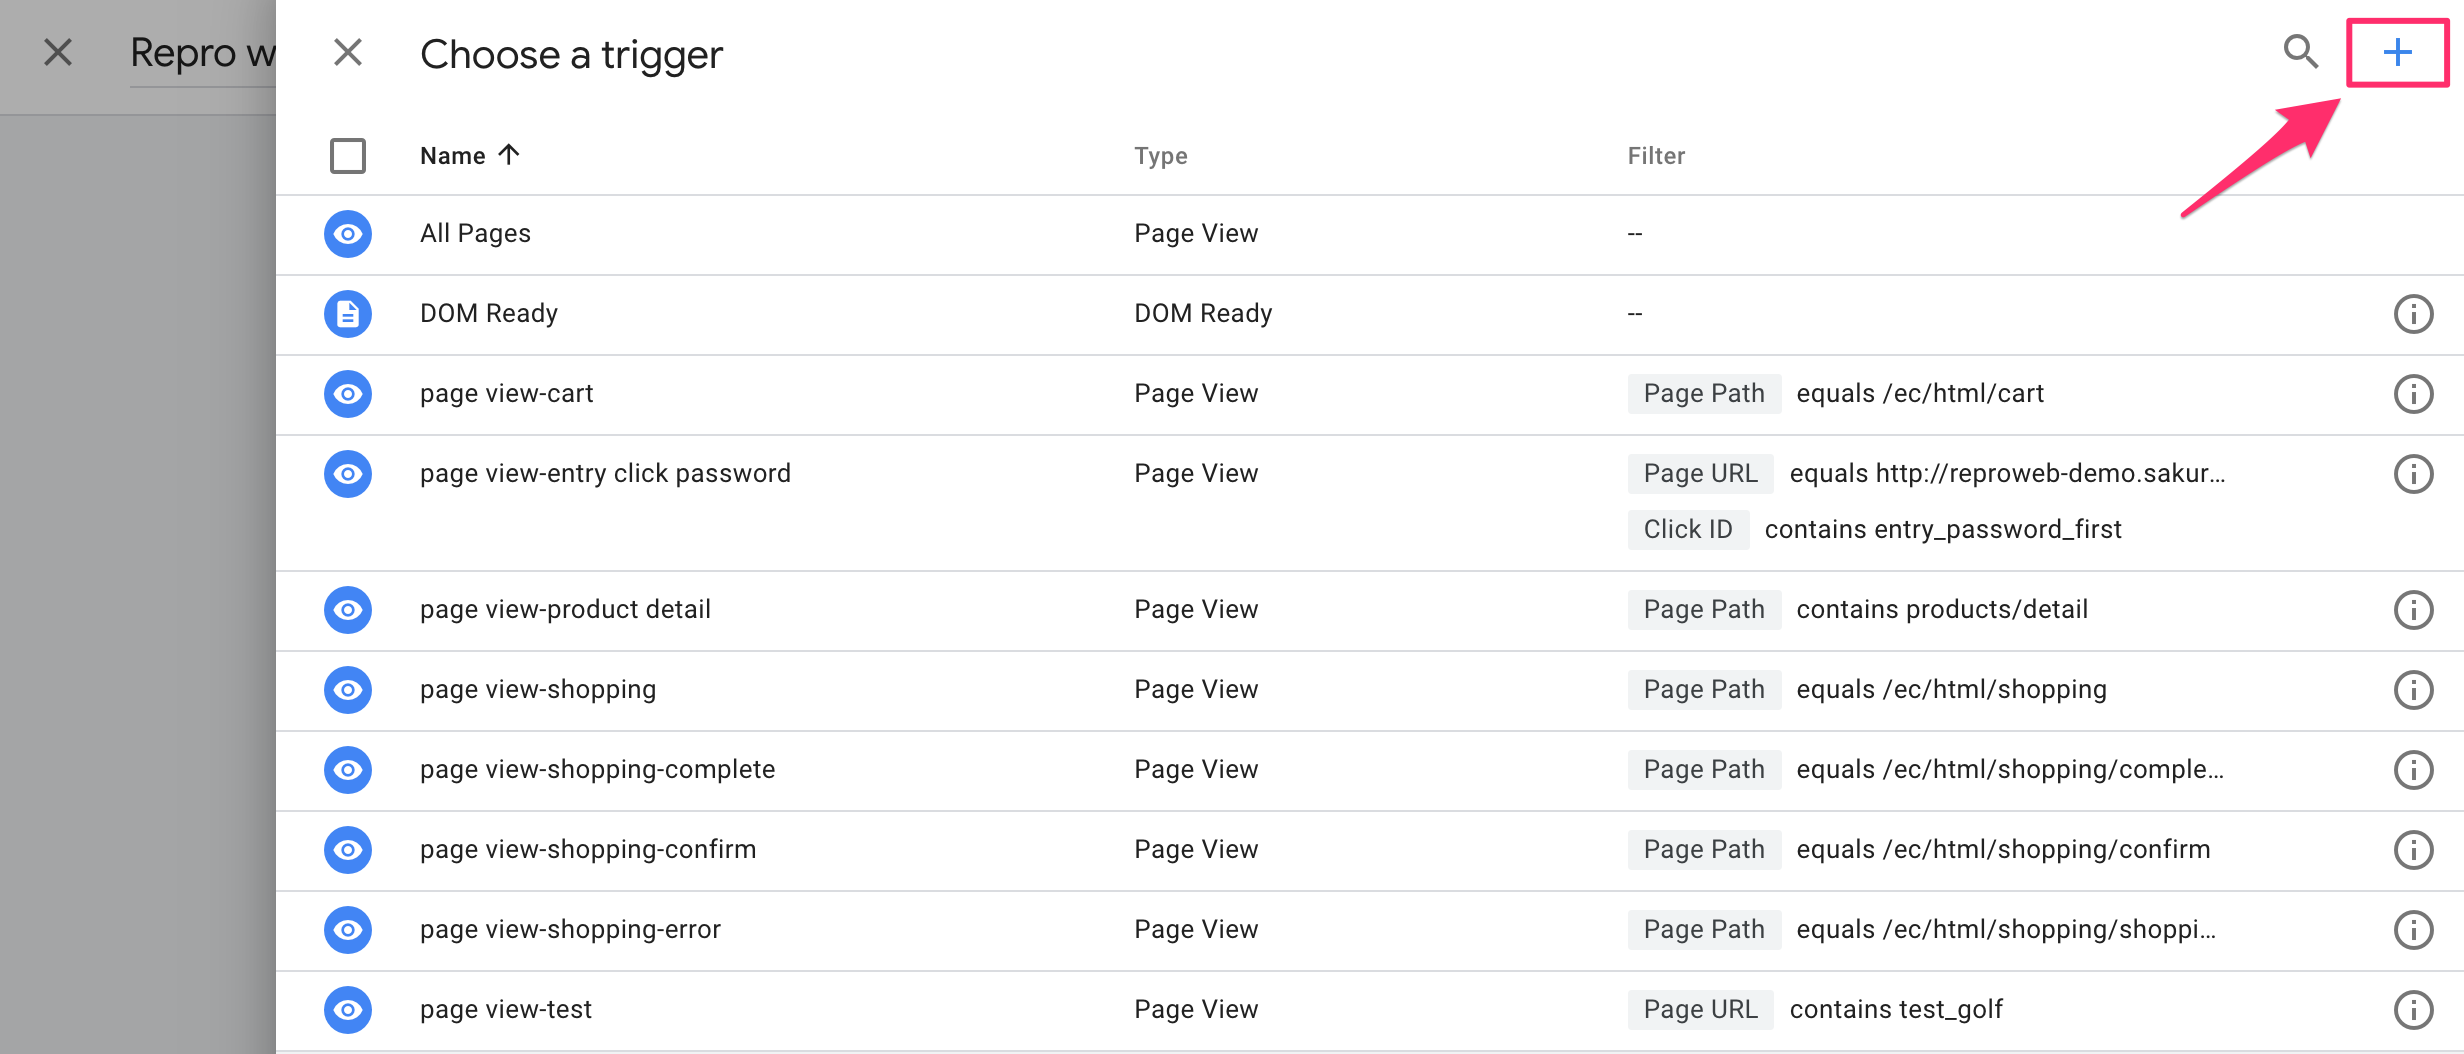 3.Please put an easy and simple name for trigger name. We use “DOM Ready”as an example.4.Please set up trigger type to
DOM Ready.5.Please chooseall DOM Ready eventfor this trigger fires on.6.Click ”Save” to save the trigger.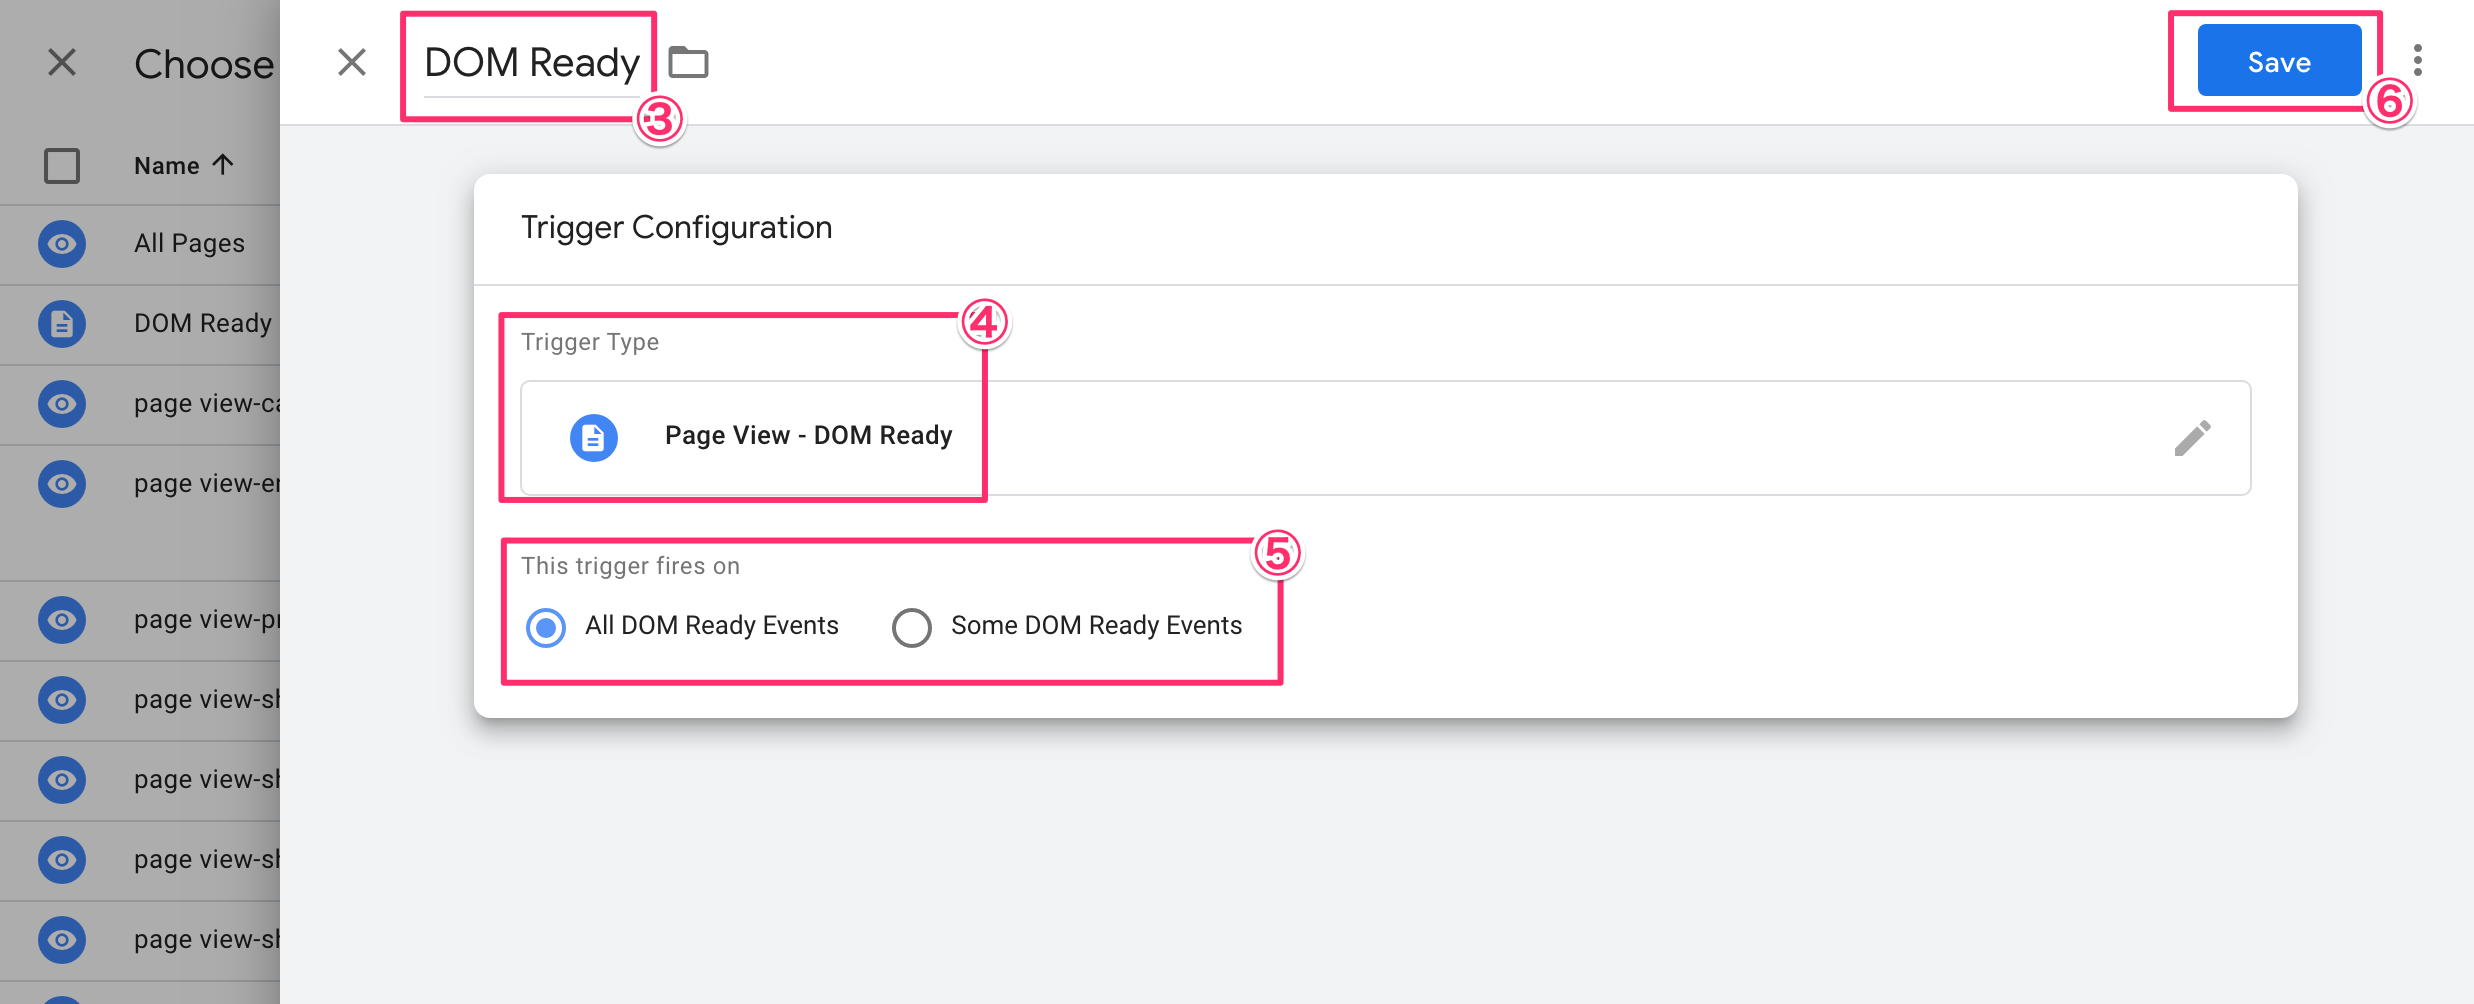
Operation verification of set up measurement tag
Confirm if the set up measurement tag is successfully placed
To confirm if the set up measurement tag is placed successfully, please click “Preview” button left next to”Publish” button.
After clicking“Preview”,you can confirm the tag operating inside the site when you view the site implemented the tag. 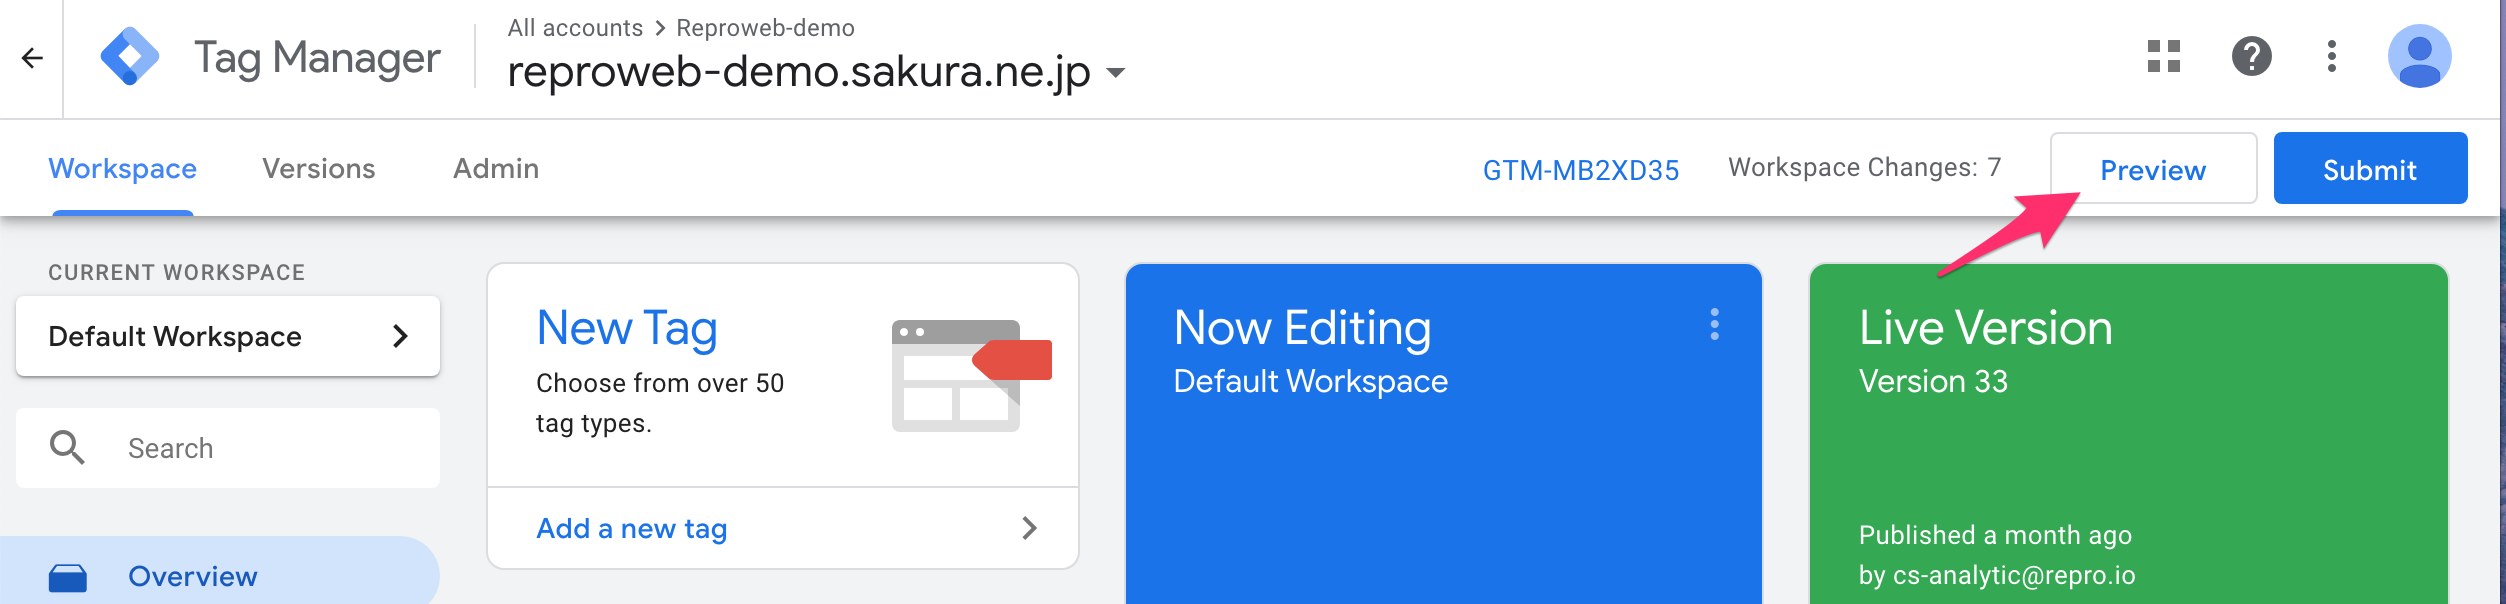
Confirm if the date is uploaded to Repro
Check whether Repro Web is correctly operating.
EVENT in Menu on left > EVENT SETTINGS 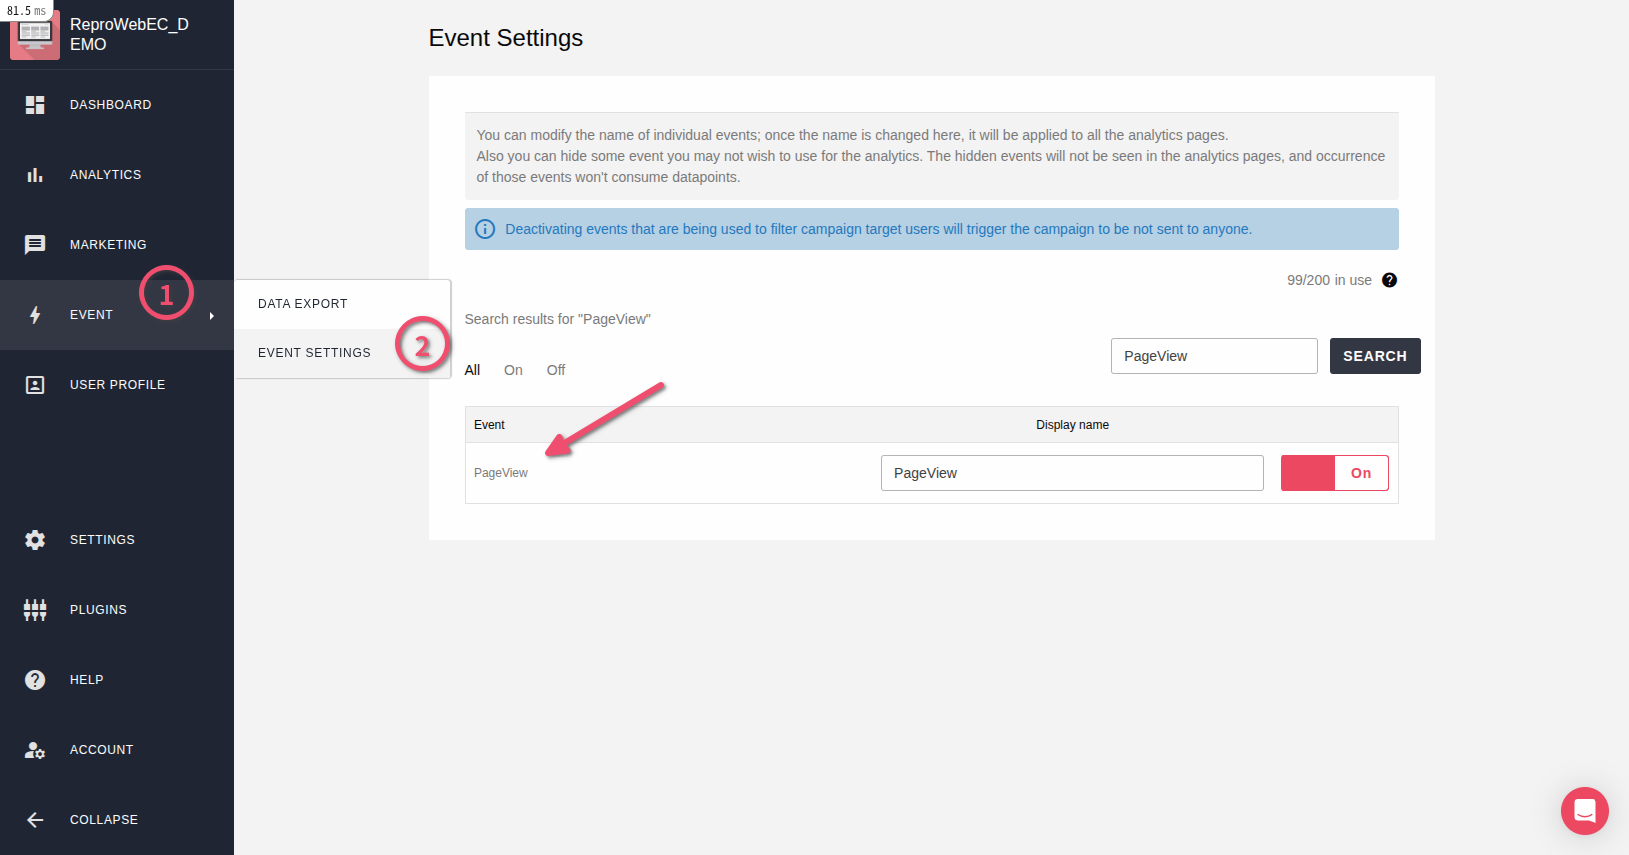
Publish set up measurement tag
Please click the “Publish” on GTM and reflect the set up measurement tag implemented to the site.
Install a Conversion Tracking tags
Conversion Tracking tags can track performance, such as purchases, bookings, and material requests.
By operating at the complete points such as the completion page, you can track the site results and incidental information at that time.
Prepare the Conversion Tracking tags
Obtain conversions only
Replace the part starts with Enter in below in the Conversion Tracking tag description with the name you want to reflect on the Dashboard.
Conversion Tracking tag
<script>
 reproio("track", "ここに「/complete 購入完了」のようなイベント名を入力してください");
</script>
Obtain conversion with incidental information
For example, when acquiring values such as purchase experience, latest purchase date, last purchase amount, last purchase product category, etc.On the EC site, it can be obtained by describing as follows at the time of purchase completion.
Replace the part starts with Enter in below in the Conversion Tracking tag description with the name you want to reflect on the Dashboard, and edit the description in the tracking tag according to the information you want to obtain.
※Values to be embedded must be prepared using GTM variables.
Conversion Tracking tag(with incidental information)
<script>
 reproio("track", "ここに「/complete 購入完了」のようなイベント名を入力してください");
 reproio("setStringUserProfile", "購入経験", "あり");
 reproio("setDateUserProfile", "最終購入日", new Date());
 reproio("setIntUserProfile", "前回購入合計金額", "ここに動的に合計金額を埋め込んでください");
 reproio("setStringUserProfile", "前回購入商品カテゴリ", "ここに動的に商品カテゴリを埋め込んでください");
</script>
If you have any questions about the value to obtain and how to use it, please ask Repro Customer Success Team.
Set up the Conversion Tracking tags

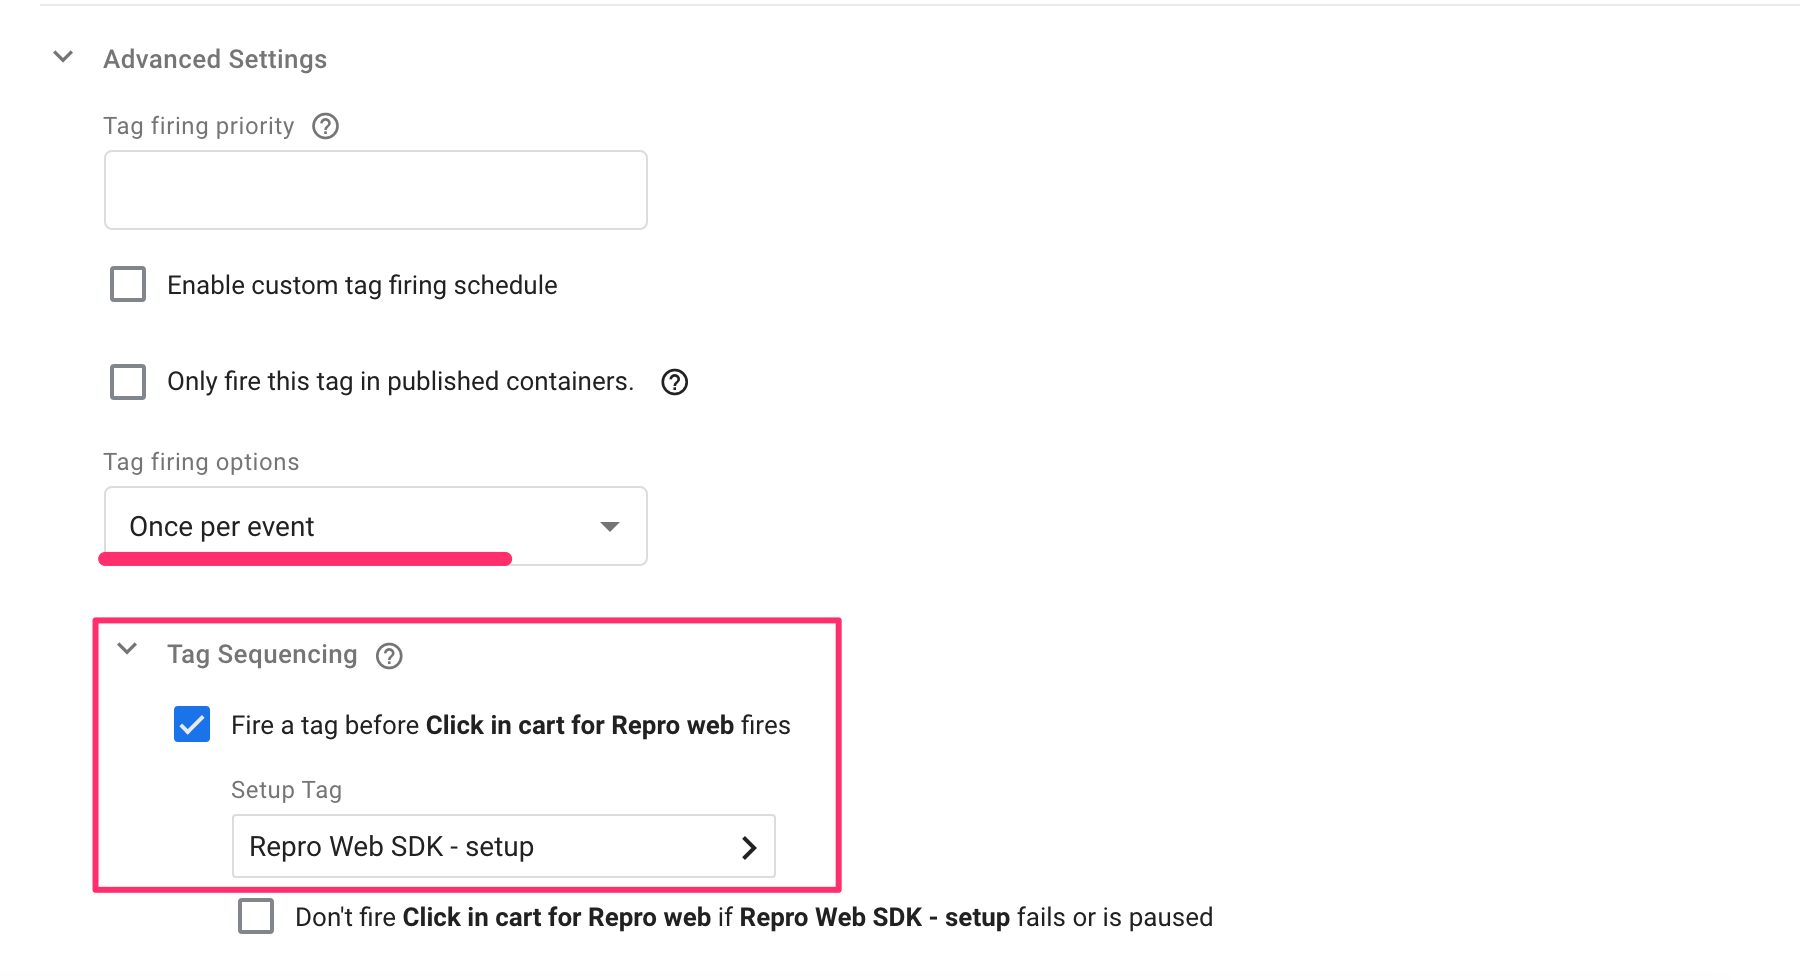
DOM Ready as the trigger type.Some DOM Ready Events button.Page Path , contains , /complete , like the following image.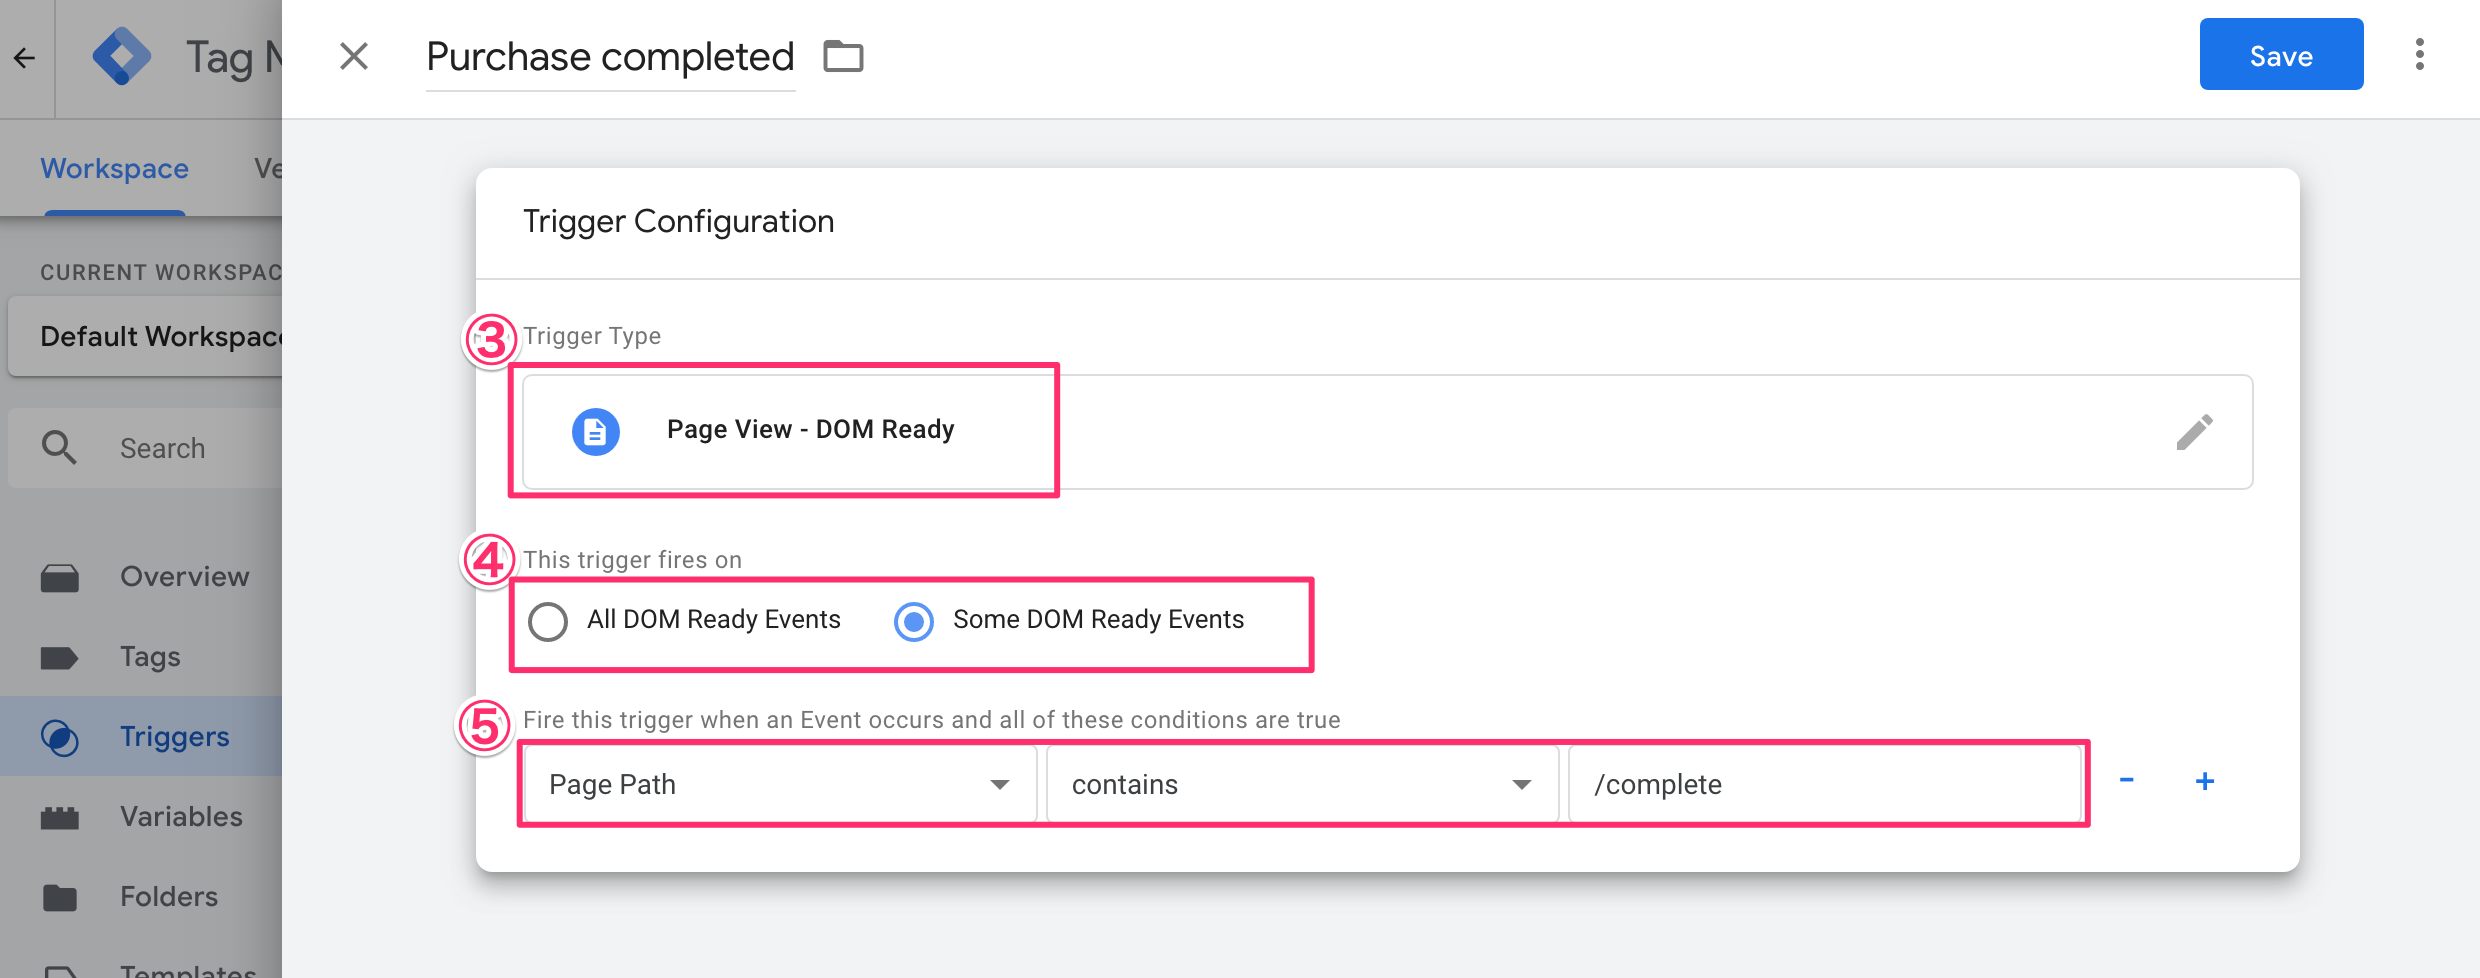
Secondly, set up the tags.

Custom HTML as the tag type.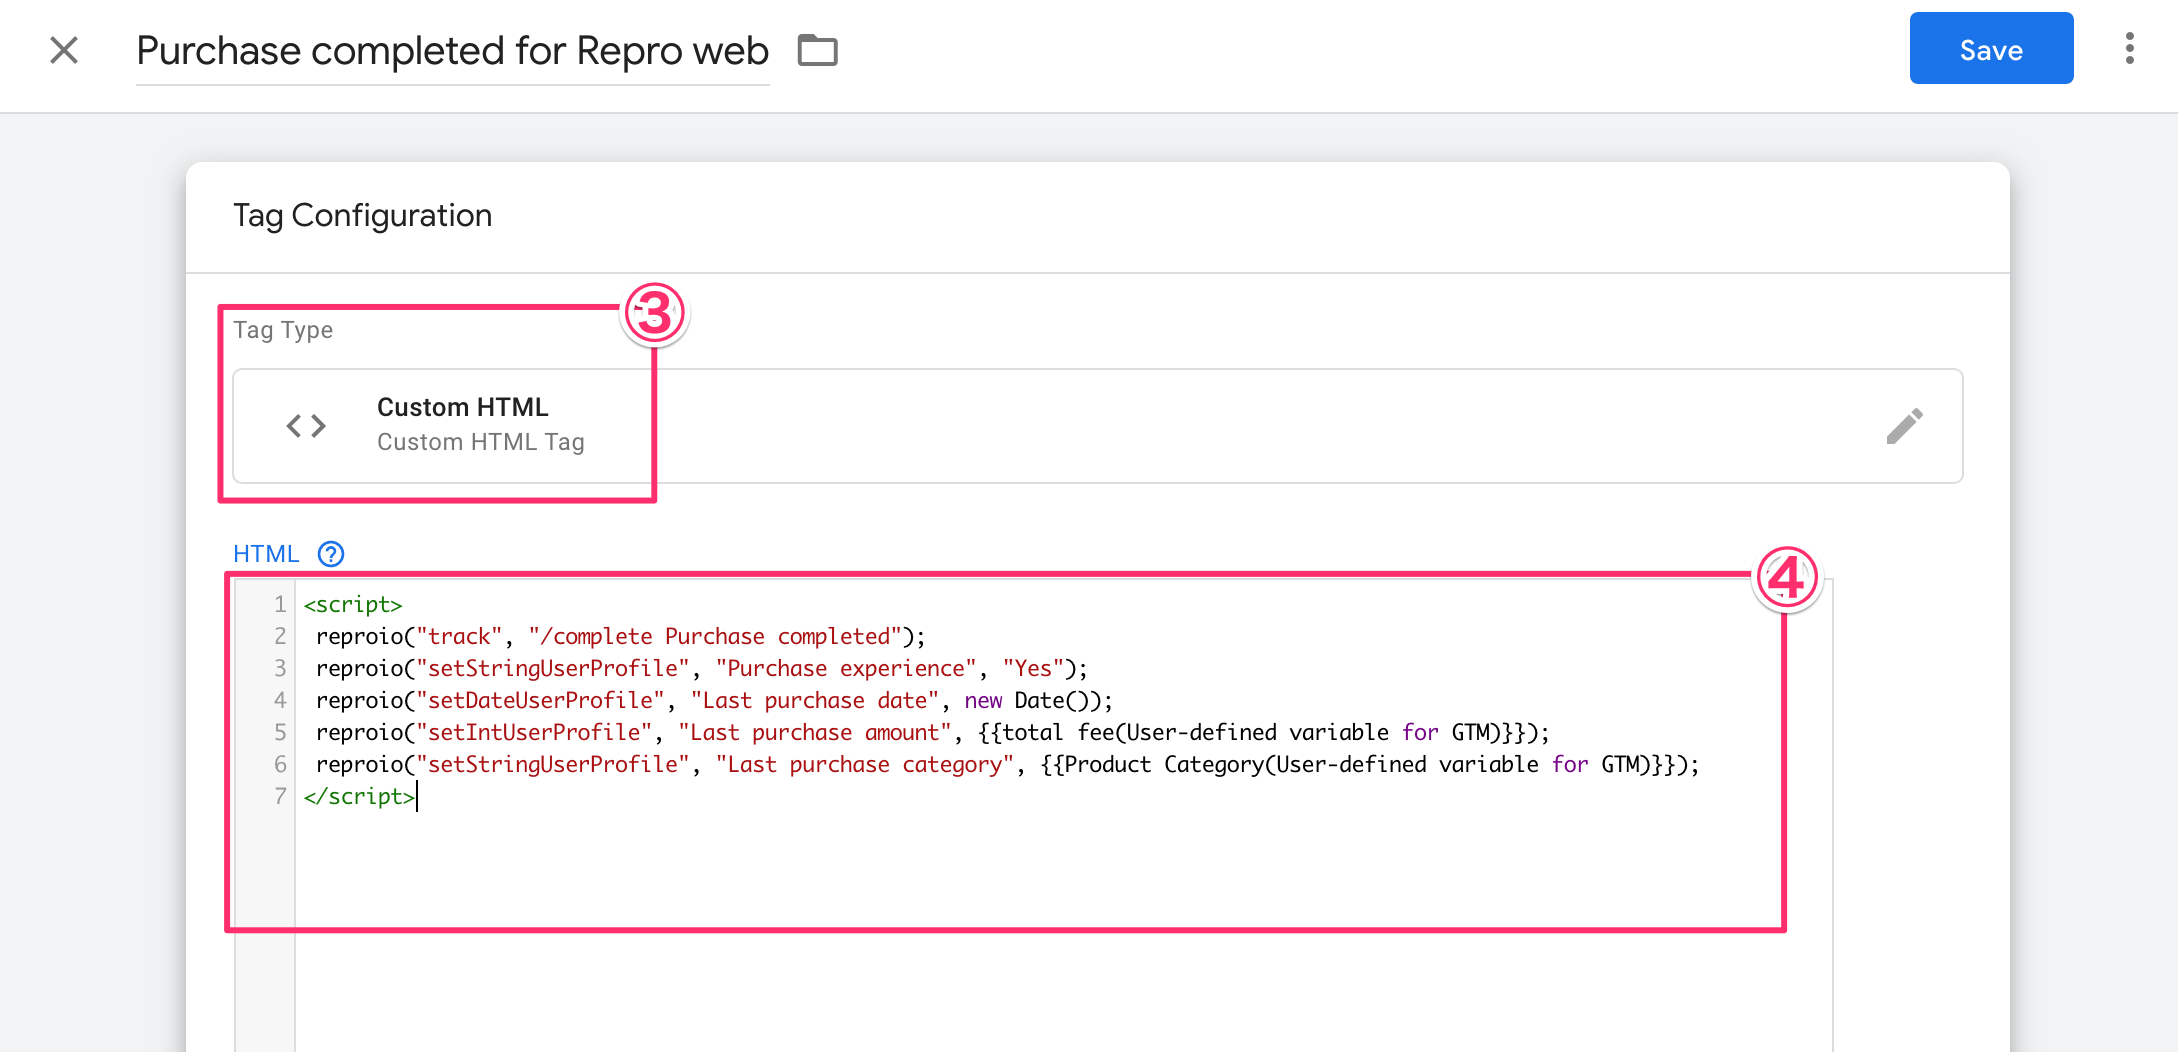
Note1: When obtaining a dynamic value such as the total purchase price, prepare a value in advance with a user-defined variable of GTM.Please embed and enclose it in double brackets “{{}}” at a predetermined place of the Conversion Tracking tag.
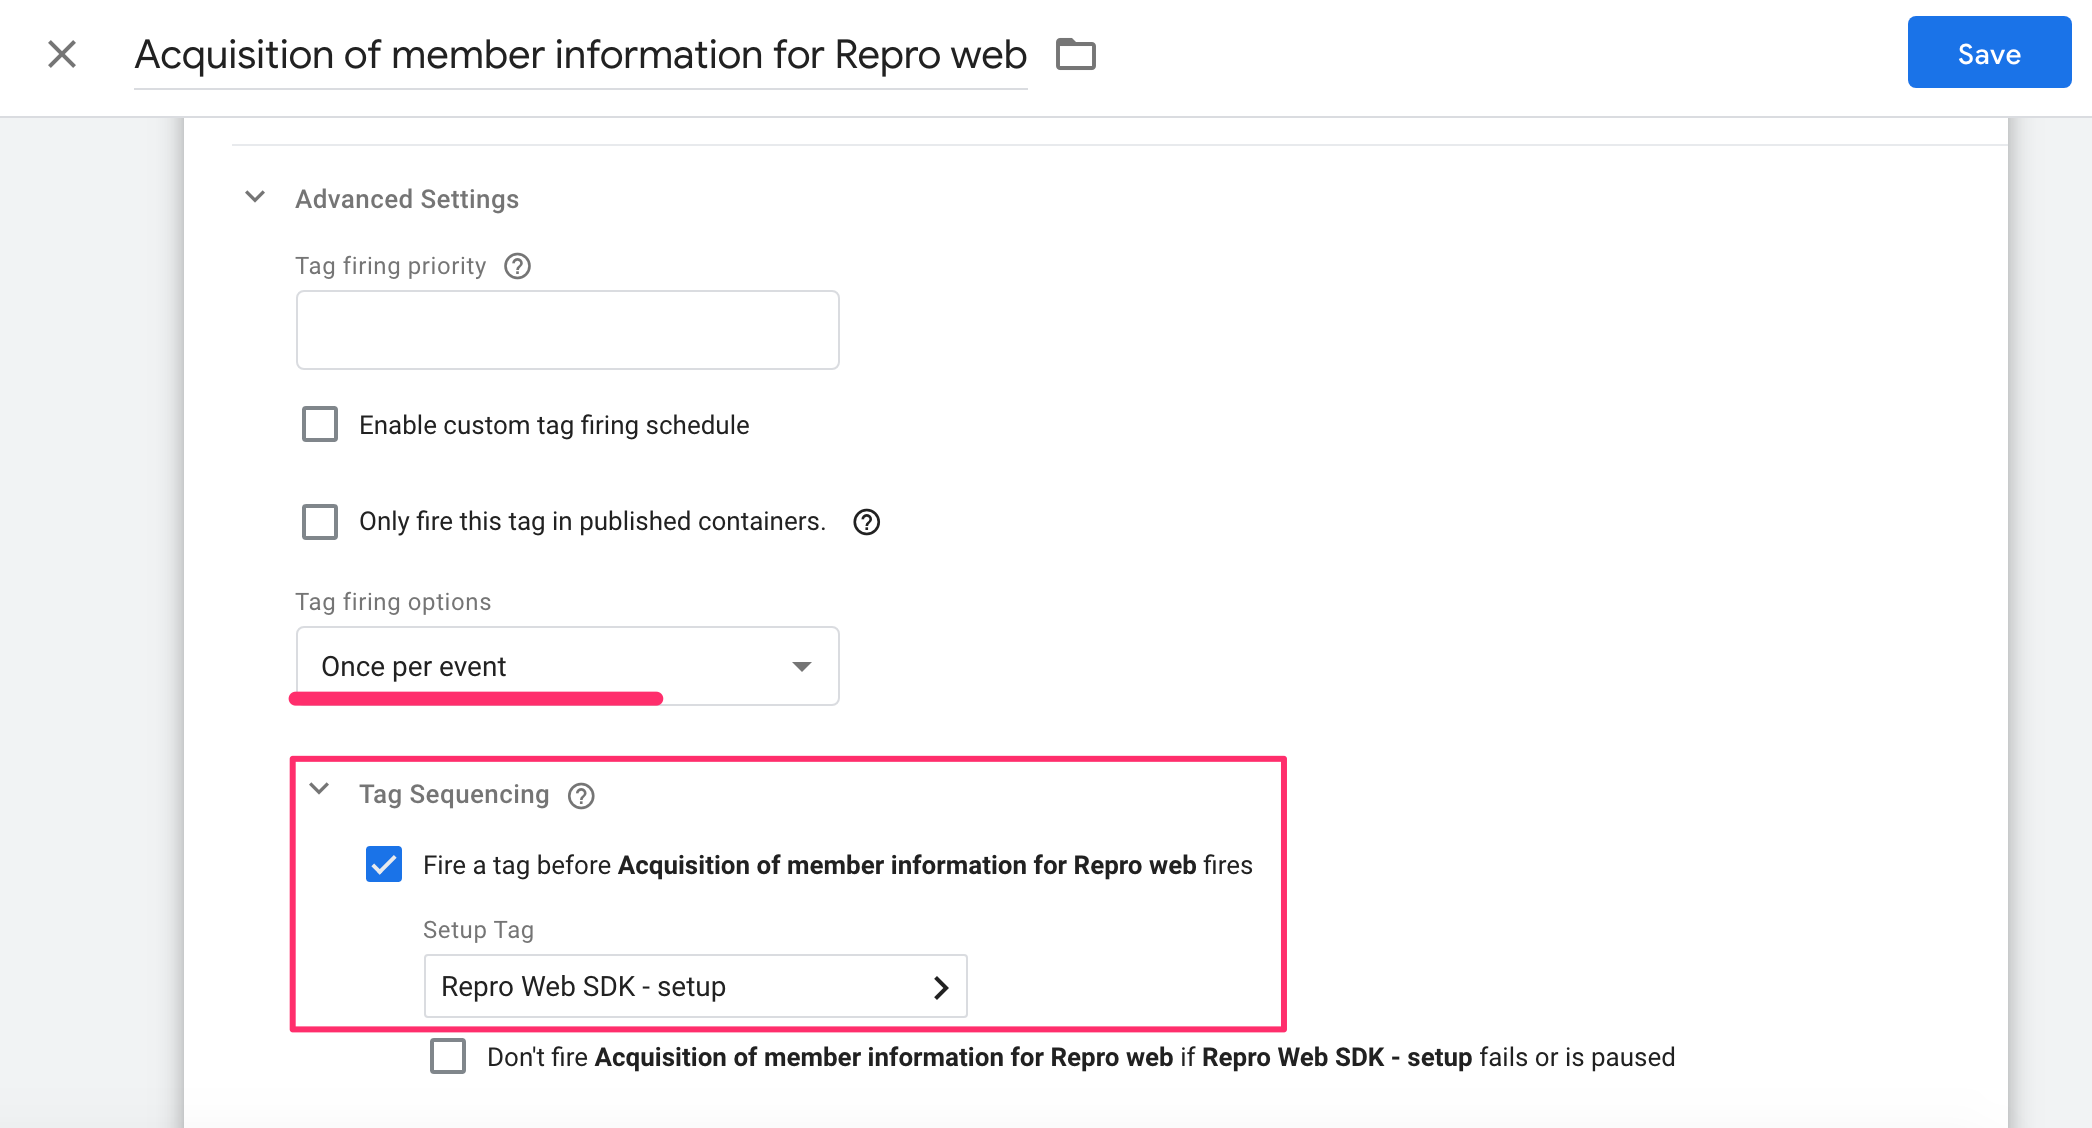
At this time, make the following two settings in the detailed tag settings. - Select the
Once per eventas the tag firing options. - Select the Fire atag before purchase completed for Repro Web fires as the tag sequencing.
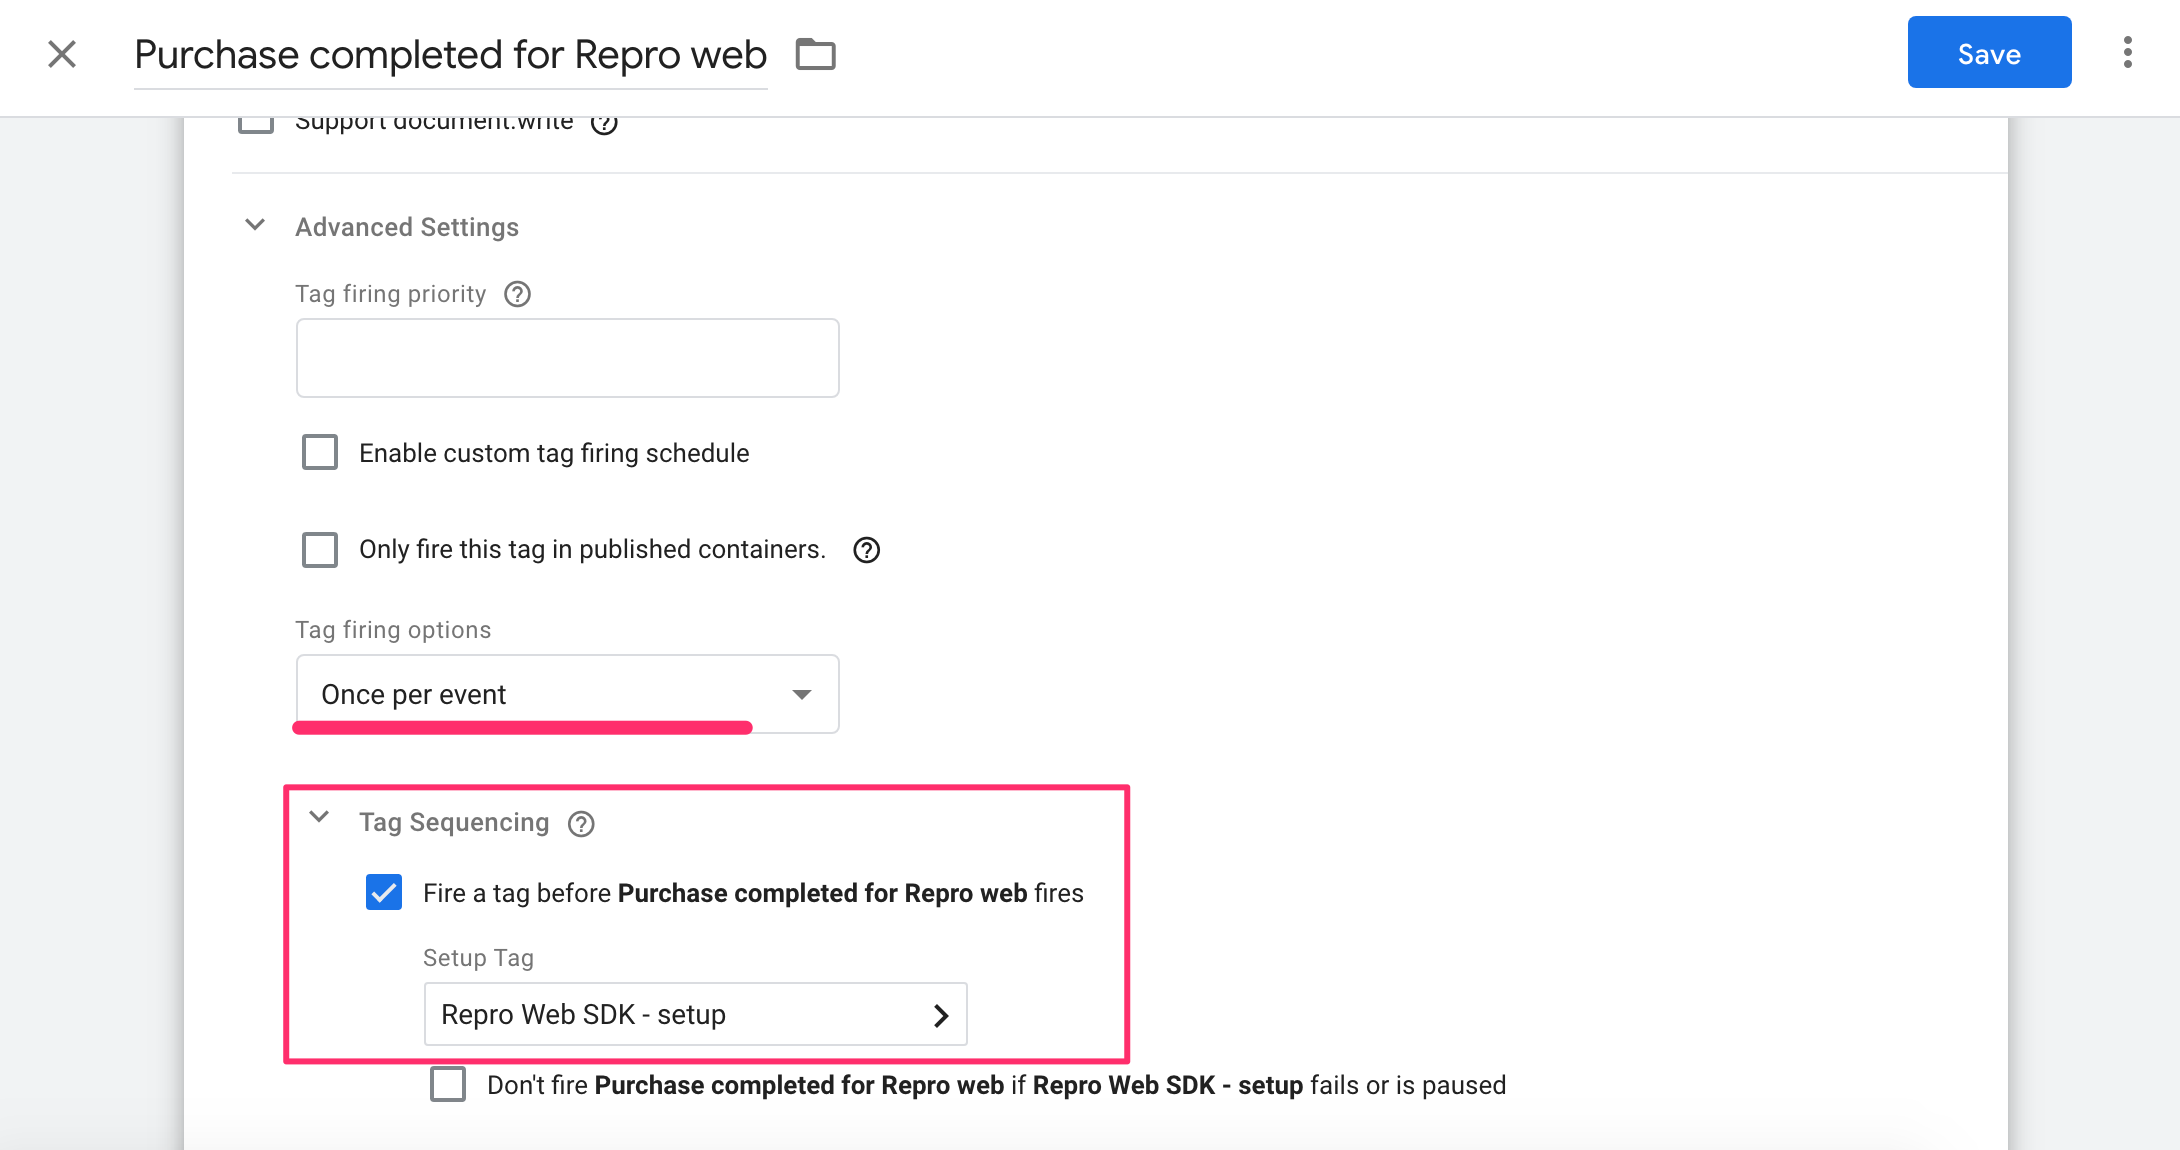
Finally, select the GTM trigger setup in the previous step, save it, and publish it on GTM.
Note
Install Event Tracking tags
In addition to page views, you can track user behavior on your website.
For example, you can track actions such as clicking a cart or displaying a specific element.
Prepare the Event Tracking tag
Replace the name of the event you want to obtain in the Enter event name here .
Event Tracking tag
<script>
  reproio("track", "ここにイベント名を入力してください");
</script>
Note
Set the Event Tracking tag
Click-All Elements as the trigger type.Some Clicks .Click Text, contains , add to cart, for the page starts event like the following image.
In GTM, you can set various events such as display of specific elements, timer, scrolling, YouTube video playback start, etc.
Secondly, set up the tags.
Custom HTML as the tag type.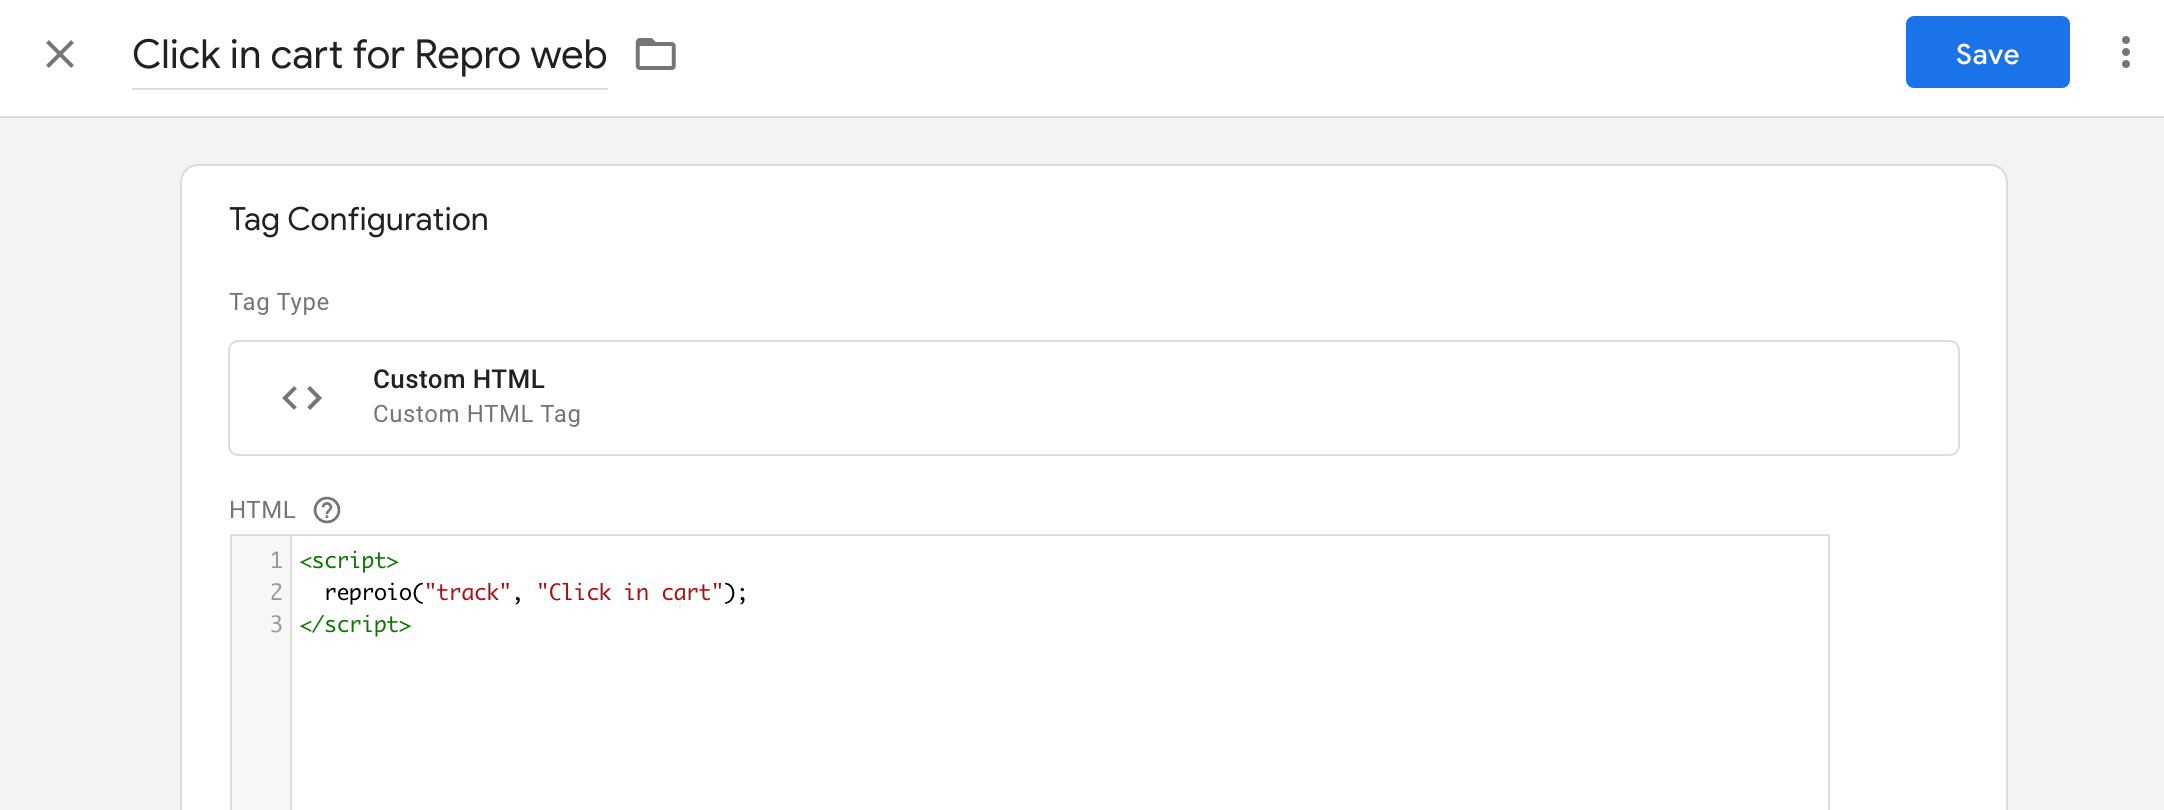
Set to
Once per eventin Tag firing options.Set to fire the setup tag before firing the Conversion Tracking tag in Tag Sequencing.
Finally, select the GTM trigger setup in the previous step, save it, and publish it on GTM.
How to verify if the Event Tracking tag is working or not
EVENT on the left menu > EVENT SETTINGS and check the data is correctly reflected.

Note
Obtain User Profiles
The following are the two ways to obtain User Profiles.
Basic programming skills may be required when setting up. Please share this manual with the appropriate person, such as your website administrator, to proceed with the setup.
1.Obtain via User Profile tracking tags on the website
Set up the user profile tracking tag and embed the value you want to obtain in the specified place.
Use the appropriate tag from the following tags according to the type of data type to be obtained.
Also in order to make sure the tag functions after the setup tag, please add it below to the setup tag in the HTML.
User Profile tracking tag (String)
<script>
  reproio("setStringUserProfile", "男女", "ここに値を埋め込んでください");
  reproio("setStringUserProfile", "会員ランク", "ここに値を埋め込んでください");
  reproio("setStringUserProfile", "ログイン状態", "ここに値を埋め込んでください");
  reproio("setStringUserProfile", "ニックネーム", "ここに値を埋め込んでください");
</script>
User Profile tracking tag (Integer)
<script>
  reproio("setIntUserProfile", "年齢", "ここに値を埋め込んでください");
  reproio("setIntUserProfile", "保有ポイント残高", "ここに値を埋め込んでください");
</script>
User Profile tracking tag (Date)
<script>
  reproio("setDateUserProfile", "会員登録日", "ここに値を埋め込んでください");
  reproio("setDateUserProfile", "お誕生日", "ここに値を埋め込んでください");
</script>
Add the User Profile tracking tag
Add the user profile tracking tag via GTM.
First, create the firing condition of the event by GTM’s trigger.
For example, if you want to obtain the membership information when the user views any of the pages while logged-in, the following settings are required.
Page View as the trigger type.Some Page Views button.ID , starts with , ID , like the following image.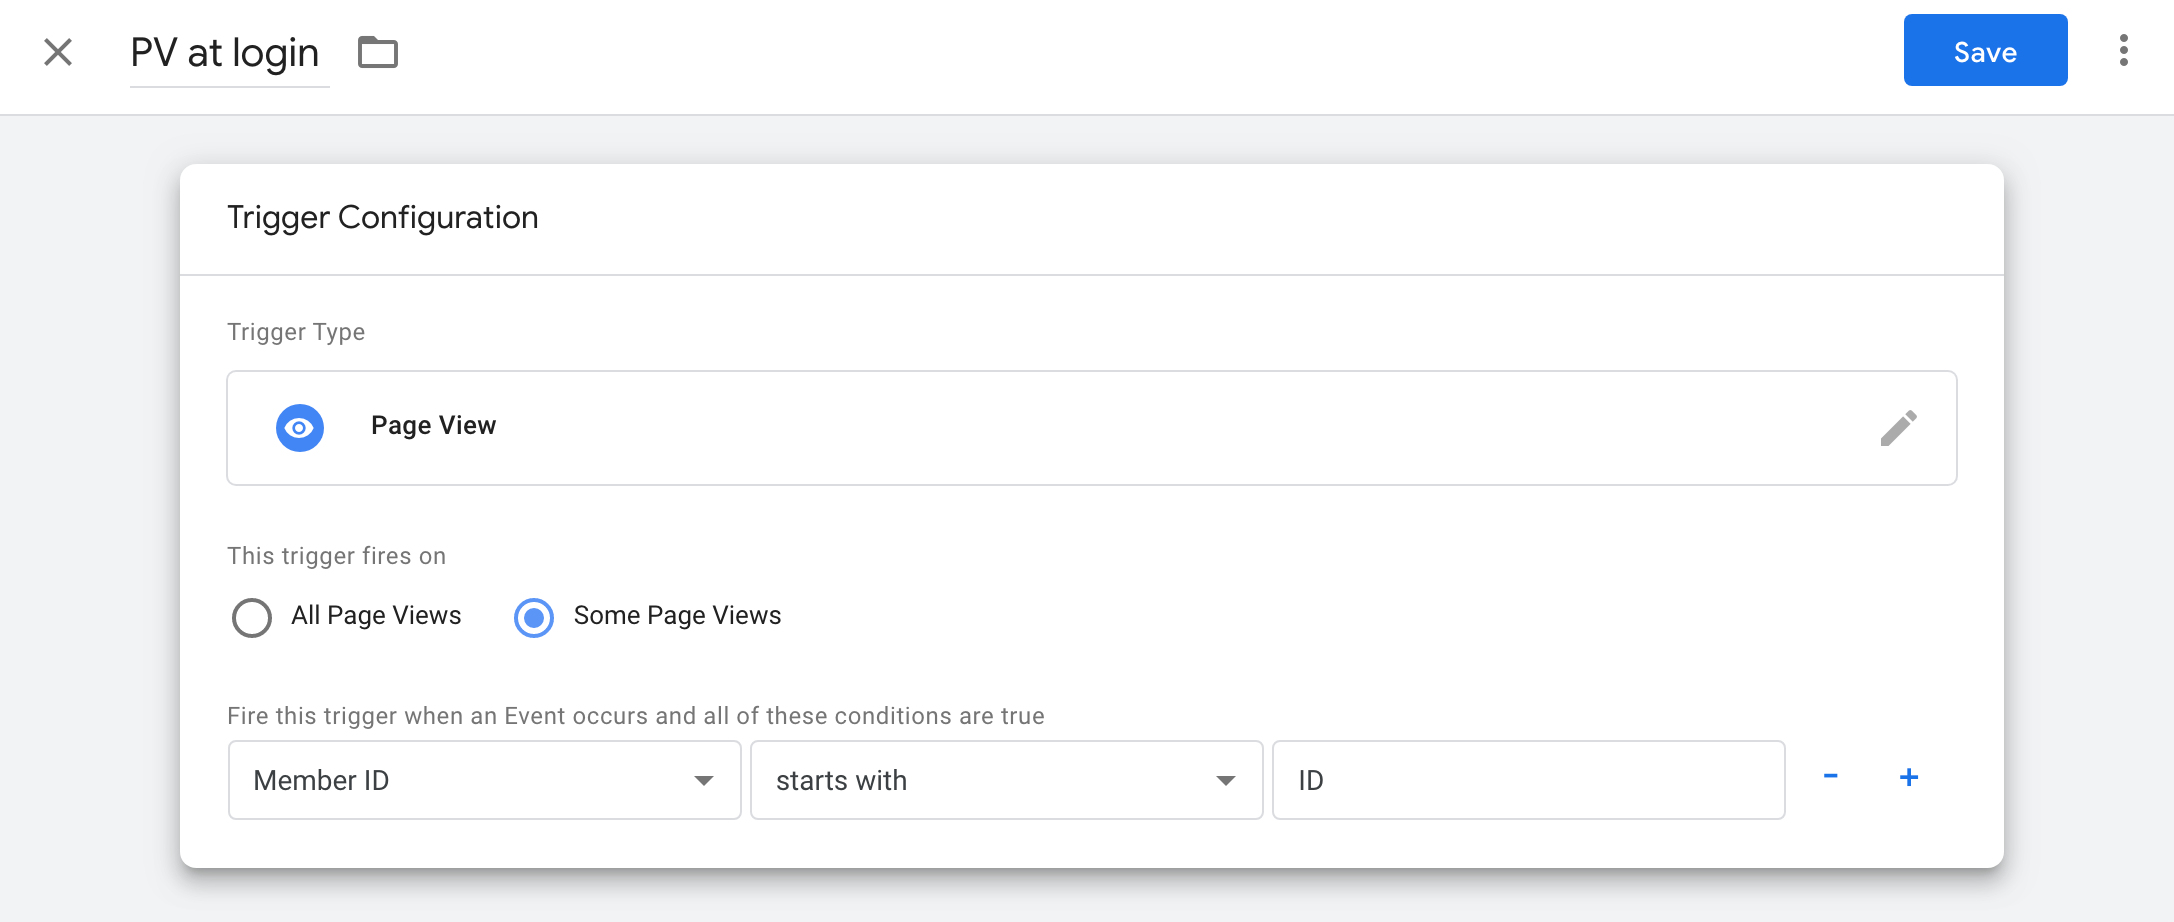
Secondly, set up the tags.
Custom HTML as the tag type.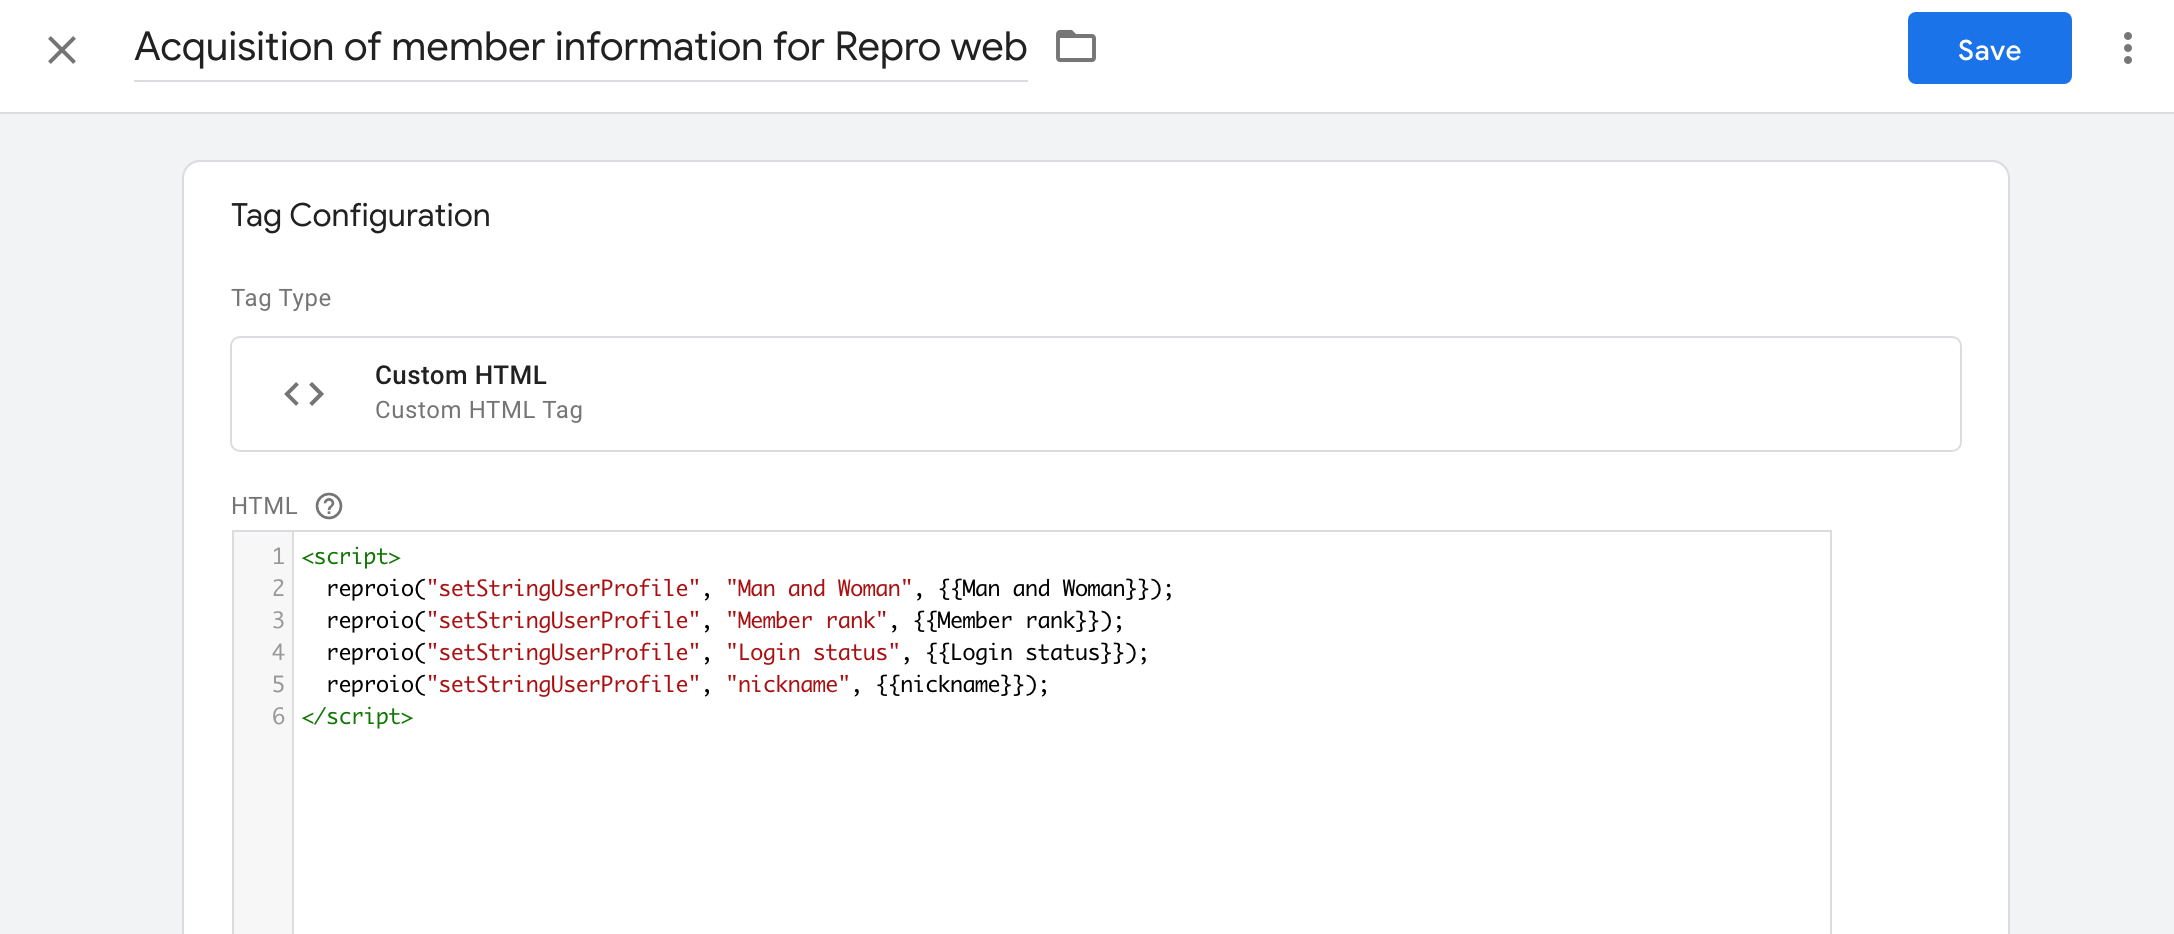
At this time, making the following two settings in the detailed tag settings are required.
Set to
Once per eventin Tag firing options.Set to Once per event in Tag firing options.
Finally, select the GTM trigger setup in the previous step, save it, and publish it on GTM.
2.Integrate the data directly from your own database and DMP to Repro Web with API
Basically, this method requires setting the user ID in the setup tracking tag.
You can directly register the attributes of users which are stored in your own database only and not presented on the website.
Based on the updated User Profile information using this API, you can send messages to fine-grained targets.
There are four types of APIs, so please consult with our support team to choose the appropriate one.
How to verify if the User Profile is working or not
Registered user profiles will be reflected on here: USER PROFILE on the left menu > USER PROFILE SETTINGS.
Check whether the data is correctly reflected here.
USER PROFILE > USER PROFILE SETTINGS 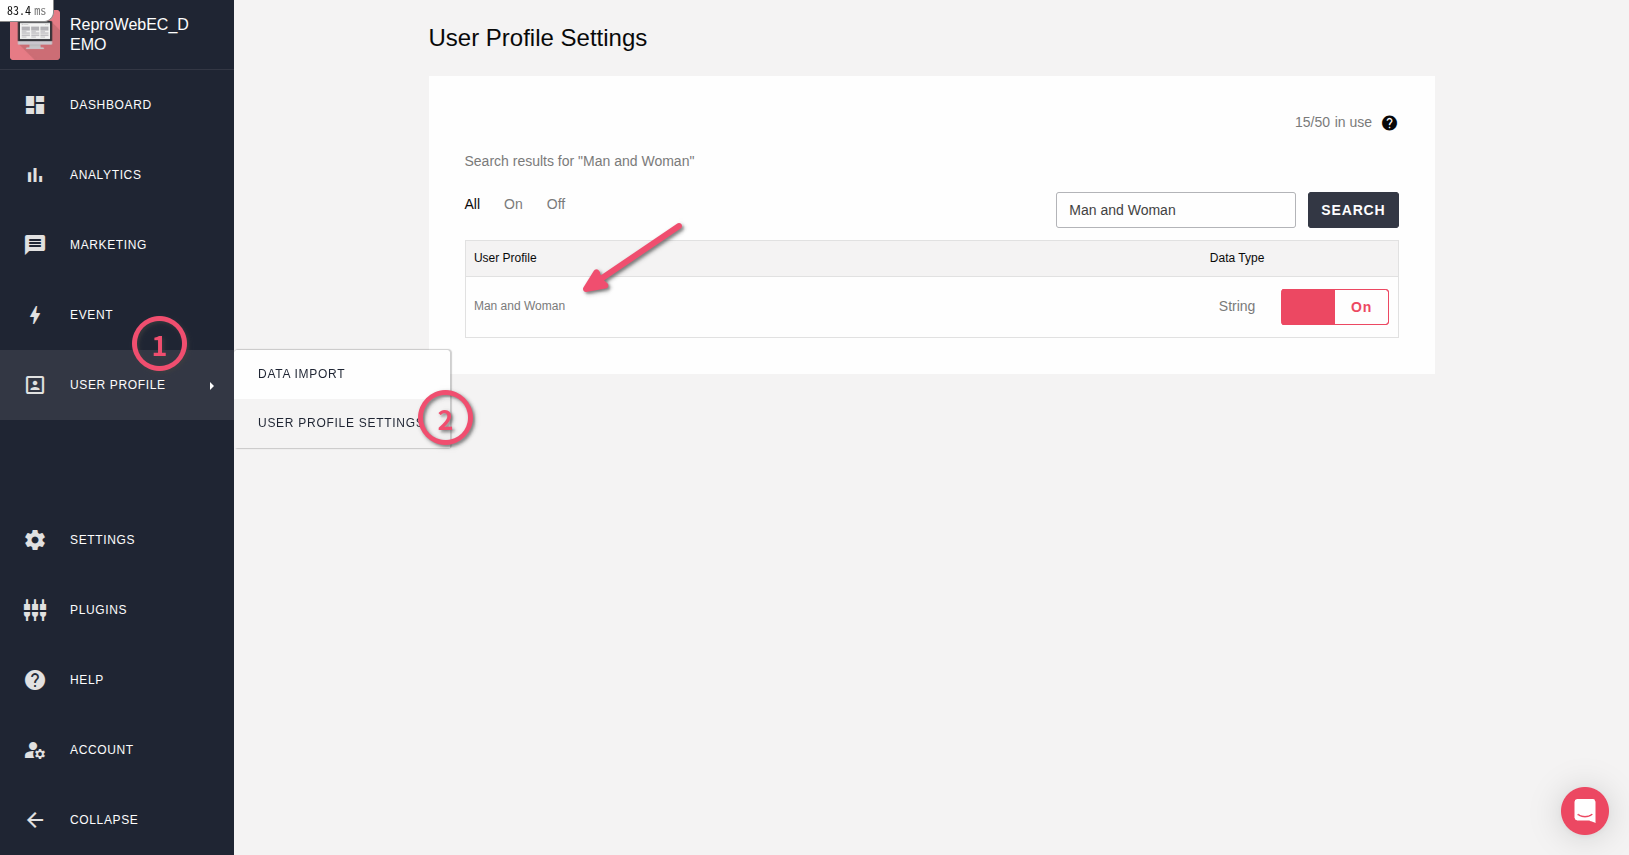
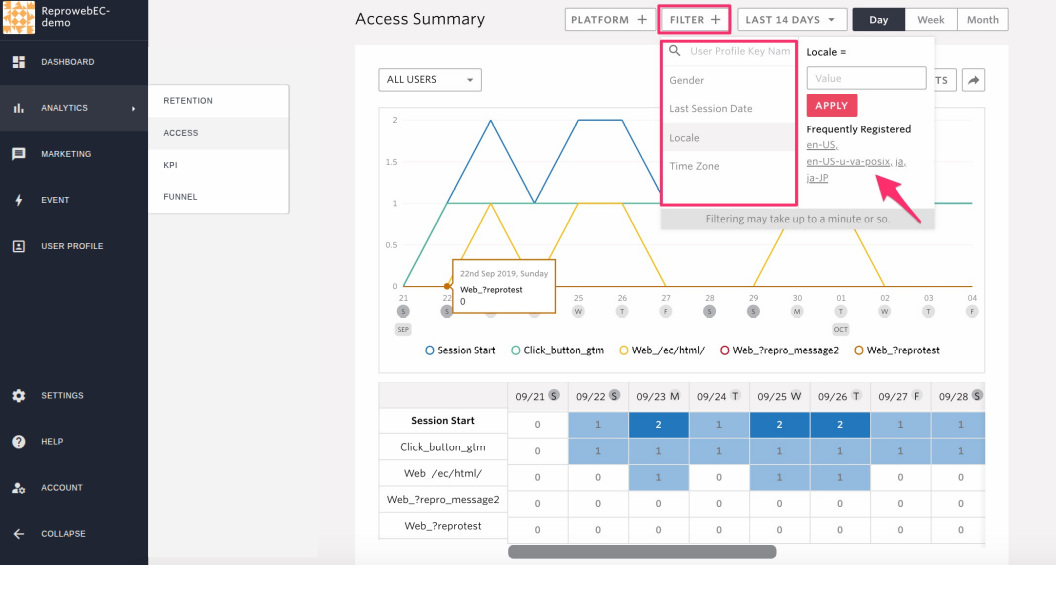
If you want to verify whether the obtained value is as intended, go to ANALYTICS>ACCESS, select the specified value and check.
Note
Implement with directly embedding tag into the web page
This is a setting process for using Repro Web install directly on the web site by embed tags.
INDEX
Install/Implement Setup Measurement tag(GTM)
Prepare Set up measurement tag
Prepare a set up measurement tag to be placed on the site.
Please choose whether you collect user ID through the website using Repro.
Note
User ID is an identifier for identifying the user on Repro Web. Normally, Repro Web identifies users based on the browser (cookie), but in order to identify users across different browsers and platforms, it is necessary to set a unique ID such as a member ID on the DB for the user ID.
If you would like to realize the following cases, it is required to set up User ID.
Perform measurement or segment measures across devices such as PCs and smartphones
Perform measurement and segment measures across platforms such as the Web and App
Link server data, such as DB and DMP, directly with Repro Web using the member ID etc. as a key
Basic programming skills may be required when setting up. Please share this manual with appropriate person, such as your website administrator, to proceed with the wetup.
In the following, please use the tag with the user ID implemented if acquiring the user ID, and use the tag without the user ID implemented if not acquiring the user ID.
Setup Measurement tag(User ID implemented)
// SET_USER_ID の部分に貴社のユーザーIDが取得できる実装をしてください
<script>
    !function(o,e,n){var r=[];if(window.reproio)console.info("Repro Web SDK was loaded more than once");else{window.reproio=function(){r.push(arguments)};var i=o.createElement(e),t=o.getElementsByTagName(e)[0];i.src="https://cdn.reproio.com/web/v2/repro-sdk.min.js",i.async=!0,i.crossOrigin="",i.onload=function(){window.reproio("setSnippetVersion","2.1"),r.forEach(function(o){window.reproio.apply(window.reproio,o)})},t.parentNode.insertBefore(i,t)}}(document,"script");
    reproio("setUserID", "SET_USER_ID");
    reproio("setup", "YOUR_REPRO_SDK_TOKEN");
    reproio("track","PageView");
</script>
Setup Measurement tag (no user ID implemented)
<script>
   !function(o,e,n){var r=[];if(window.reproio)console.info("Repro Web SDK was loaded more than once");else{window.reproio=function(){r.push(arguments)};var i=o.createElement(e),t=o.getElementsByTagName(e)[0];i.src="https://cdn.reproio.com/web/v2/repro-sdk.min.js",i.async=!0,i.crossOrigin="",i.onload=function(){window.reproio("setSnippetVersion","2.1"),r.forEach(function(o){window.reproio.apply(window.reproio,o)})},t.parentNode.insertBefore(i,t)}}(document,"script");
   reproio("setup", "YOUR_REPRO_SDK_TOKEN");
   reproio("track","PageView");
</script>
Secondary, log in to the Repro Web dashboard you got a invitation and go to menu, PROJECT SETTINGS > Credentials and copy the SDK token
Paste the value of SDK token copied on YOUR_REPRO_SDK_TOKEN part in the Setup Measurement tag
If your site where Repro Web is installed is built as an SPA, see Implement to SPA(Single Page Application) site .
Once you finish all above steps, the preparation for the set up measurement tag is completed.
Place Setup Measurement tag
Please set up the Setup Measurement tag to be fired in all page views of the target site for measurement.
Please insert the Setup Measurement tag into the head tag of the site.
When setting up a setup measurement tag with a user ID implementation, dynamically embed values such as the member ID in the specified part (SET_USER_ID ) in the setup measurement tag description.
Operation verification of Setup Measurement tag
Please check if the Page view is registered in the list of events.
EVENT in Menu on left > EVENT SETTINGS
Install Event Tracking tags
In addition to page views, you can track user behavior on your website.
For example, you can track actions such as clicking a cart or displaying a specific element.
Set the Event Tracking tag
Replace the name of the event you want to obtain in the Enter event name here and operate the following tags when you want to obtain events.
Also please add it in order to make sure the tag functions after the setup tag.
Event Tracking tag
<script>
  reproio("track", "ここにイベント名を入力してください");
</script>
In addition, GoogleTagManager (GTM) can easily set event tracking such as link click and appearance of specific elements.
When obtaining some events at the same time, collectively describe the events to be obtained in the <script> tag as shown below.
Multiple Event Tracking tags
<script>
  reproio("track", "ここにイベント1を入力してください");
  reproio("track", "ここにイベント2を入力してください");
</script>
How to verify if the Event Tracking tag is working or not
EVENT on the left menu > EVENT SETTINGS and check the data is correctly reflected.
Note
Obtain User Profiles
The following are the two ways to obtain User Profiles.
Basic programming skills may be required when setting up. Please share this manual with the appropriate person, such as your website administrator, to proceed with the setup.
1.Obtain via User Profile tracking tags
Use the appropriate tag from the following tags according to the type of data type to be obtained.
Use the appropriate tag from the following tags according to the type of data type to be obtained.
Also in order to make sure the tag functions after the setup tag, please add it below to the setup tag in the HTML.
User Profile tracking tag(String)
<script>
  reproio("setStringUserProfile", "男女", "ここに値を埋め込んでください");
</script>
User Profile tracking tag (Integer)
<script>
  reproio("setIntUserProfile", "購入金額", "ここに値を埋め込んでください");
</script>
User Profile tracking tag (Date)
<script>
  reproio("setDateUserProfile", "最終購入日", ココにnew Date()等の値を埋め込んでください);
</script>
2.Integrate the data directly from your own database and DMP to Repro Web with API
Basically, this method requires setting the user ID in the setup tracking tag.
This method requires setting the user ID in the setup tracking tag.
Not only information on the site but also user attribute information stored only in the company’s database can be registered directly in the user profile.
There are four types of APIs, so please consult with our support team to choose the appropriate one.
How to verify if the User Profile is working or not
Registered user profiles will be reflected on here: USER PROFILE on the left menu > USER PROFILE SETTINGS.
Check whether the data is correctly reflected here.
USER PROFILE on the left menu > USER PROFILE SETTINGS
If you want to verify whether the obtained value is as intended, go to ANALYTICS>ACCESS, select the specified value and check.
Note
Finally
This is the end of the implementation of Repro Web. Thank you for setting this up.
If you want to deliver Web Messages, go to MARKETING on the left > MESSAGING.