cpp
Get Started: Cocos2d-x
Installation of the Repro Cocos-2dx SDK
Download the latest release version zip file of Repro Cocos2d-x SDK from here.
Copy the
Reprodirectory included in the downloaded file to your Cocos2d-x project root.The files contained in the
Reprodirectory will be added partially later to the iOS and Android project.

Specific instructions for the iOS platform
Add the bridge classes to your Xcode project
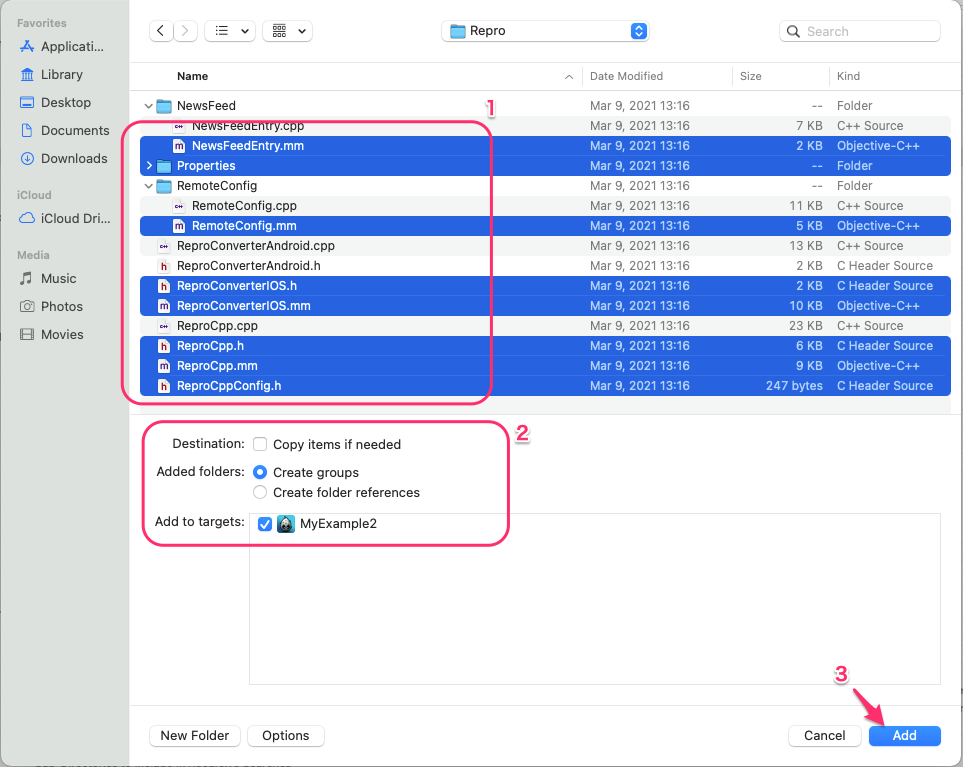
Please open your iOS project in Xcode and add the files from the previously mentioned Repro directory.
Select
File > Add Files To "YOUR PROJECT NAME" ...Please select the files below
ReproCpp.hReproCpp.mmReproCppConfig.hReproConverterIOS.hReproConverterIOS.mmProperties/NewsFeed/NewsFeedEntry.mmRemoteConfig/RemoteConfig.mm
While adding, select the options below:
Destination: Copy items if needed-> offAdded folders:-> Create groupsAdd to targets:-> Select your application target

Add required Frameworks to your Xcode project
Add the downloaded Repro.xcframework to your Xcode project.
Select
File > Add Files To "YOUR PROJECT NAME" ...Select
Repro.xcframeworkfrom the downloaded zip file.While adding, select the options below:
Destination: Copy items if needed-> onAdded folders:-> Create groupsAdd to targets:-> Select your application target

The following frameworks are also required.
You can add these frameworks at Targets > Build Phases > Link Binary With Libraries in your project.
SystemConfiguration.framework
WebKit.framework
UserNotifications.framework

Specific instructions for the Android platform
Note
Using Cocos2d-x v3.10 and above as well as Android Studio is recommended when installing Repro SDK to your Android project. Please note that if you use non-recommended environment, some codes and procedures for installation may be different.
Install SDK in Android platform
Make libs directory in proj.android-studio/app directory.
Copy the repro-android-sdk-x.x.x.aar file in the downloaded files in the libs directory.
Add dependency to Repro SDK in your app/build.gradle
repositories {
    flatDir { dirs 'libs' }
}

dependencies {
    implementation fileTree(dir: 'libs', include: ['*.jar'])
    implementation project(':libcocos2dx')
    implementation(name: 'repro-android-sdk-x.x.x', ext:'aar')
}
Note
‘implementation’ is not available for versions below Gradle 3.4. Please use ‘compile’ instead.
If you are not using your own custom Application class:
Set android:name attribute of the application element to io.repro.android.Cocos2dxApplication.
 <!-- AndroidManifest.xml -->
  <application
      android:name="io.repro.android.Cocos2dxApplication"
      android:label="@string/app_name"
      android:allowBackup="true"
      android:icon="@mipmap/ic_launcher">
If you are using your own custom Application class:
Call io.repro.android.Cocos2dxBridge.setupWithoutToken(Application) at onCreate in a custom Application class.
 public class MyApplication extends Application {
     @Override
     public void onCreate() {
         super.onCreate();
           ...
+        io.repro.android.Cocos2dxBridge.setupWithoutToken(this);
         ...
     }
 }
To use Repro SDK, your application must have the following android permissions. These permissions are automatically merged into your application. You don’t need to add permissions to your application’s AndroidManifest.xml manually.
android.permission.INTERNETandroid.permission.ACCESS_NETWORK_STATE
Add bridge classes to project
Edit LOCAL_SRC_FILES and LOCAL_C_INCLUDES in app/jni/Android.mk as below.
   // Android.mk
   LOCAL_SRC_FILES := hellocpp/main.cpp \
                      ../../../Classes/AppDelegate.cpp \
                      ../../../Classes/HelloWorldScene.cpp \
                      ../../../Repro/ReproCpp.cpp \
                      ../../../Repro/ReproConverterAndroid.cpp \
                      ../../../Repro/NewsFeed/NewsFeedEntry.cpp \
                      ../../../Repro/RemoteConfig/RemoteConfig.cpp \
                      ../../../Repro/Properties/StandardEventProperties.cpp \
                      ../../../Repro/Properties/ViewContentProperties.cpp \
                      ../../../Repro/Properties/SearchProperties.cpp \
                      ../../../Repro/Properties/AddToCartProperties.cpp \
                      ../../../Repro/Properties/AddToWishlistProperties.cpp \
                      ../../../Repro/Properties/InitiateCheckoutProperties.cpp \
                      ../../../Repro/Properties/AddPaymentInfoProperties.cpp \
                      ../../../Repro/Properties/PurchaseProperties.cpp \
                      ../../../Repro/Properties/ShareProperties.cpp \
                      ../../../Repro/Properties/LeadProperties.cpp \
                      ../../../Repro/Properties/CompleteRegistrationProperties.cpp

   LOCAL_C_INCLUDES := $(LOCAL_PATH)/../../../Classes
   LOCAL_C_INCLUDES += $(LOCAL_PATH)/../../../Repro
   LOCAL_C_INCLUDES += $(LOCAL_PATH)/../../../Repro/Properties
Add the following class into app/src
package com.your.PackageName;
import org.cocos2dx.lib.Cocos2dxHelper;
import io.repro.android.Repro;
import io.repro.android.remoteconfig.RemoteConfigListener;
import android.net.Uri;

public class ReproBridge {
    public static void enableInAppMessagesOnForegroundTransition() {
        Repro.enableInAppMessagesOnForegroundTransition(Cocos2dxHelper.getActivity());
    }

    private static native void nativeListenerHandler(final RemoteConfigListener.FetchStatus status);

    public static void fetchRemoteConfig(final long timeout) {
        Repro.getRemoteConfig().fetch(timeout, new RemoteConfigListener() {
            @Override
            public void onCompletion(FetchStatus status) {
                ReproBridge.nativeListenerHandler(status);
            }
        });
    }

    private static native void nativeOpenUrlHandler(final String url);

    public static void setupOpenUrlCallback() {
        Repro.setOpenUrlCallback(new Repro.OpenUrlCallback() {
            @Override
            public void onOpened(Uri uri) {
                ReproBridge.nativeOpenUrlHandler(uri.toString());
            }
        });
    }
}
Modify the following line in ReproCpp.cpp added in Install Repro SDK.
   #ifndef __REPRO_CPP_CONFIG_H__
   #define __REPRO_CPP_CONFIG_H__

   #define CLASS_NAME_REPRO_CLIENT_BRIDGE  "io.repro.cocos2dx.v3.sample.ReproBridge"
   #define JNI_REPRO_CLIENT_BRIDGE         io_repro_cocos2dx_v3_sample_ReproBridge

   #endif
Setup
Include ReproCpp.h in AppDelegate.cpp and start a new session in applicationDidFinishLaunching
You can find the YOUR_APP_TOKEN at SDK Token in SETTINGS > PROJECT SETTINGS > Credentials on the management screen.
#include "ReproCpp.h"

...

bool AppDelegate::applicationDidFinishLaunching() {

  ...

  // Setup Repro
  ReproCpp::setup("YOUR_APP_TOKEN");

  ...
}
Information collected by the SDK will be uploaded to the server periodically.
Track event
Targeting the right group of users is critical to effectively make analyses or marketing campaigns. By keeping track of user behavior as events, you will be able to choose the right group of users according to your purpose from the dashboard.
Example of targeting user group with events:
If you don’t exactly know which events to track in your app, we recommend you to start from tracking the event when each view is displayed.
Example:
@implementation MainViewController

- (void)viewDidAppear:(BOOL)animated
{
    [super viewDidAppear:animated];
    [Repro track:@"MainViewController" properties:nil];

    ...
}
class MainViewController: UIViewController {

    override func viewDidAppear(_ animated: Bool) {
        super.viewDidAppear(animated)
        Repro.track(event: "MainViewController", properties: [:])

        ...
    }
public class MainActivity extends AppCompatActivity {

    @Override
    protected void onResume() {
        super.onResume();
        Repro.track("MainActivity");

        ...
    }
}
class MainActivity : AppCompatActivity() {

    override fun onResume() {
        super.onResume()
        Repro.track("MainActivity")

        ...
    }
}
#include "ReproCpp.h"

...

ReproCpp::track("Initialized");
Repro.Track ("Initialized");
// Will be written later
class MainScreen extends React.Component {

    componentDidMount() {
        Repro.track("MainScreen", {});
    }

    ...
 }
import Repro from 'react-native-repro';

...

Repro.track("MainScreen", {});
import 'package:repro_flutter/repro.dart';

...

await Repro.track("Initialized");
Set User ID
The analytics results you will see in Repro are aggregated per each user. By setting the User ID, you gain the advantages below:
Identify the same user across multiple devices
Target campaigns more accurately
Please see here for more details.
Send push notifications
You can send push notifications from Repro’s dashboard as well as using the API. Please refer to this document when implementing push notification.
Next…
For more details of other available features, please see below.
