In-App Message
In-App Message is a customizable popup message with an image and buttons delivered to targeted group of users at a desirable timing. All you need to do is to create and publish a message from the dashboard. Message will be delivered without making any modification to any of the source code or releasing a new version of the app to the store, which allows marketers to run effective marketing campaigns to improve conversions without having developer’s help.

You can deliver effective marketing messages by customizing the settings as follows:
Image
The buttons with embedded URL to open a web page from the browser, or a deeplink that routes to anywhere in the app
Schedule
The target of users
Display timing of In-App Message
For example:
Deliver a coupon code to users who put items in the cart but didn’t finalize the purchase
Display an appropriate navigation to users who just registered within several days ago to increase their conversion.
Additionally, you can deliver the message to the users who declined to receive the push notification.
Also, the created in-app message judges that it has been “displayed” when either the action button or the close button at the top right of the message has been pressed.
Create In-App Message
Here we will create an in-app message from the dashboard.
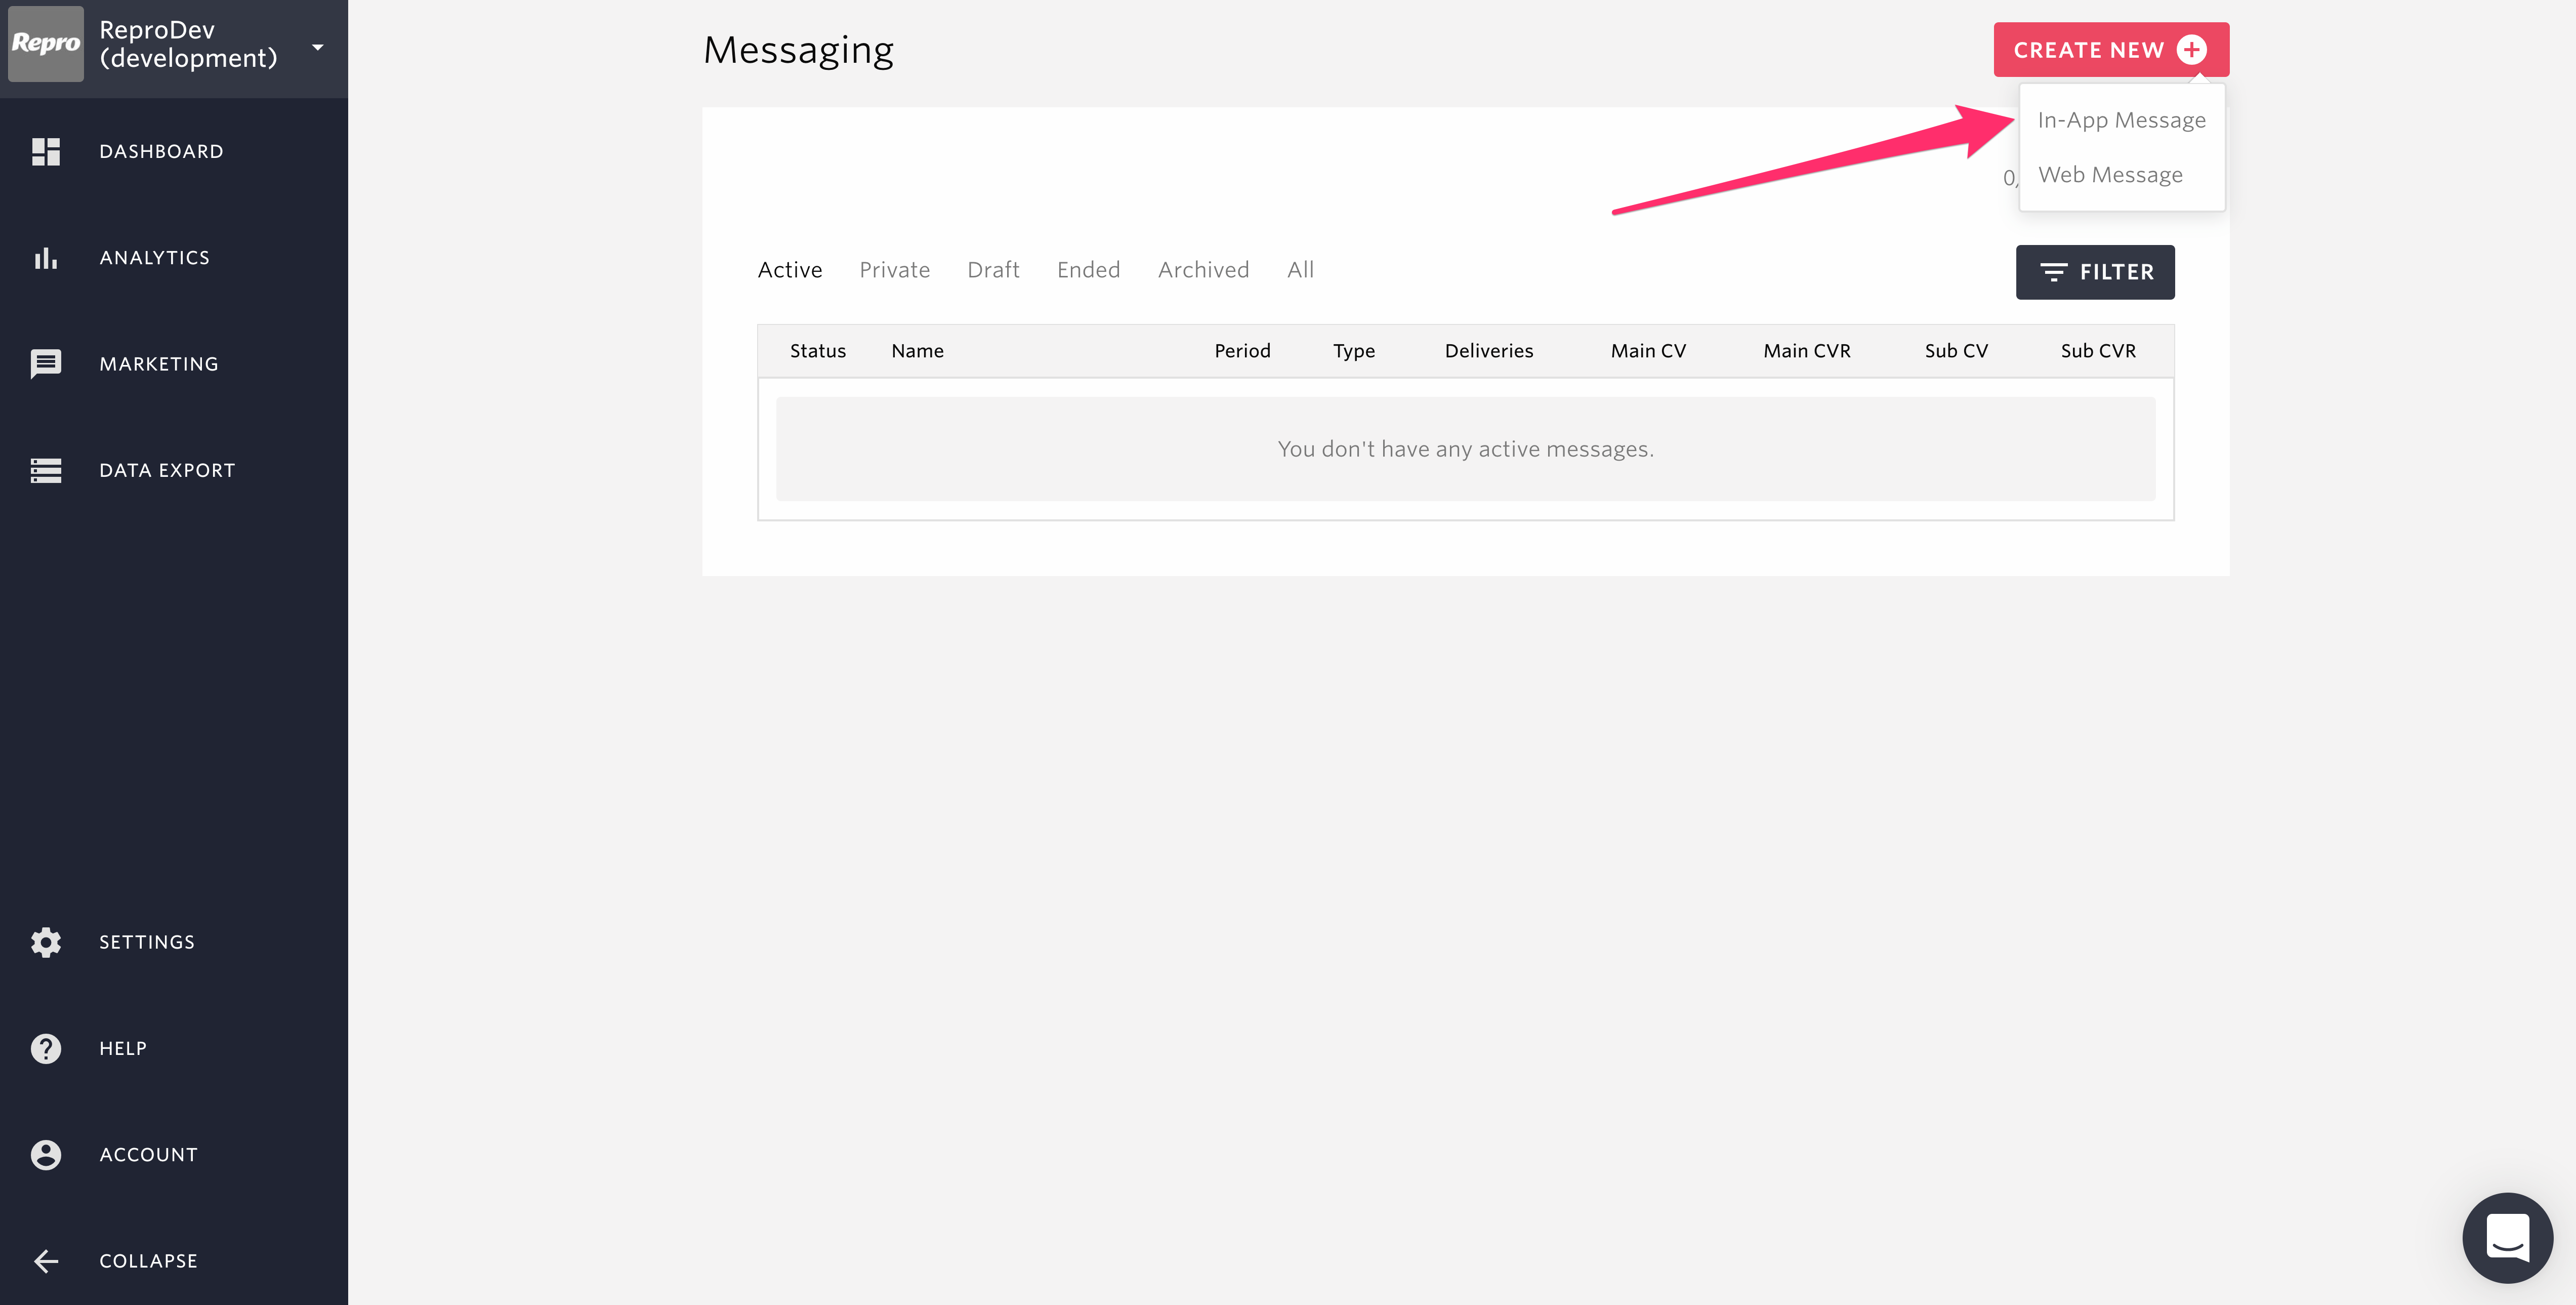
Go to MARKETING > MESSAGING and click CREATE NEW > In-App Message
Choose Message Template
The template selection screen is displayed when creating a new message. From the templates there, you can select the composition of the message you want to display. There are two main types of templates that can be used for In-App Messages.
Built-In(Native)Template: You can create and deliver In-App Messages with simply filling in the input items designated for each template.
HTML(WebView)template: You can create and deliver In-App messages that cannot be expressed by the built-in (Native) template with customizing the message using HTML or CSS. See here for the details.
Also, templates are prepared for each message structure you want to display. Each template specifies the presence of buttons, text, and images.
Text: Message will contain header and body
Image: An image can be attached to the message.
Button: You can place a button that the end user can tap.You can track any event when end user taps the button

Campaign settings

Campaign Name
Set the name for the new campaign. This name can be seen from the list of in-app messages.
Set the Conversion Event
You can set the campaign goal. This represents the number of users who have executed the specified event within 24 hours from the in-app message delivery. See Campaign Measurement for more details.
Select whether to use the campaign as a newsfeed
You can select whether to use the campaign as a newsfeed using the checkbox in the image above.
The Newsfeed is a history of campaigns which each user has ever received. Using those histories, for instance, you can show the contents of push notifications which you have sent to users so far in your app’s notification screen.
In order to use NewsFeed, you will need to implement it in your application.See Development Guide for details.
Warning
When using In-app Messages and Web Messages as NewsFeeds, please note that the intended behavior may not occur in use cases such as those described below.
Create a campaign,which has a purchase event as trigger, and Use it as NewsFeeds.
NewsFeeds are created independently of campaigns, so even if a campaign is not displayed, it will still be available as a NewsFeed.
Create contents
Depending on the template selected, the available settings and contents may differ. The different types and their respective contents are explained below.
Note
For items with the “INSERT VARIABLE” button, you can insert user profile values using Liquid notation. For details, see Personalization with Liquid.
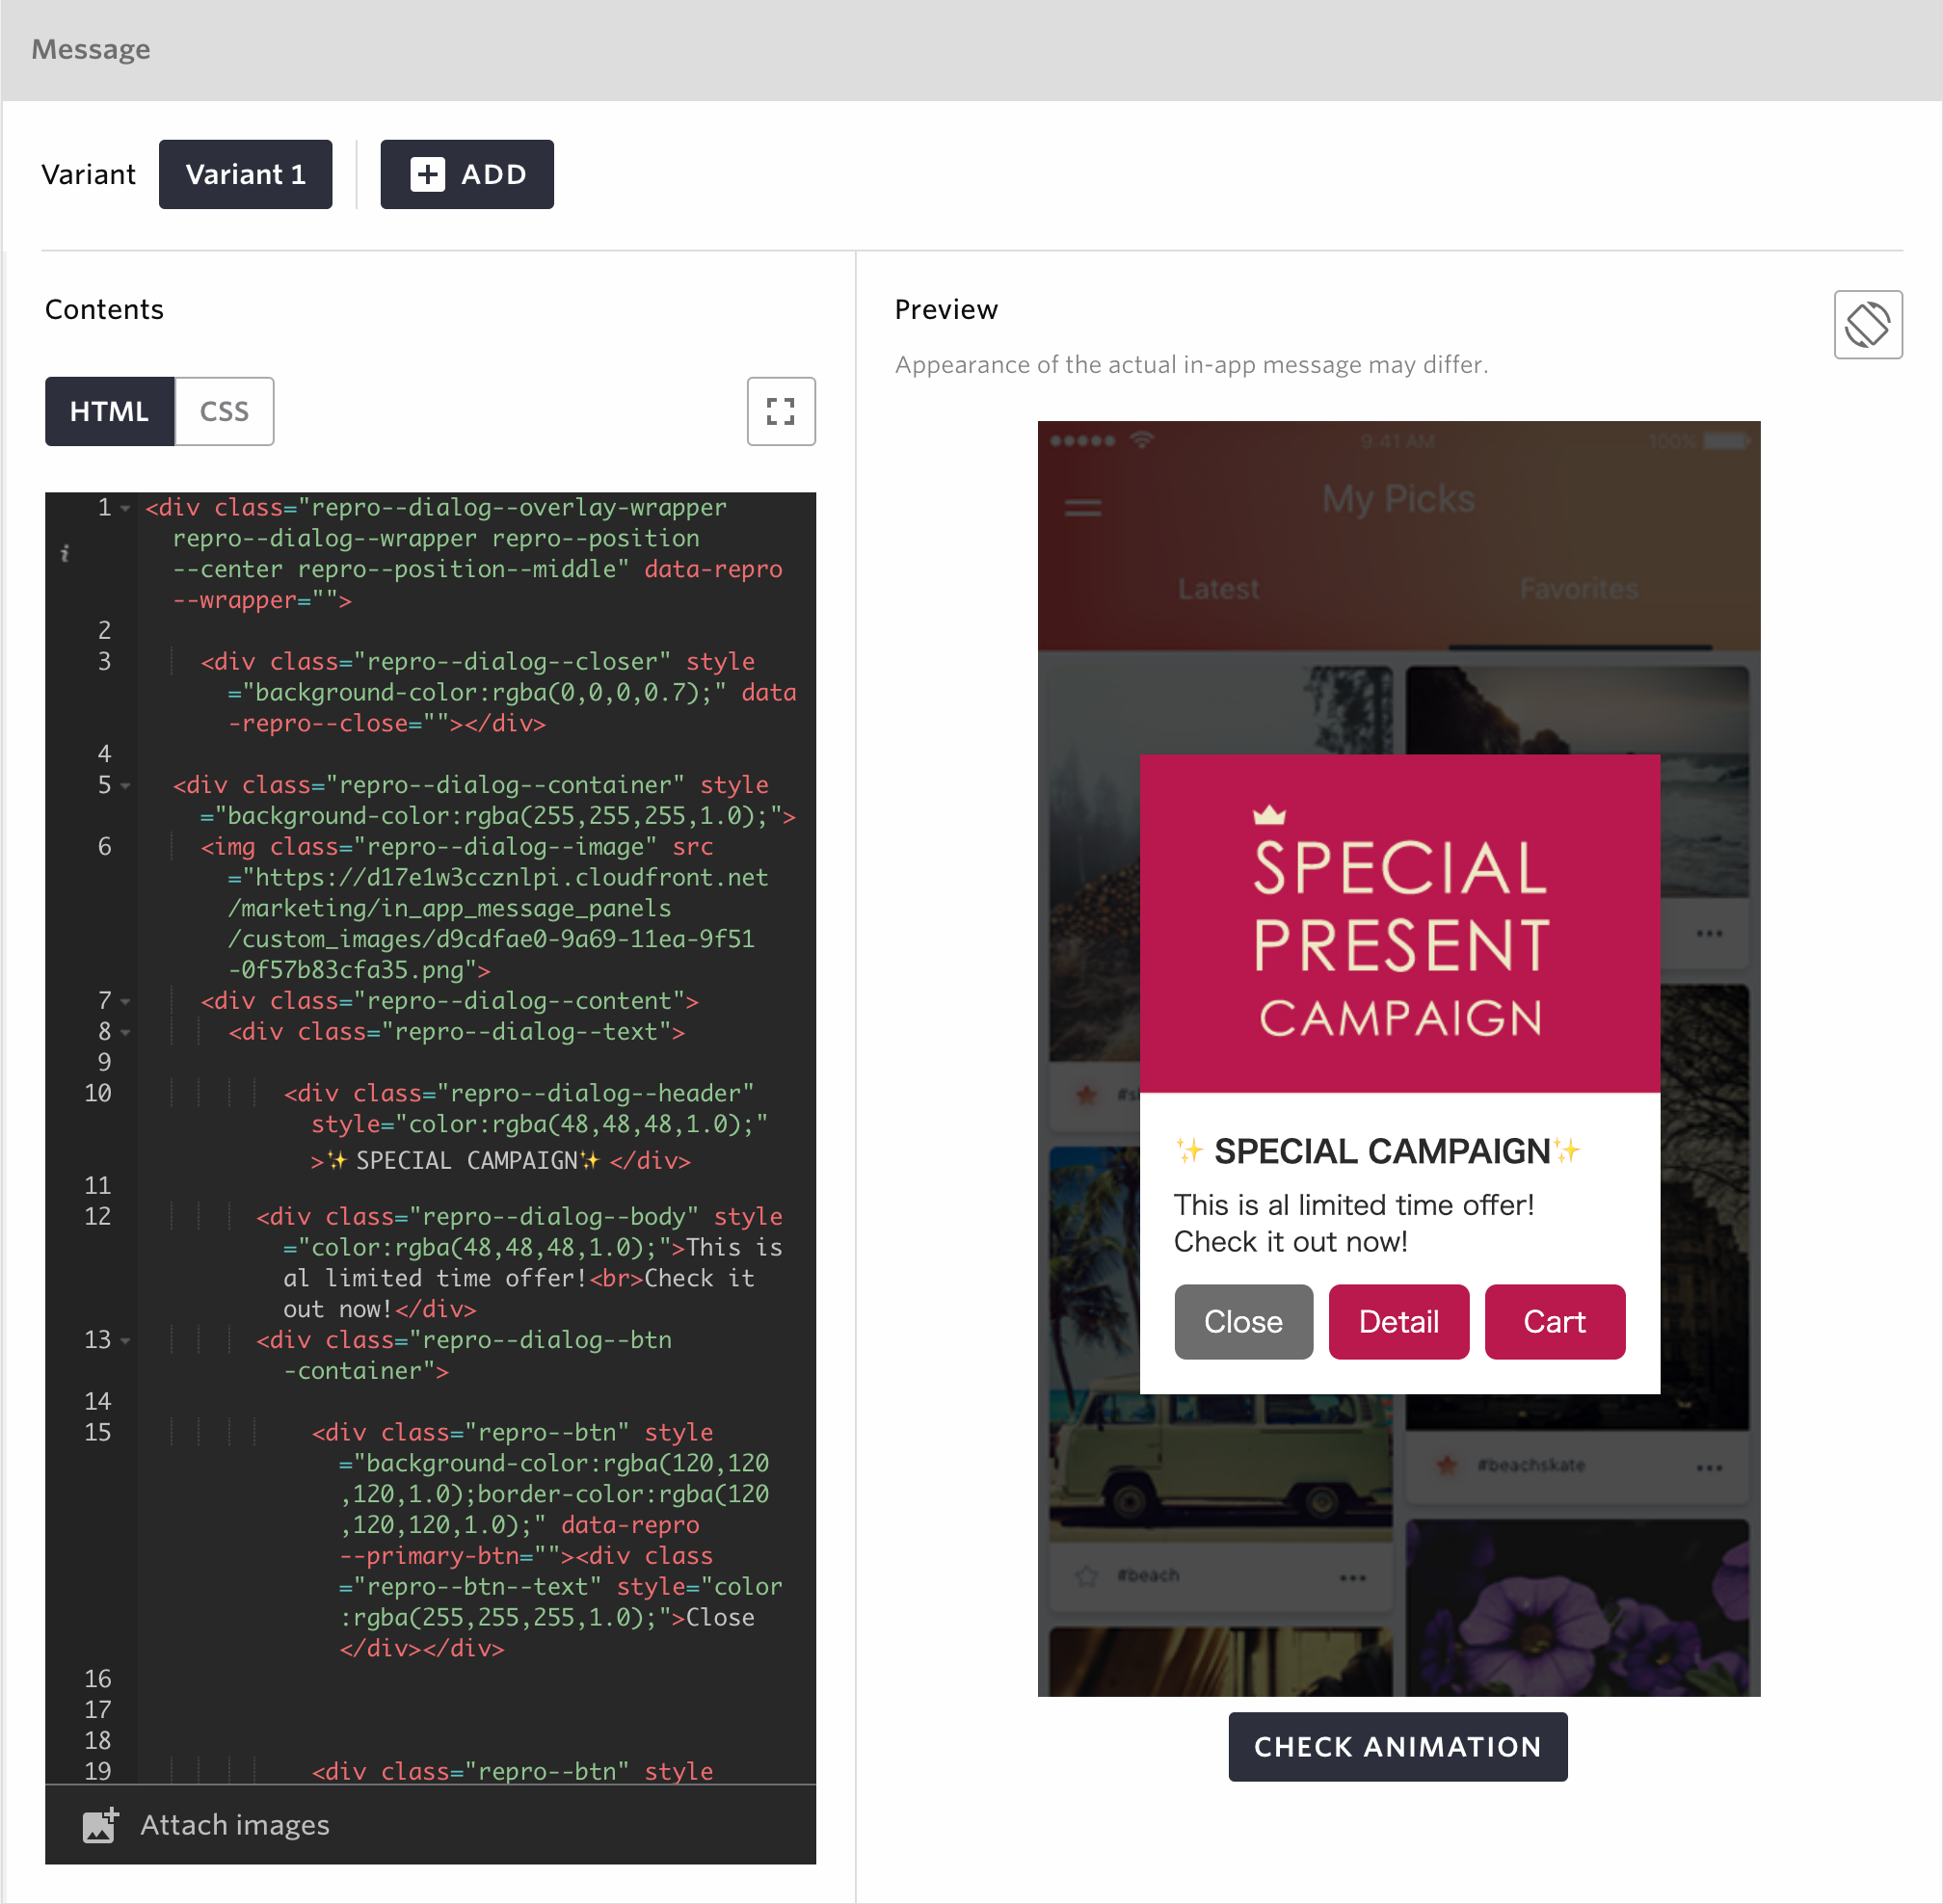
DIALOG(Text + Button)
You can display image, text and buttons as the content of the message. One or two buttons can be placed in a single message, and you can set the URL to be opened when the button is clicked individually.
Fill out the below forms to create an In-App Message:

- Background Colors
Choose the colors of the background area as well as the dialog area of the message.
- Header (optional)
Fill out the header text. You can also set the text color.
- Body
Fill out the body text. You can also set the text color.
- Button Label
Fill out the button label text. You can also set the background and text colors.
- Deep Link or Web URL (optional)
Fill out the URL which will be opened when the button of the message is clicked. When this is left blank, the message will just close when the buttons is clicked.
Character Limit
Maximum: 1000
The following three types of deep linking are supported.
Universal Link
App Link
Custom URL Scheme
If you want to specify universal and application links, please check When using Universal Link (iOS) or App Link (Android) for deep linking
DIALOG(Image)
You can only display an image for Image Only layout of dialog message.
Fill out the below forms to create an In-App Message:

Note
It may take a while to display the message if the selected file is large. It is recommended that image files not exceed 300 KB.
- Background Colors
Choose the background color of the outer area of the message.
- Image
Choose the image you want to insert into the message.
Supported file formats: JPEG, PNG
File size
Maximum: 1MB
Recommended: Below 300KB
Image size
Maximum: 3000px × 3000px
Recommended: 1152px by 1500px (portrait) or 1500px by 1152px (horizontal)
- Deep Link or Web URL (optional)
Fill out the URL which will be opened when the image is clicked. When this is left blank, the message will just close when the image is clicked.
Character Limit
Maximum: 1000
The following three types of deep linking are supported.
Universal Link
App Link
Custom URL Scheme
If you want to specify universal and application links, please check When using Universal Link (iOS) or App Link (Android) for deep linking
- Button Tracking Event Name (optional)
You can change the name of the collected event when the image is clicked.
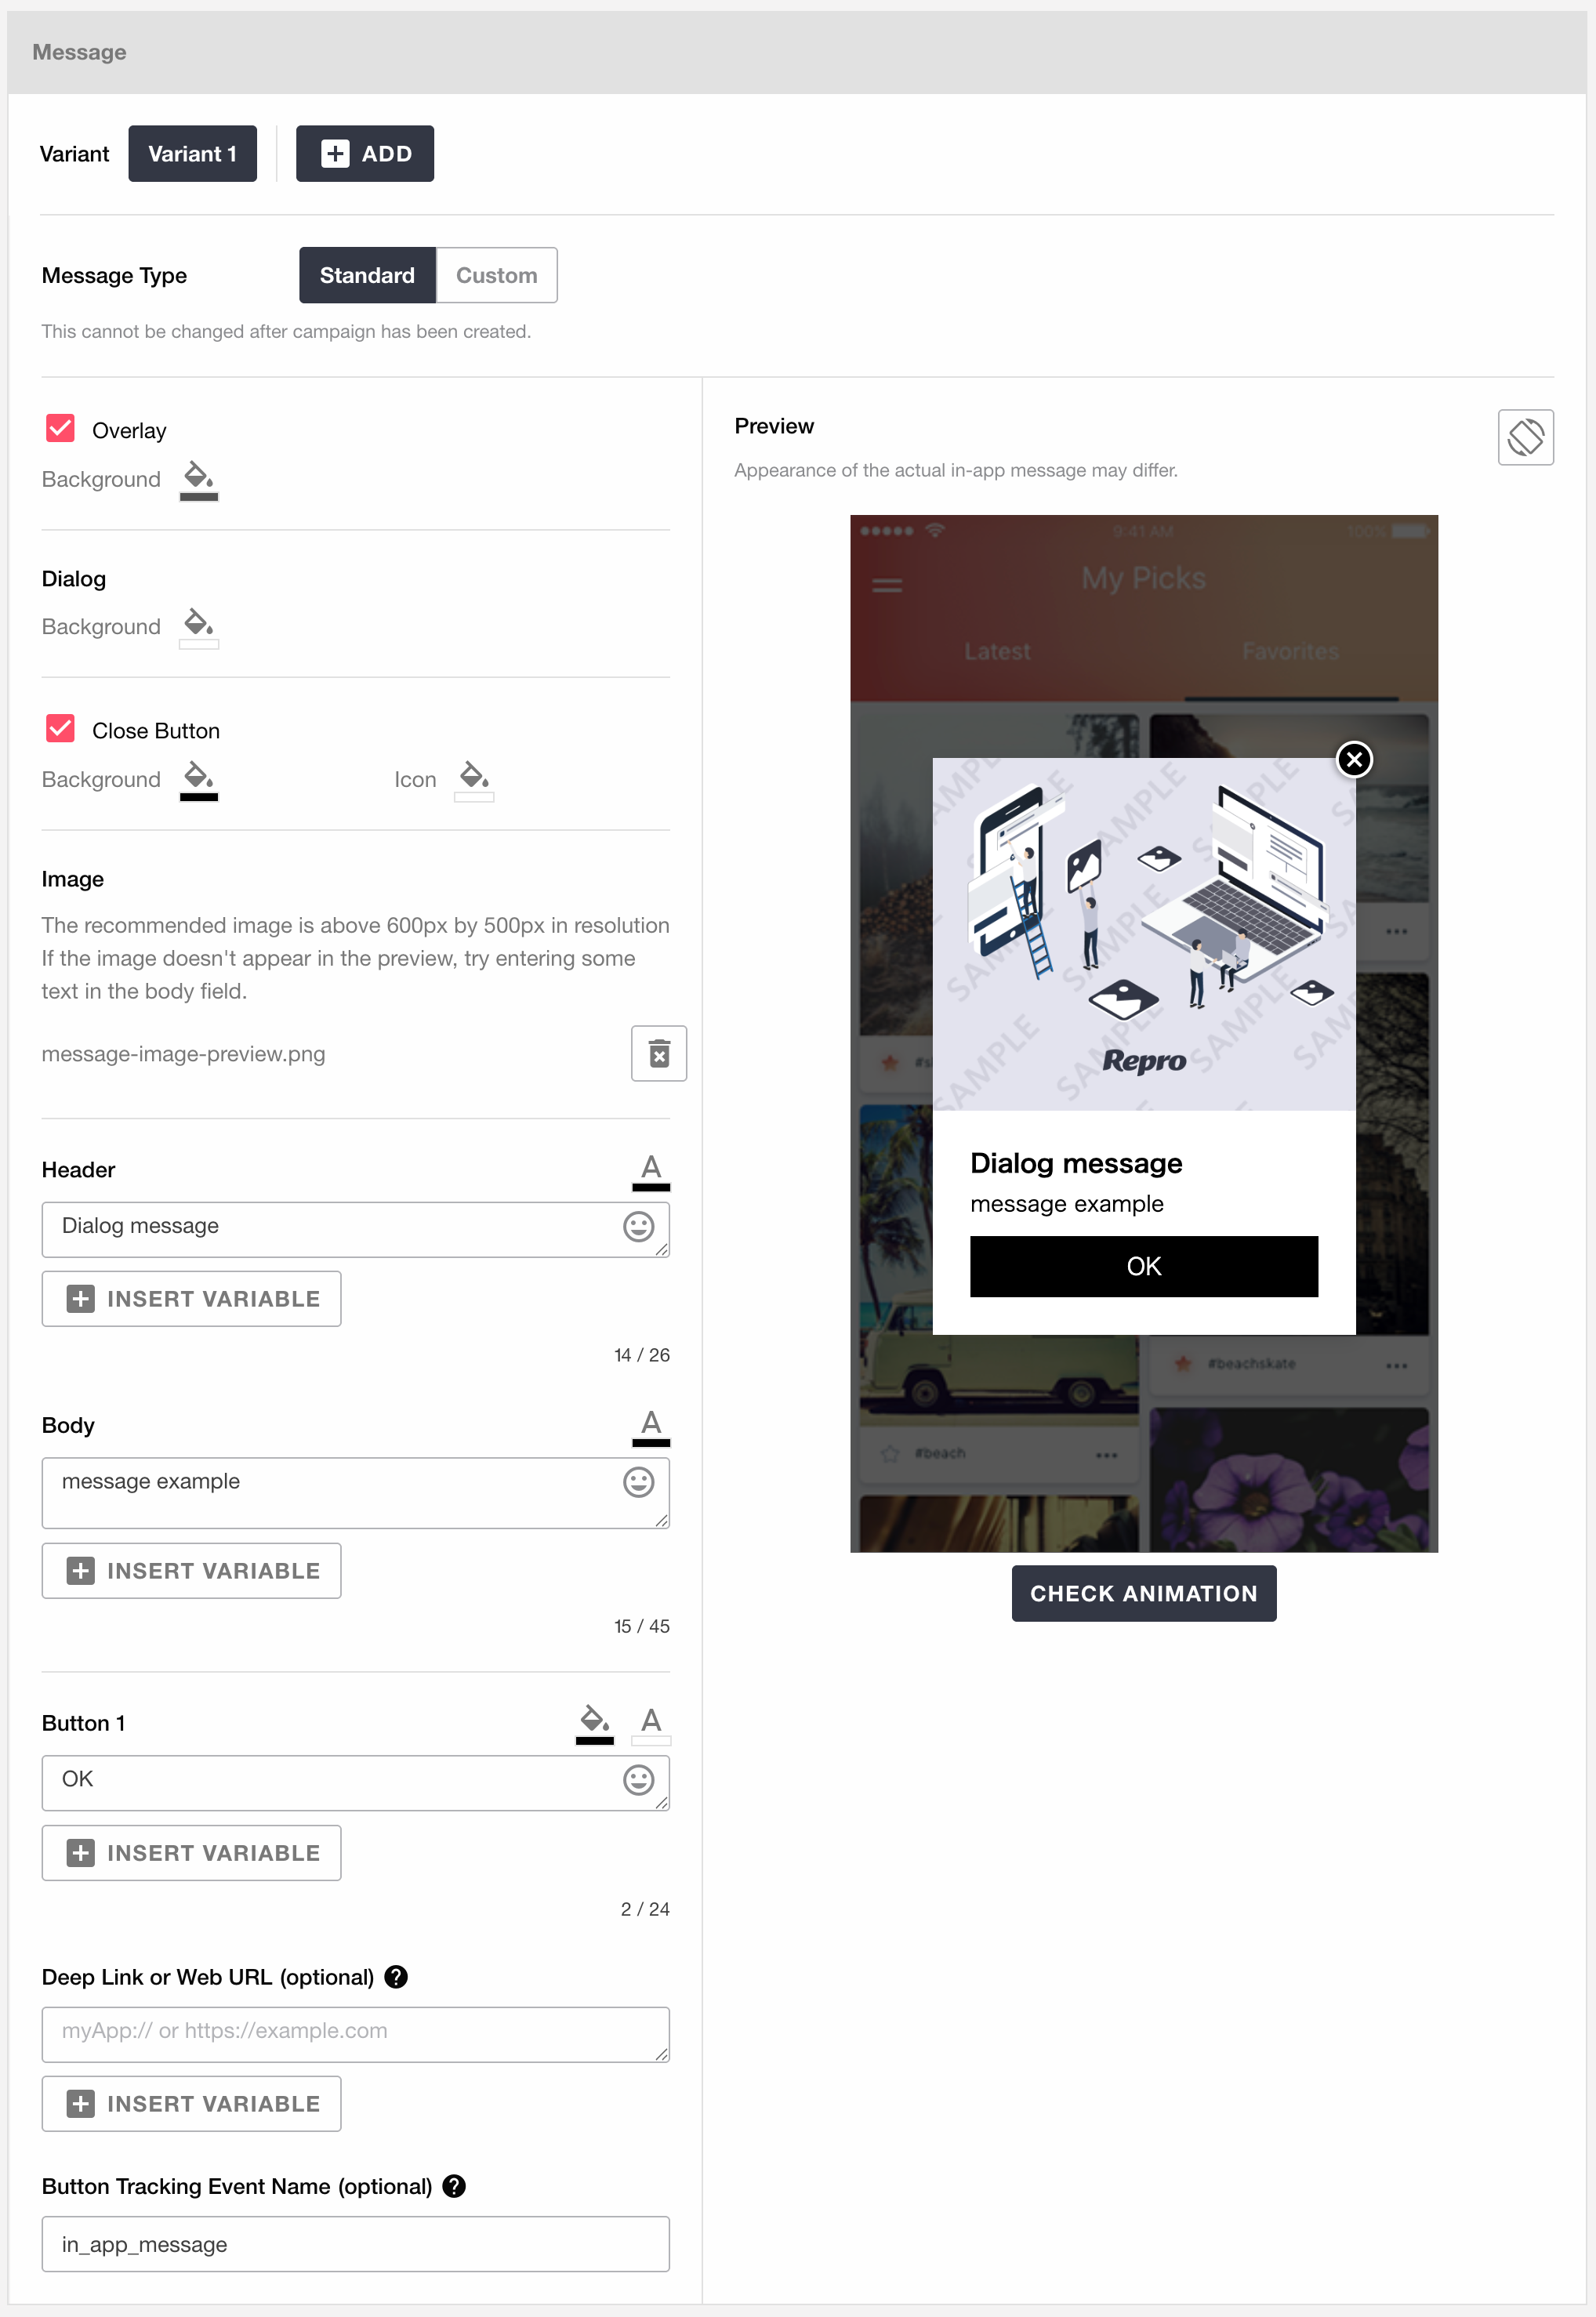
DIALOG(Text + Image + Button)
You can display image, text and buttons as the content of the message. One or two buttons can be placed in a single message, and you can set the URL to be opened when the button is clicked individually.
Fill out the below forms to create an In-App Message:
Note
It may take a while to display the message if the selected file is large. It is recommended that image files not exceed 300 KB.
- Background Colors
Choose the colors of the background area as well as the dialog area of the message.
- Image
Choose the image you want to insert into the message.
Supported file formats: JPEG, PNG
File size
Maximum: 1MB
Recommended: Below 300KB
Image size
Maximum: 3000px × 3000px
Recommended: 1152px by 1152px (portrait) or 960px by 960px (horizontal)
- Header (optional)
Fill out the header text. You can also set the text color.
- Body
Fill out the body text. You can also set the text color.
- Button Label
Fill out the button label text. You can also set the background and text colors.
- Deep Link or Web URL (optional)
Fill out the URL which will be opened when the button of the message is clicked. When this is left blank, the message will just close when the buttons is clicked.
Character Limit
Maximum: 1000
The following three types of deep linking are supported.
Universal Link
App Link
Custom URL Scheme
If you want to specify universal and application links, please check When using Universal Link (iOS) or App Link (Android) for deep linking
- Button Tracking Event Name (optional)
You can change the name of the collected event when the button is clicked.
OVERLAY(Text + Image + Button)
OVERLAY message will cover the whole screen of the app, and you can display image, text and buttons as the content of the message. One or two buttons can be placed in a single message, and you can set the URL to be opened when the button is clicked individually.
Fill out the below forms to create an In-App Message:

Note
It may take a while to display the message if the selected file is large. It is recommended that image files not exceed 300 KB.
- Background Colors
Choose the background color of the outer area of the message.
- Image
Choose the image you want to insert into the message.
Supported file formats: JPEG, PNG
File size
Maximum: 1MB
Recommended: Below 300KB
Image size
Maximum: 3000px × 3000px
Recommended: 1200px by 1200px (portrait) or 832px by 832px (horizontal)
- Header
Fill out the header text. You can also set the text color.
- Body
Fill out the body text. You can also set the text color.
- Button Label
Fill out the button label text. You can also set the background and text colors.
- Deep Link or Web URL (optional)
Fill out the URL which will be opened when the button of the message is clicked. When this is left blank, the message will just close when the buttons is clicked.
Character Limit
Maximum: 1000
The following three types of deep linking are supported.
Universal Link
App Link
Custom URL Scheme
If you want to specify universal and application links, please check When using Universal Link (iOS) or App Link (Android) for deep linking
- Button Tracking Event Name (optional)
You can change the name of the collected event when the button is clicked.
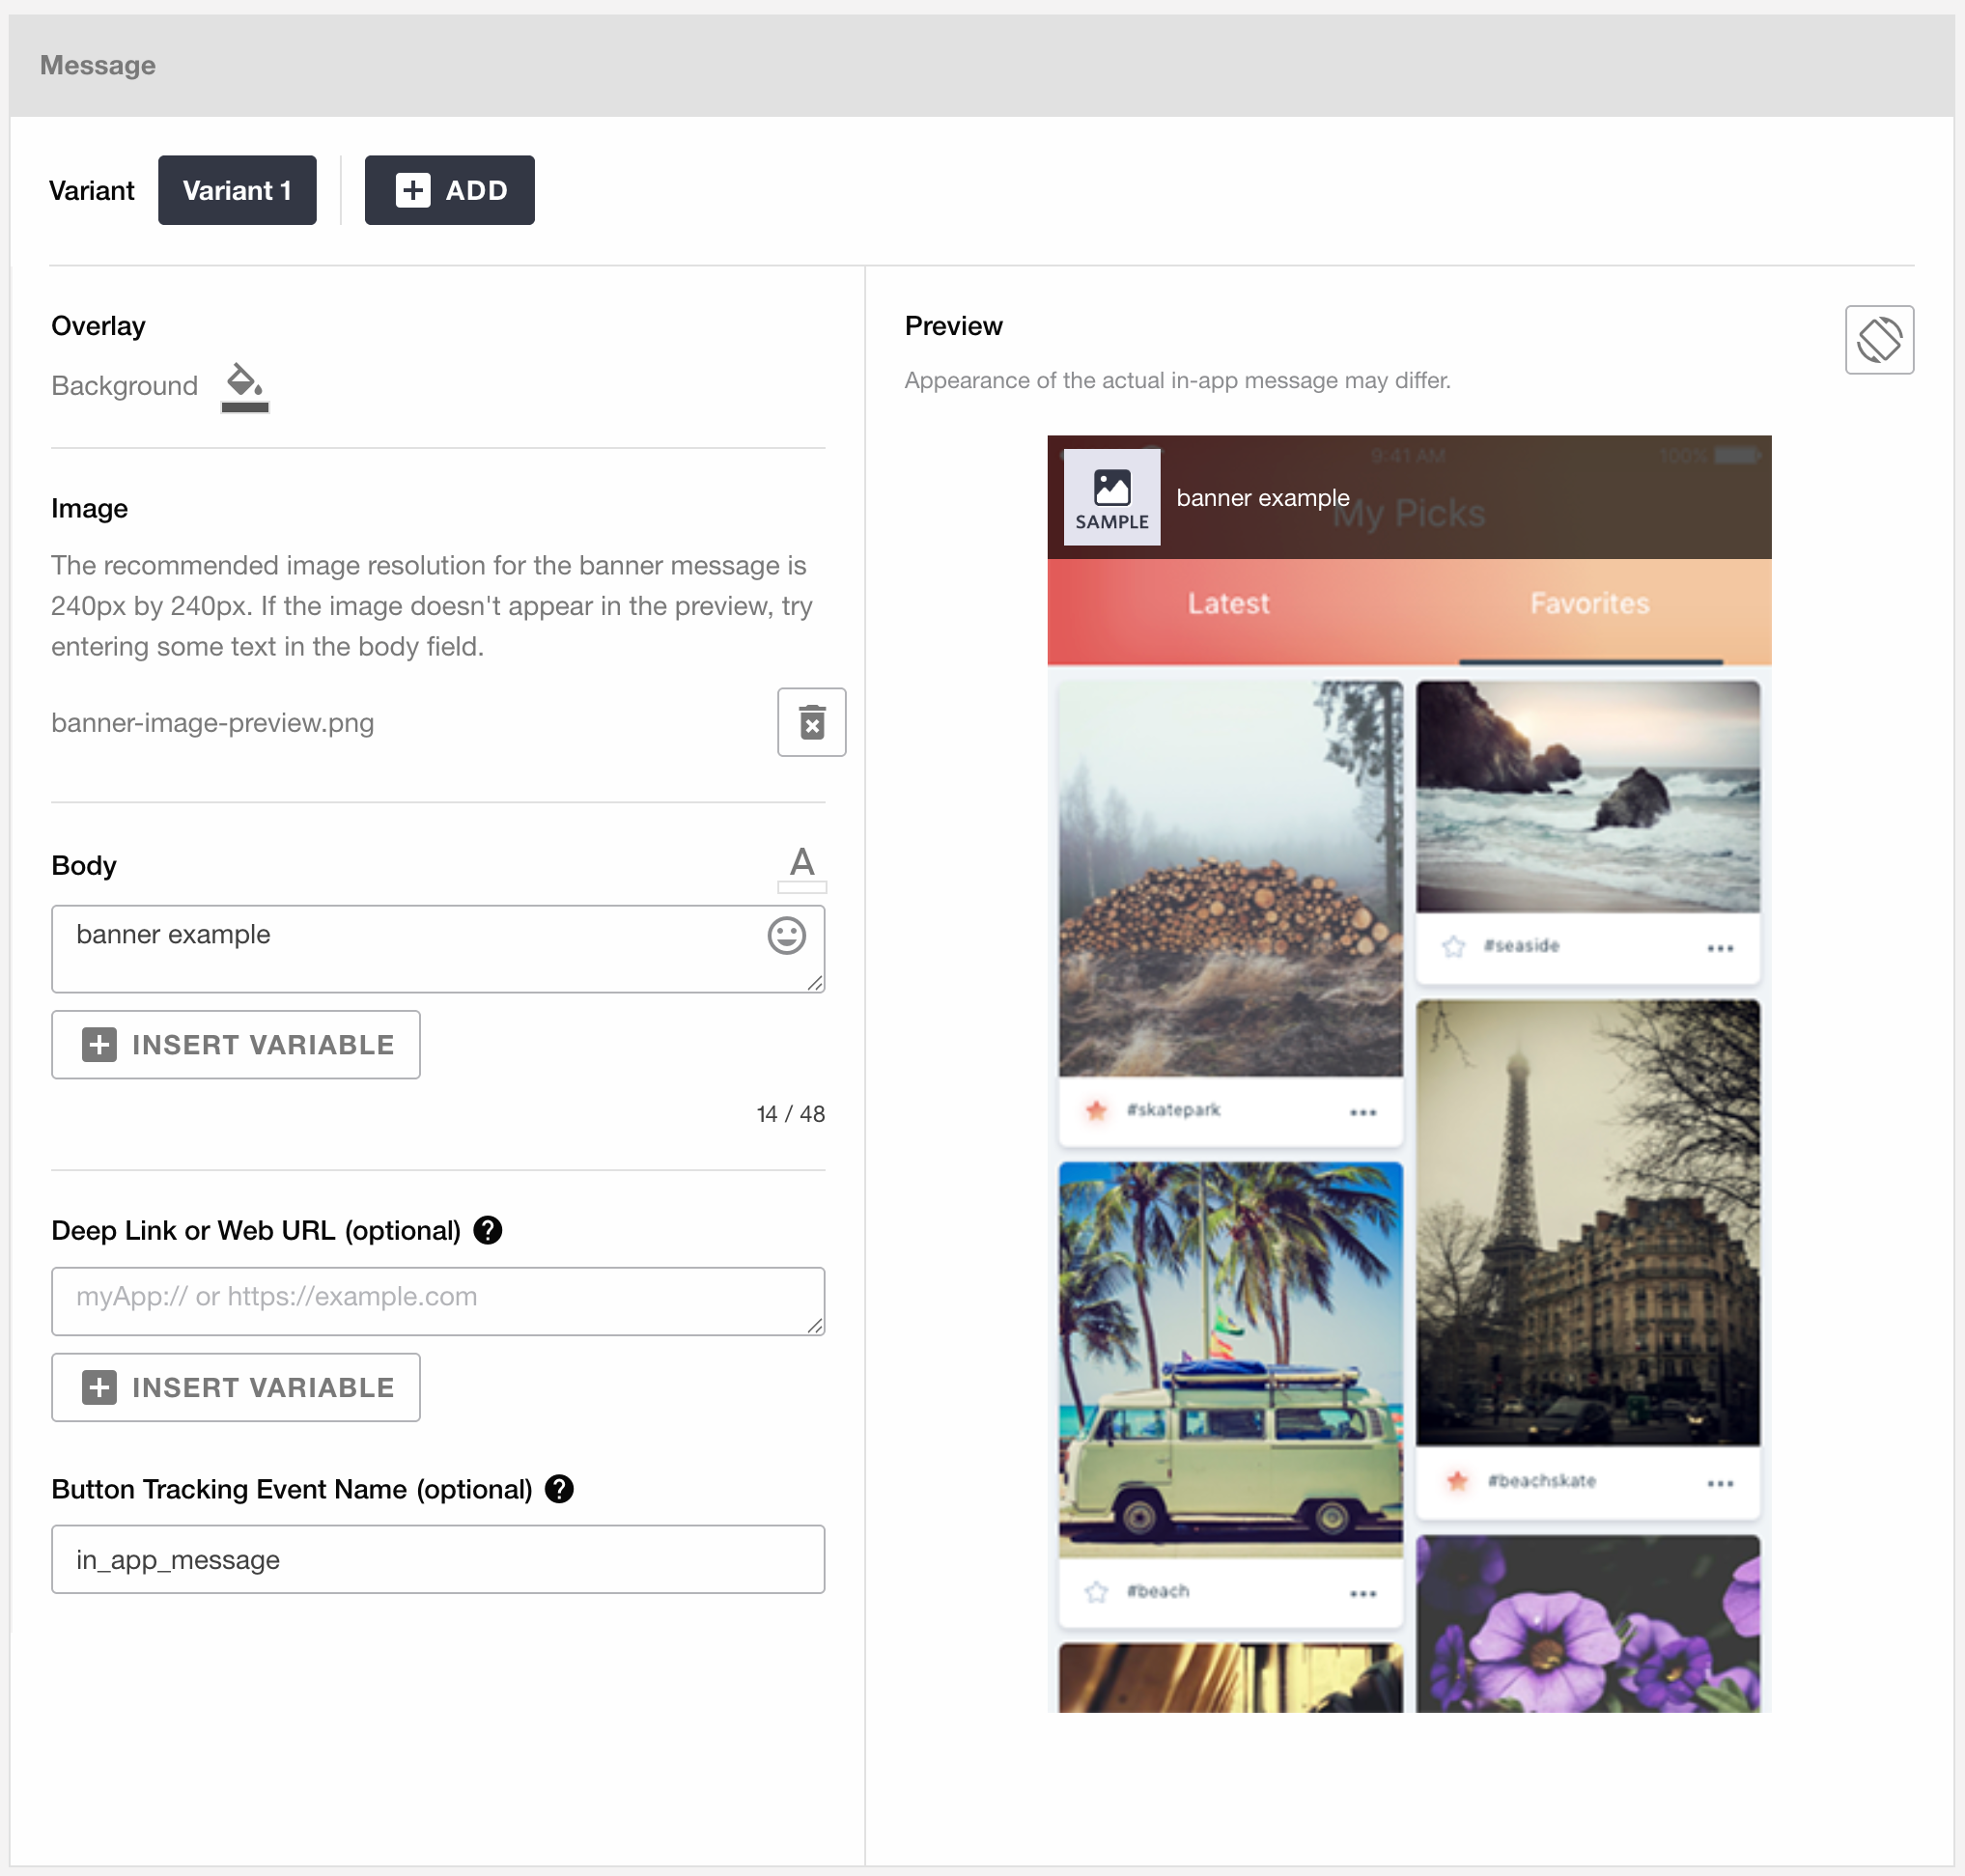
BANNER(Text + Image)
With BANNER type In-App Message, you can display image and text as an message to cover the top part of the screen. You can set the URL to be opened when the banner is clicked.
Fill out the below forms to create an In-App Message:
Note
It may take a while to display the message if the selected file is large. It is recommended that image files not exceed 300 KB.
- Background Colors
Choose the background color of the outer area of the message.
- Image
Choose the image you want to insert into the message.
Supported file formats: JPEG, PNG
File size
Maximum: 1MB
Recommended: Below 300KB
Image size
Maximum: 3000px × 3000px
Recommended: 240px by 240px
- Body
Fill out the body text. You can also set the text color.
- Deep Link or Web URL (optional)
Fill out the URL which will be opened when the banner is clicked. When this is left blank, the message will just close when the banner is clicked.
Character Limit
Maximum: 1000
The following three types of deep linking are supported.
Universal Link
App Link
Custom URL Scheme
If you want to specify universal and application links, please check When using Universal Link (iOS) or App Link (Android) for deep linking
- Button Tracking Event Name (optional)
You can change the name of the collected event when the button is clicked.
Video Embedding(YouTube + Text + Image)
You can display YouTube as the content of the message. Two buttons can be placed in a single message, and you can set the URL to be opened when the button is clicked individually.
Warning
(Important) Due to YouTube specification changes in July 2025, we have confirmed issues where videos may not play when using this template. Repro guarantees operation with iOS SDK 5.21.1 or later and Android SDK 5.20.3 or later, however, functionality may vary depending on future specification changes. Therefore, when using this template, please be sure to verify video playback functionality in your own app environment before implementation.
Android apps built using Unity will deliver messages with embedded YouTube videos, but the videos will not play. Please note that the video will not play.
Note
This template is only available for Repro iOS SDK 5.2.0 or above and iOS 9 or above, or for Repro Android SDK 5.1.0 or above and Android 5 or above. If either of those versions is older than the ones described above, the message of the campaign won’t be shown.
Video playback in messages is guaranteed to work with iOS SDK 5.21.1 or later and Android SDK 5.20.3 or later.
In some cases, videos in delivered messages may not play because they are no longer available or have been set to not embeddable. Please make sure that the video is ready to be played, especially if you set the delivery period of the message for a longer period of time.
Fill out the below forms to create an In-App Message:

- Background Colors
Choose the background color of the outer area of the message.
- YouTube URL
Specify the YouTube URL to be displayed in the message. The URL you specify should be the URL for embedding. The following captures were obtained by clicking Share > Embed on the YouTube play screen.
Character Limit
Maximum: 2000

Note
The YouTube URL is given
playsinline=1by default. Therefore, if aplaysinlineparameter is given in the form, you will not be able to compose a message. Do not give theplaysinlineparameter.If you enter a non-YouTube video URL or a non-embedded YouTube video URL, you will not be able to compose a message.
Although it is possible to add parameters other than
playsinline, it is important to note that these parameters may not work on some operating systems or devices.
- Header
Fill out the header text. You can also set the text color.
- Body
Fill out the body text. You can also set the text color.
- Button Label
Fill out the button label text. You can also set the background and text colors.
- Deep Link or Web URL (optional)
Fill out the URL which will be opened when the button of the message is clicked. When this is left blank, the message will just close when the buttons is clicked.
Character Limit
Maximum: 1000
The following three types of deep linking are supported.
Universal Link
App Link
Custom URL Scheme
If you want to specify universal and application links, please check When using Universal Link (iOS) or App Link (Android) for deep linking
- Button Tracking Event Name (optional)
You can change the name of the collected event when the button is clicked.
Embed the survey(Google Form)
You can embed a Google form in your message.
Note
This template is only available for Repro iOS SDK 5.2.0 or above and iOS 13 or above, or for Repro Android SDK 5.1.0 or above and Android 5 or above. If either of those versions is older than the ones described above, the message of the campaign won’t be shown.
In some cases, the survey in delivered messages may not display because they are no longer available. Please make sure that the survey is ready to be displayed, especially if you set the delivery period of the message for a longer period of time.
Fill out the below forms to create an In-App Message:
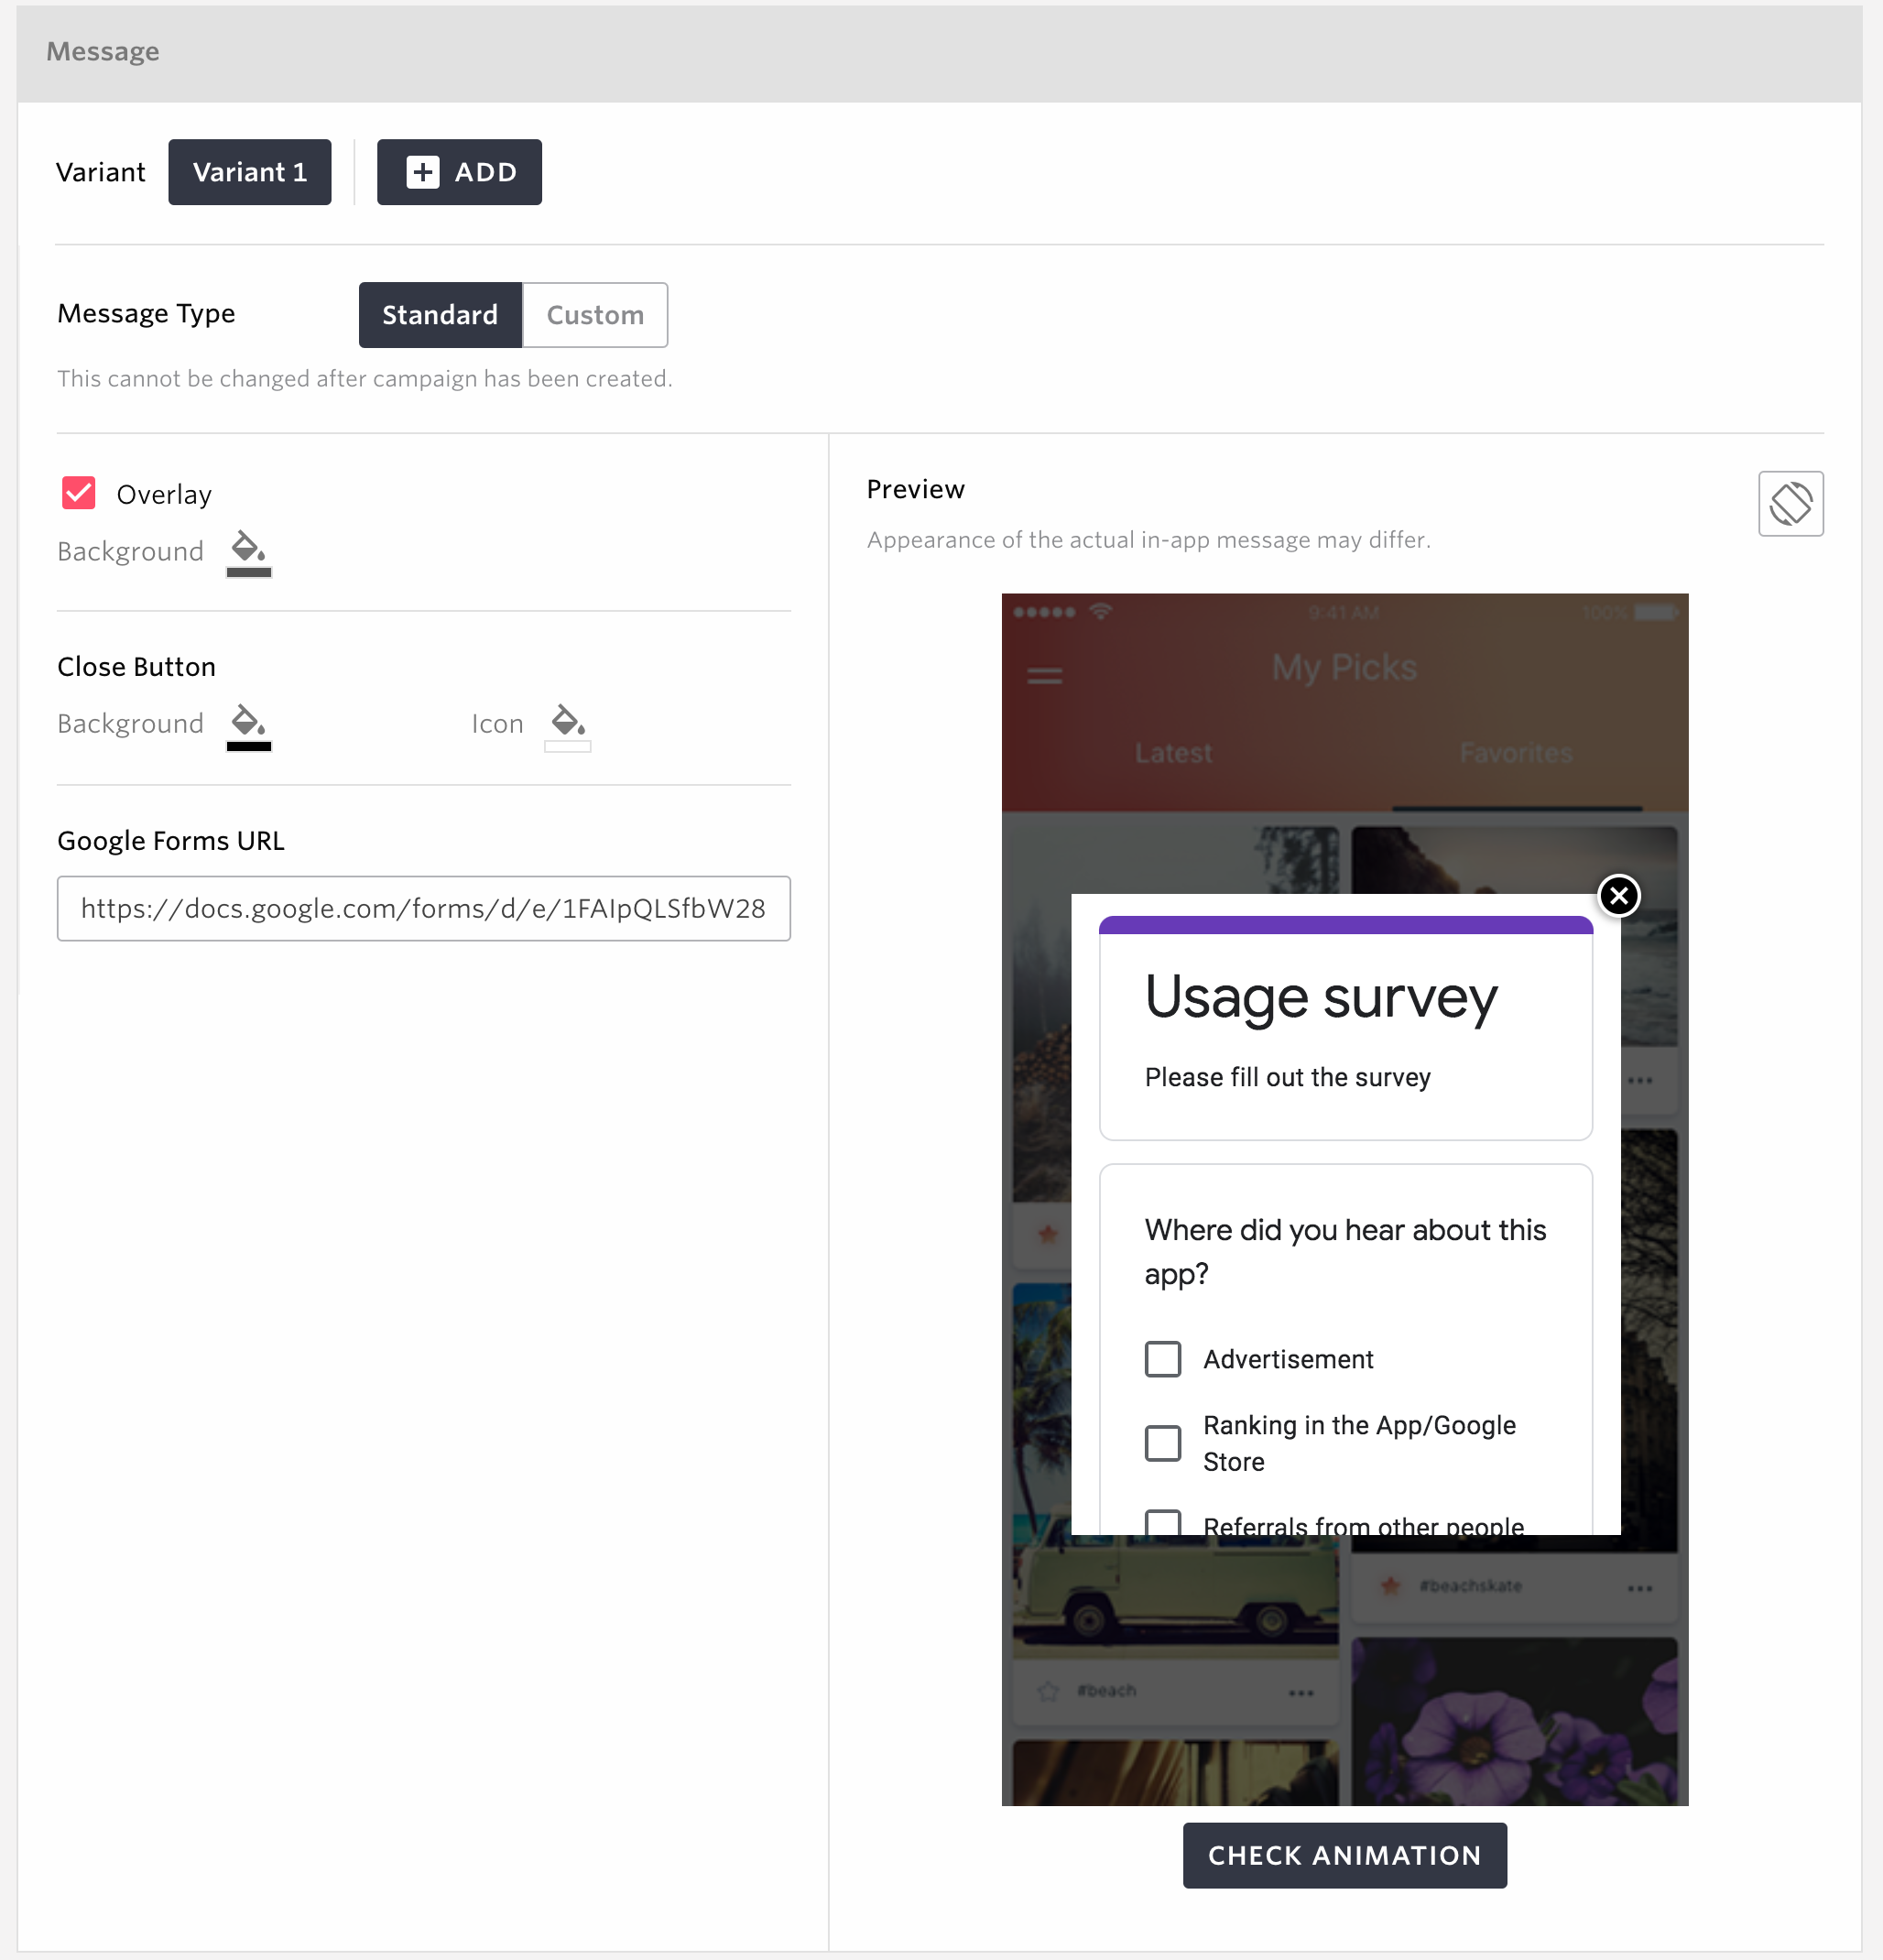
- Background Colors
Choose the background color of the outer area of the message.
- Close Button
Specify the color of the button to close the message.
- Google Forms URL
Specify the Google forms URL to be displayed in the message. The URL you specify should be the URL for embedding. The following captures were obtained by clicking Send on the Google form’s screen.
Character Limit
Maximum: 2000

Note
The Google Form URL is
https://docs.google.com/forms/d/e/{form_id}/viewformformat. If the format is different, the message cannot be saved.The parameter
embedded=truemust be set. If it is not specified, messages cannot be saved.Although it is possible to add parameters other than
embedded, it is important to note that these parameters may not work on some operating systems or devices.
Original
This can be used when you want to create the content of an In-App Message from scratch using HTML and CSS without a template. See HTML In-App Message for details.
Silver Egg
In cooperation with Silver Egg Technology’s recommendation service, different contents can be displayed for each end user. For more information, please see Silver Egg Recommend Message .
Note
Please contact our sales representative or customer success representative if you would like to take advantage of this function.

Advertisement Linked Message
Advertisement Linked Message is, using attribution data obtained from AppsFlyer/Adjust to display an in-app message linked to the creative of the advertisement on the first launch of the app to users who have flown in from the advertisement.
For example, users who click on Advertisement A to install the app will receive in-app message A. For Advertisement B, will receive in-app message B. by combining advertisement creative and in-app message at first launch, you can provide a seamless onboarding experience.
How to implement on the app
To use this feature, you need to implement on your app. Please refer to AppsFlyer、Adjust ans set the advertisement attribution data in the event property. Once you’ve implemented setting attribution data as an event property, you don’t have to update your app every time you serve a new advertisement afterwards.
Settings

After implementing on the app, decide which attribution data to use to display the in-app message, and use Trigger messages by the value of event property to display the in-app message.
In the example above, the message is displayed if the Adjust Adgroup contains sample1234. You can display the message with any campaign structure parameter that you set in the event property.
Set the Target Users as
First-time Users.
Note
When checking to see if it works, reset your advertisement ID and install the app via the AppsFlyer/Adjust tracker and check the display.
Warning
If IDFA cannot be obtained on iOS app, the in-app message of the user who clicked another advertisement may be displayed depending on the accuracy of the attribution data.
Use Campaign as a newsfeed
If you check the “Use campaign as newsfeed” checkbox in the Campaign settings , an input form for the newsfeed will appear below the form for content creation, as shown in the image below, and can be configured. See Newsfeed .

- Title
Specifies the title of the NewsFeed. The value entered here can be retrieved as the
titlein the NewsFeed.- Summary
Specifies the summary of the NewsFeed. The value entered here can be retrieved as the
summaryin the NewsFeed.- Detail (optional)
Specifies the body of the NewsFeed. The value entered here can be retrieved as the
bodyin the NewsFeed.
Link URL(optional) Specifies the link url of the NewsFeed. The value entered here can be retrieved as the link_url_string (SDK) or link_url (NewsFeed API) in the NewsFeed.
Image(Optional) Specifies the image url of the NewsFeed. The value entered here can be retrieved as the image_url_string (SDK) or image_url (NewsFeed API) in the NewsFeed.
Distribute Users Among Variants
Distribute target users among Control Group and message variants as configured in Select Target. Control Group refers to the group of users who will not receive the message in order to see how effective the message was by comparing the results between users who received the message and who did not.See A/B Testing for more details how to change the settings with additional variants.
For example, when sending to Existing Users with Control Group set to 20% and Variant 1 to 80%, 80% of the users randomly chosen from all of the users will receive the message while the 20% rest will not.
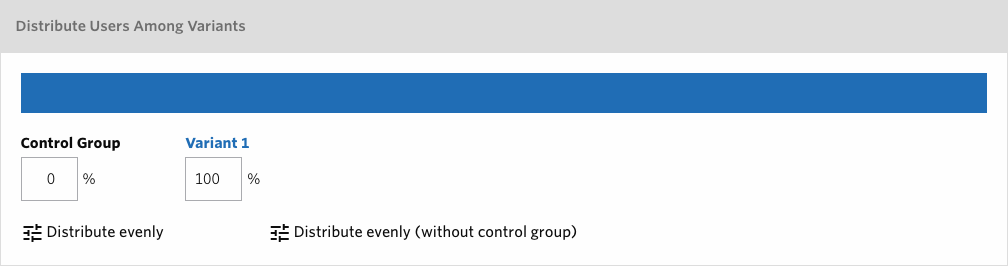
Set distribution percentages
By default, Control Group is set as 0% and Variant 1 is set as 100% which will make all of the target users receive the message. If you do not wish to use the Control Group, you can leave these settings as is. If you want to use the Control Group then you can adjust the percentages with the total being 100%.
You can assign 50% each to Control Group as well as Variant 1 by clicking Distribute evenly, while Distribute evenly (without control group) will make Control Group 0% and Variant 1 100%.
Note
Control Group’s percentage can be anything between 0% and 99%.
Variant 1’s percentage can be anything between 1% and 100%.
Only integers can be set.
Changing the distribution settings is not possible after a campaign has been saved.
The actual number of impressions may fluctuate depending on the volume of the target user.
Delivery Type
- Delivery period
Set the period of time you want the campaign to be delivered to your users. The message will be shown once per user during this period. Users are identified by User ID.
- Display Frequency
You can limit the number of times a message is displayed.
Only once per user
The default is to show the message only once per user.
Multiple times per user
If you select multiple times per user, the same message can be displayed to each user multiple times.
For example, if you want to limit the total number of times a message is being displayed to 3 times, you can use the below settings.
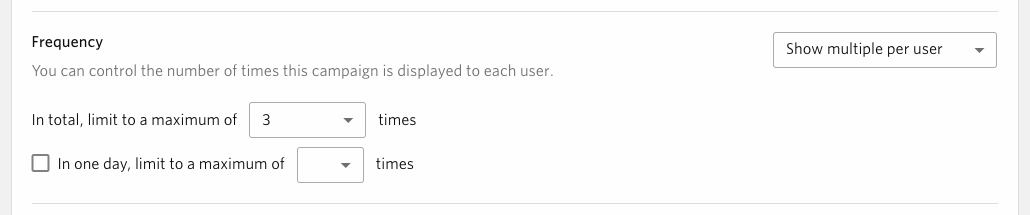
With the above setting, if the message’s trigger event occurs 3 times in a day, the same in-app message will be displayed 3 times in that day.

Warning
If you limit the total times to No limit, the message continue to be displayed without limit.
If you allow a user to receive the message multiple times, it is required to limit the total number of times they can receive the same message.
The total times per day setting is optional, so if you wish to set a limit, check the checkbox before launching the campaign.
If you allow a user to receive the message multiple times, the message is not displayed until Repro internally detects that the message has been displayed.
- Adjust Display Priority
You can set a display priority for the message. If multiple campaigns have the same trigger and their display timings conflict, the message from the campaign with the higher display priority will be shown preferentially.
Turning on the “Message Priority” checkbox displays a form to enter the priority.

How to Specify Priority
Priority can be specified as a number from 1 to 100, and larger numbers are displayed preferentially.
About Default Priority
When the checkbox is empty, the priority is treated as 50. In addition, for existing campaigns created before this feature was released, the priority is uniformly treated as 50.
Behavior When Priority is the Same
When conflicting campaigns have the same display priority (including when both are unset), the message from the most recently updated campaign will be given priority.
Note
To use this feature, iOS SDK 5.23.0 or later and Android SDK 5.21.0 or later are required.
For devices using older versions of the SDK, the set priority value is not applied (even if a value is set, all campaigns are treated as having the same priority, and the most recently updated one is prioritized).
Message Display Trigger
The display timing of messages can be controlled by the message’s trigger. You can choose the timing based on your use case.
Trigger messages by event trigger
Trigger the display of message when the selected event is triggered.

- Trigger Type
Select Event Trigger
- Trigger
Select an event from the first list.
Select “Trigger” from the second list.
Trigger messages by the number of occurrences of the triggered event
Trigger the display of message when the selected event is triggered for specified number of times.
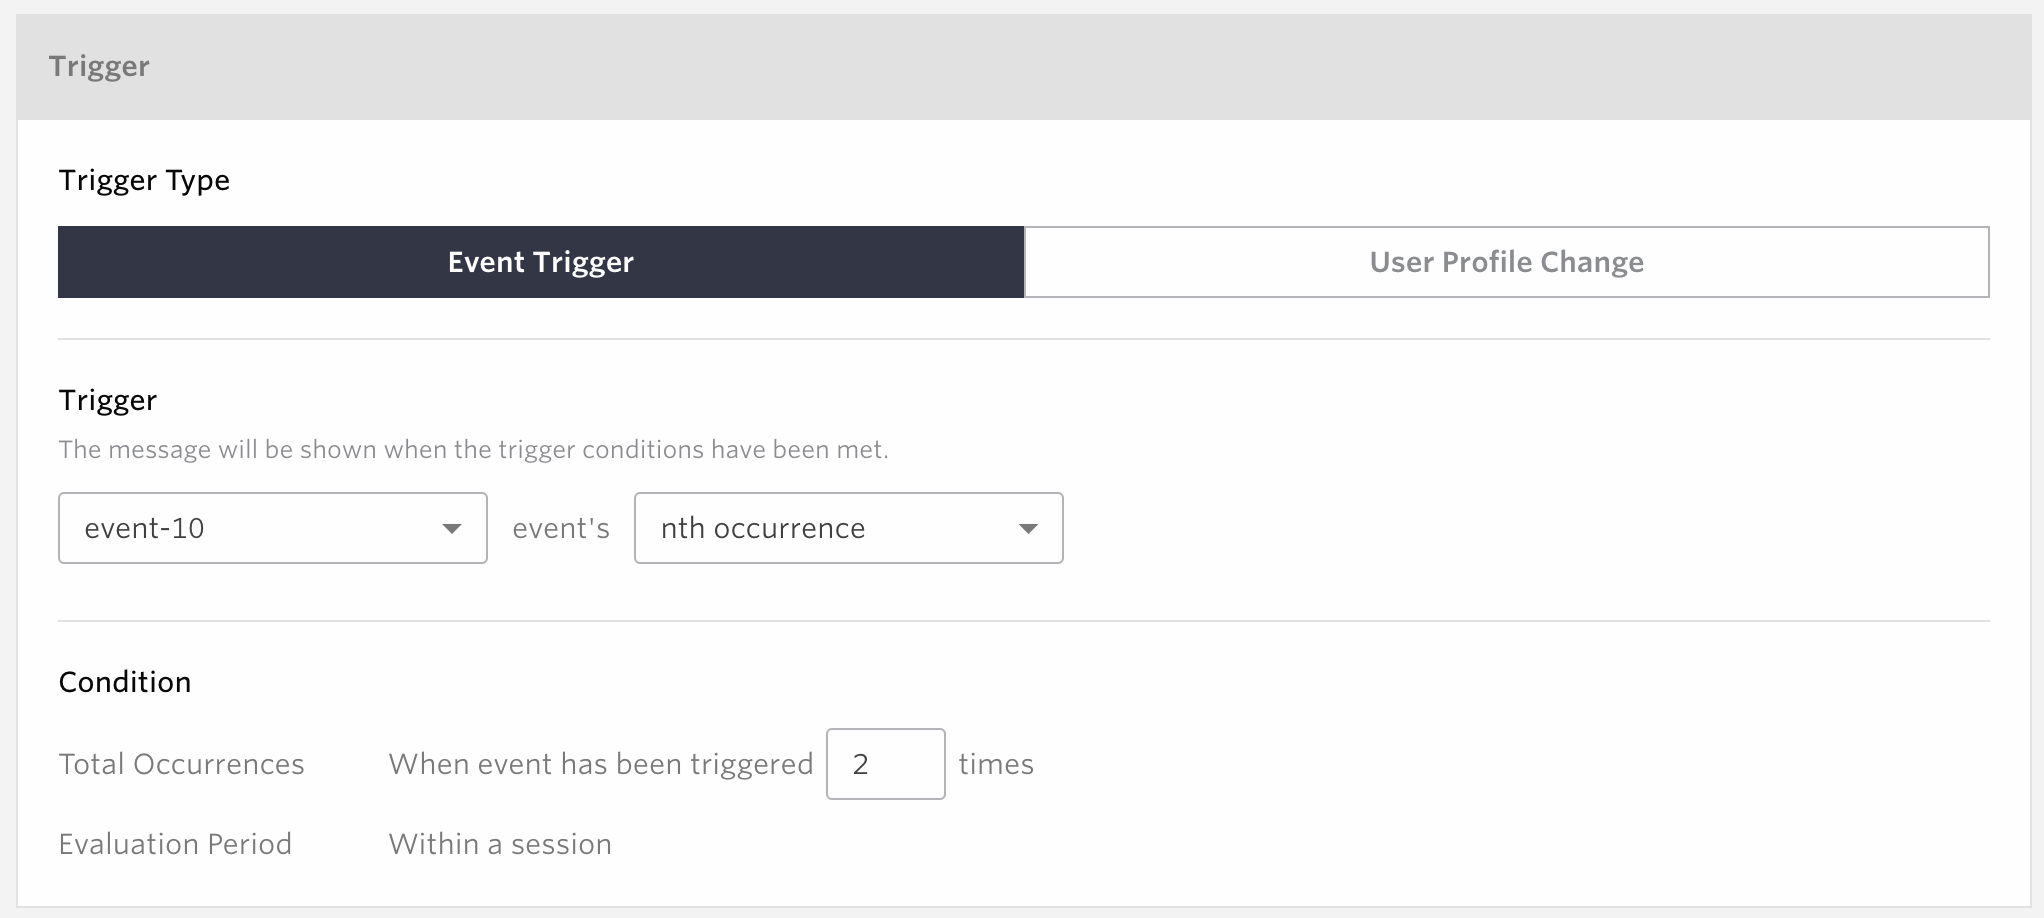
- Trigger Type
Select Event Trigger
- Trigger
Select an event from the first list.
Select nth occurrence from the second list.
- Condition
Total Occurrences
The range for value which can be specified is from 2 to 30.
Evaluation period
Only “Within a session” can be selected as of now.
Warning
In case multiple devices have the same user ID, the evaluation happens individually on each device.
If you set multiple messages with the same event and the same number of occurrences, only one of them will be displayed in one session.
Trigger messages by the value of event property
Trigger the display of message when the specified event property has a certain value.
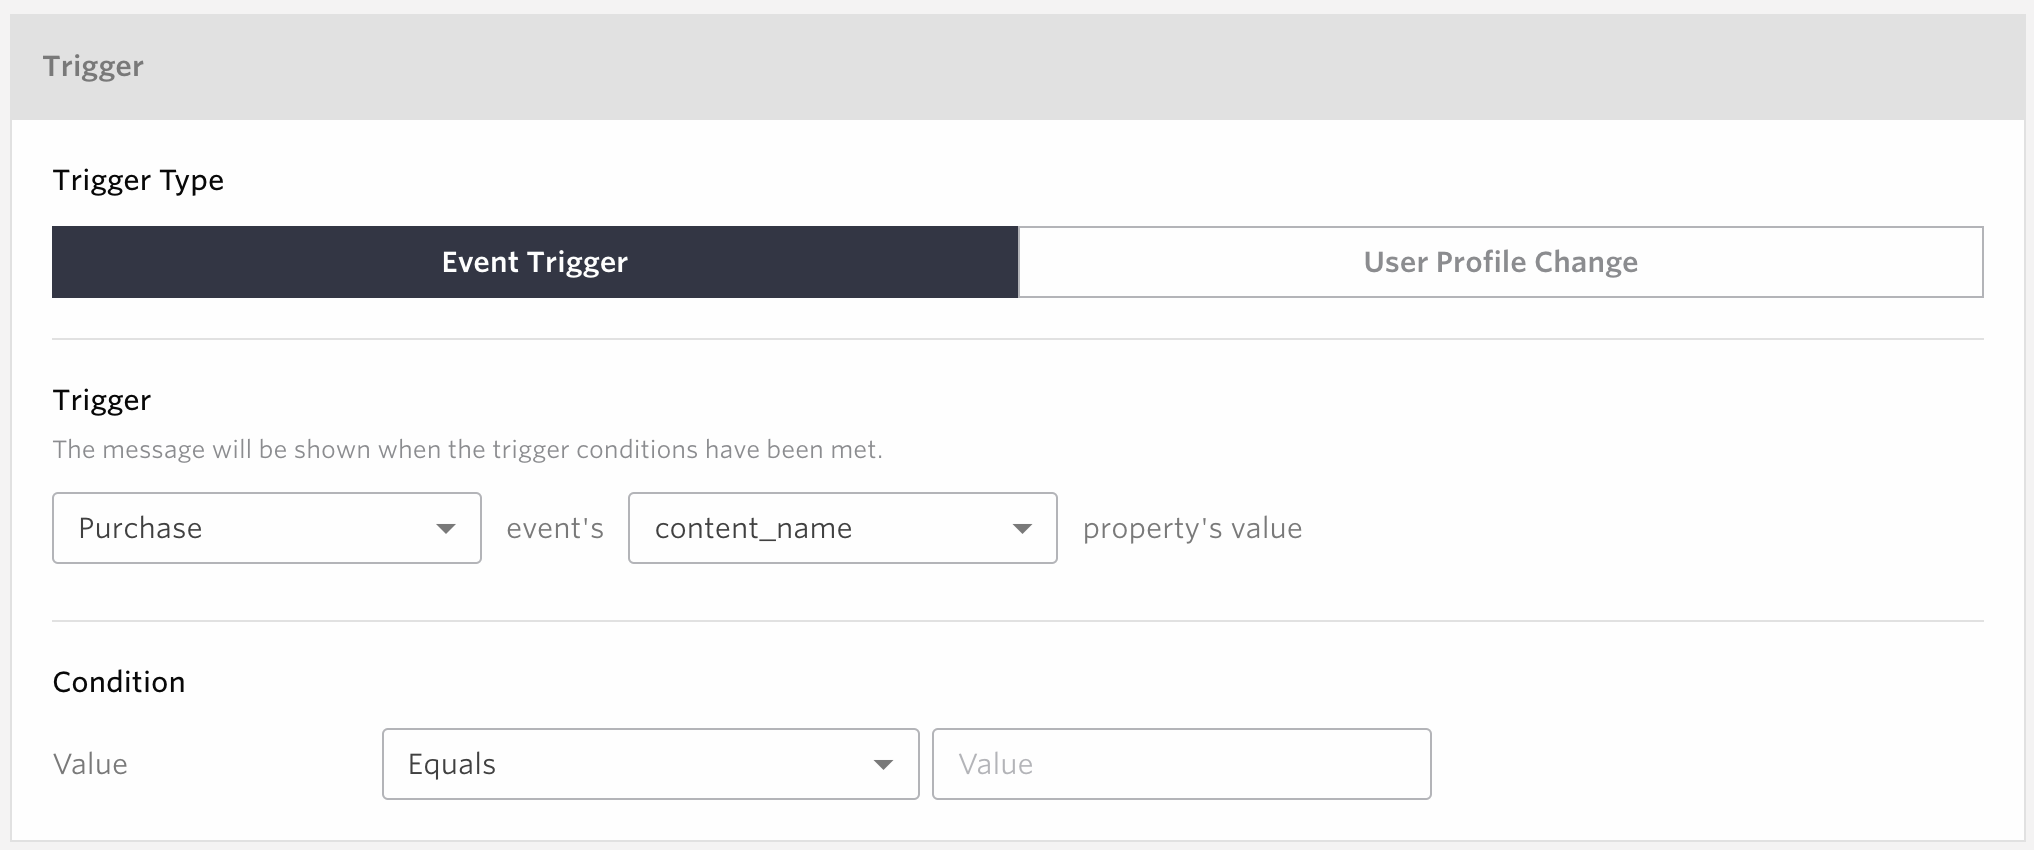
- Trigger Type
Select Event Trigger
- Trigger
Select an event from the first list.
Select the key for an event property from the second list.
- Condition
Specify the value for the condition of event property
The comparing method can be chosen from either “equals”, ”does not equal”, ”is any of”, ”is more than or equals (number)”, ”is less than or equals (number)”, or ”contains (text)”
Warning
If the event property has decimal values, comparing it with “equals” or “does not equal” may cause the message not triggered because of rounding.
Trigger messages by the value of event property
Trigger the display of message when the User Profile is set to the specified value.
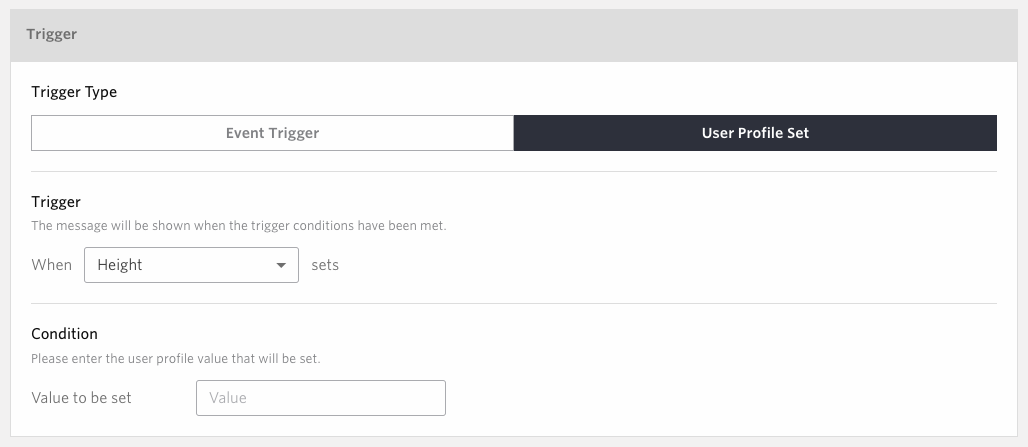
- Trigger Type
Select User Profile Set
- Trigger
Specify the User Profile.
- Condition
Value to be set
Specify the value to be set.
It triggers only when the value matches.
You cannot specify the value before setting in the condition.
Even if the value is set to the same value as before, it still triggers when the value matches the condition.
Note
User Profiles which were registered as “date” can not be selected.
Warning
For iOS SDK version 5.22.0 and Android SDK version 5.20.6 or earlier, the trigger will execute even if a matching value is set via conditional set operation for user profiles, or if the user profile increment/decrement value matches the set value. Please be aware.
Note
From iOS SDK version 5.22.1 and Android SDK version 5.20.7 onwards, the trigger will not fire even if a matching value is set via conditional set operation for user profiles, or if the calculation result matches via user profile increment/decrement.
Select Target

You can target all users or a segment of users by filtering with events or user profiles with the filters. The filters can be combined as either and , and not, or condition up to 5 in total.
and: Add the users to the delivery target who match all the specified condition.
and not: Exclude the users from the delivery target who match the specified condition.
or: Add the users to the delivery target who match any of the specified condition.
For example:
When delivering to users who have used the app 3 days ago, but have not done so for 2 days since then

When delivering to users whose gender is female and have performed either Event A or Event B within the last 3 days

Filtering with audiences
You can segment the target by using existing audiences created as explained in Audience
Note
Filtered Audience: This audience cannot be combined with other filtering conditions.
Import Audience: This audience can be combined with other filtering conditions.
Filter with Events
You can segment the target by the usage of the events, specifying how many times an event has been done within certain period.
Filter with Event Property
You can segment the target by the usage of the events and its associated properties, specifying the property name, value, and how many times an event has been done within a certain period.
Filter with User Profile
You can segment the target by registered user profile data. If you specify a numeric value for the profile type in SDK, you can use ‘greater than, less than’ etc. to specify the conditions under which the values are compared. If you specify characters, you can specify conditions for comparing values using ‘match, not match, include’ and so on. If a date is specified, the condition can be specified using ‘before Fat day, Fat day to day, before specific date,’ etc.
Please refer to the FAQ on the Support Site for a detailed explanation of date specifications.
All Users
A campaign will be delivered to all users regardless they are registered to Repro or not.If you use this filter, You can not use other filters at the same time .
Existing Users
The campaign will be delivered to all the existing users registered to Repro. If you wish to exclude users who match special conditions, please add desirable filters using combined as and not.
First-time Users
Deliver in-app message to users who have launched the app for the first time.
Note
Please note that the user will not be regarded as First-time if more more than a week has past since the app’s installation.
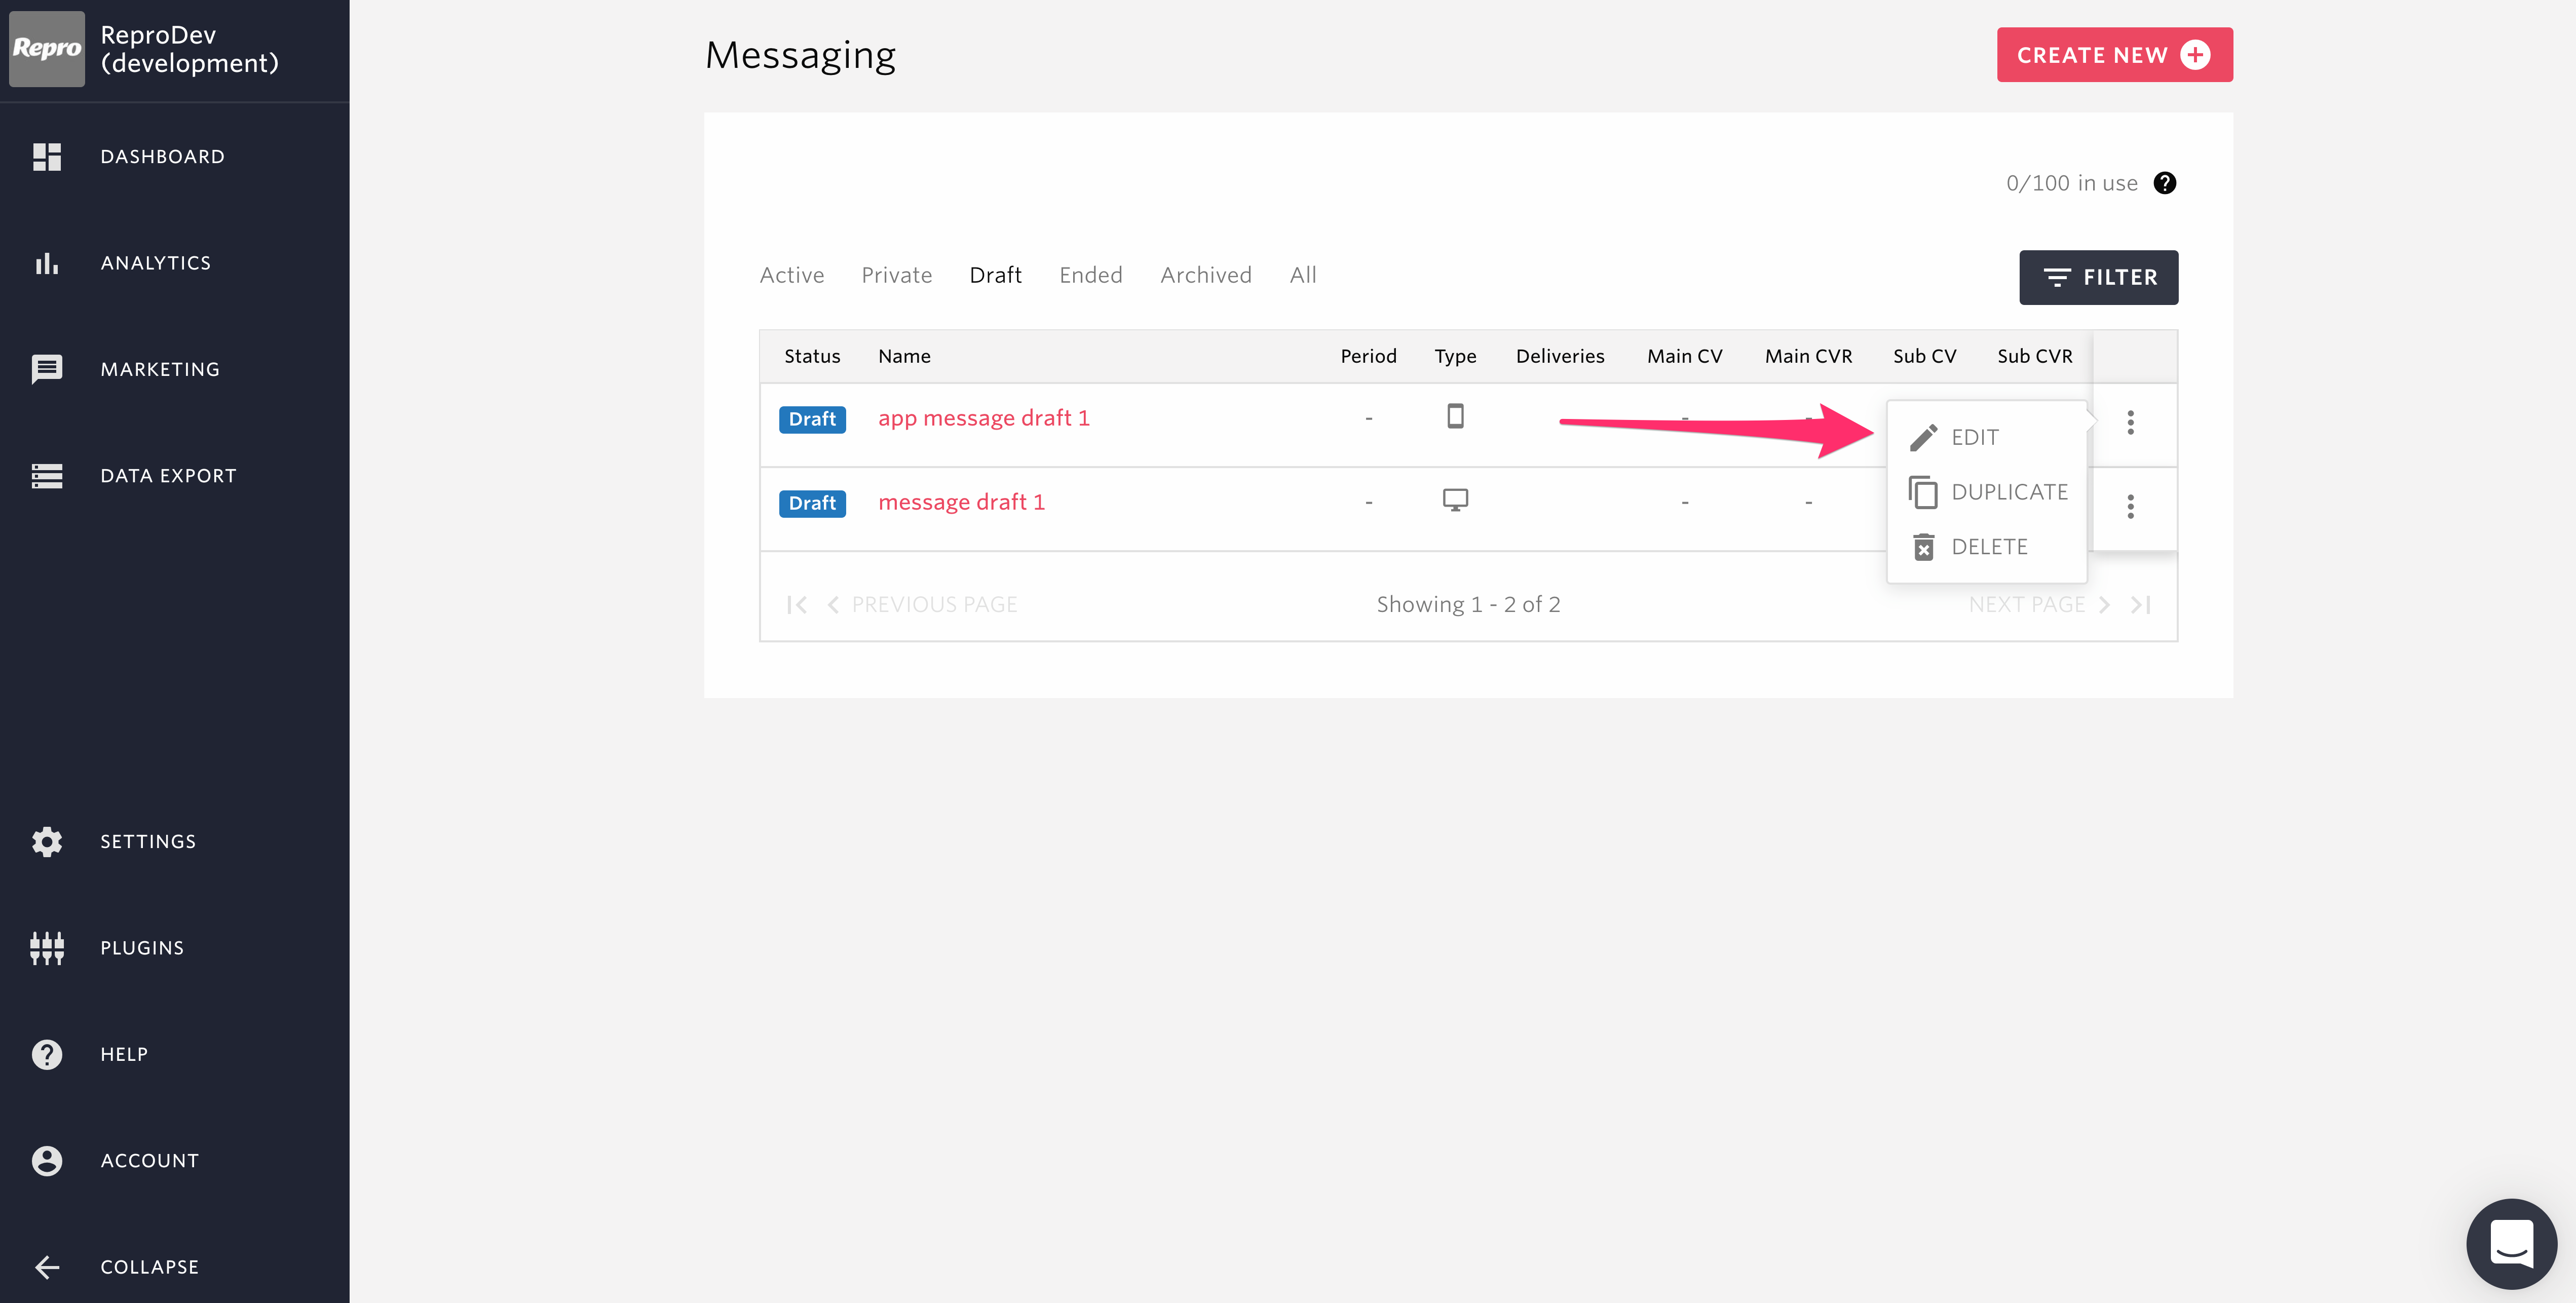
Save As Draft
To save an incomplete campaign, such as when all the required fields have not been filled out, please click the SAVE AS DRAFT button. For campaigns that are saved as draft, it is still possible to change all fields including the Campaign Goal and Variants.
You can access your drafted campaigns from the “Draft” tab on the Messaging homepage.
To Launch or Launch As Private
Before clicking the “LAUNCH” or “LAUNCH AS PRIVATE” button, please carefully check the contents of the campaign. After a campaign has been launched or launched as private, it is no longer possible to change the Campaign Goal or Variants.
Once your campaign is ready to be launched, please click the LAUNCH or the LAUNCH AS PRIVATE button.
Note
Every in-app message is displayed once per user. If the same user has multiple devices, once the message is shown on one device it will not be shown on the other one.
When the multiple campaigns are launched with the same trigger, the most recently updated message is displayed first.
Campaign Measurement
You can check the effectiveness of the campaigns.

Note
This screen will only be applied to campaigns that were created after 2016/10/14.
Delivery Result
- Impressions
Total number of users who saw the displayed message on a daily basis.
- Conversions
Number of total users who have performed the campaign goal event set from the creation page within 24 hours on a daily basis.
- Conversion Ratio
Number of conversions divided by impressions.
- Campaign Progress
Results of the impressions, opens and occurrence of the campaign goal event on a daily basis: Note that the results represent the number of users.
A/B Testing
A/B testing allows you to see what kind of content drives better conversion rate by delivering different patterns of the message to divided group of users.
You can also keep the most effective pattern from the A/B testing as the winner of the campaign and only delivery the selected variant.
Create Message
By composing a message with two or more variants, an A/B-Test can be performed.

You can create up to 4 different patterns.
Adding or removing message variants is not possible after a campaign has been saved.
Distribute Users Among Variants
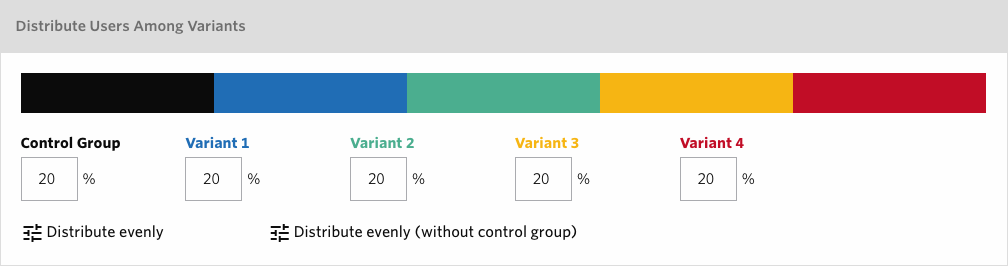
Distribution percentages can be individually adjusted when having more than 2 variants making the total 100%.
You can assign equal percentages to Control Group as well as each of the variants by clicking Distribute evenly, while Distribute evenly (without control group) will make Control Group 0% and make percentages even among multiple variants.
Note
Control Group’s percentage can be anything between 0% and 99%.
Each of the variants’ percentage can be anything between 1% and 100%.
Only integers can be set.
Changing the distribution settings is not possible after a campaign has been saved.
The actual number of impressions may fluctuate depending on the volume of the target user.
Campaign Measurement (A/BTest)
Details screen
You will see the results after a while from the delivery. The charts will show the number of deliveries, button clicks and the conversion rate of each of the patterns. Please see Analytics results aggregation for more details about when the campaign results will be updated.

Note
The overall numbers of Impressions, Opens, Conversions and Conversion Rate will exclude results of Control Group to make it easier to see how effective the campaign itself had been.
Users who belong to Control Group will not receive the message, so the results of Delivery, Button 1 Clicks and Button 2 Clicks will always be shown as -.
The number of Conversions of Control Group shows how many times the campaign goal event had been done among the users who belong to Control Group.
The number of Conversion Rate of Control Group is calculated dividing number of Conversions by the number of users who belong to Control Group.
Please note that the definition of Button Clicks slightly vary depending on the type of the message. Please refer to the below chart of each definition.
Message Type |
Definition of Button 1 Click |
Definition of Button 2 Click |
|---|---|---|
DIALOG |
Number of taps of Button 1 |
Number of taps of Button 1 |
DIALOG with Image Only layout |
Number of taps on the image |
None |
OVERLAY |
Number of taps of Button 1 |
Number of taps of Button 1 |
BANNER |
Number of taps on the banner area |
None |
During the A/B test, the results of the test will be displayed. Here, you will be able to compare the markers (Button1 CTR, Button2 CTR, CVR) that have selected different patterns, including the control group.

Pattern
Each pattern used to deliver the A/B test, including the control group, will be displayed here.
Baseline
Here, you will be able to select the baseline pattern that will be used as the standard when comparing each pattern. By changing the baseline, you will be able to compare between a variety of different patterns.
Targeted indicator
An indicator is used when comparing patterns to baselines in A/B tests. You can select a ratio value (i.e. Button1 CTR, Button2 CTR, CVR) as the indicator. Also, the indicators listed can be changed through the editing page.
90% confidence interval
The 90% confidence interval will be displayed when each pattern is compared to the baseline. For the definition of 90% confidence interval, please see the FAQ. Here, we will talk about the most common ways to recognize patterns.
Pattern 1:

When displayed as such, it means that the difference between the pattern and the baseline is significant. We recommend moving onto the winner pattern if enough time has passed since delivery.
Pattern 2:

When displayed as such, it means that the difference between the pattern and the baseline is not significant. Either wait until the results appear or consider moving on to the next campaign if enough time has passed since the delivery.
Pattern 3:

When displayed as such, it means that the difference between the pattern and the baseline is significant. If this is the only window displayed, we recommend determining the baseline pattern as the winner pattern.
Pattern 4:

When displayed as such, it means that the difference can’t be calculated because there is no indicator value.
Note
Below is an example of when the winner pattern is selected from the A/B test significant difference results. The comparison results of the rest of each pattern will not be displayed.

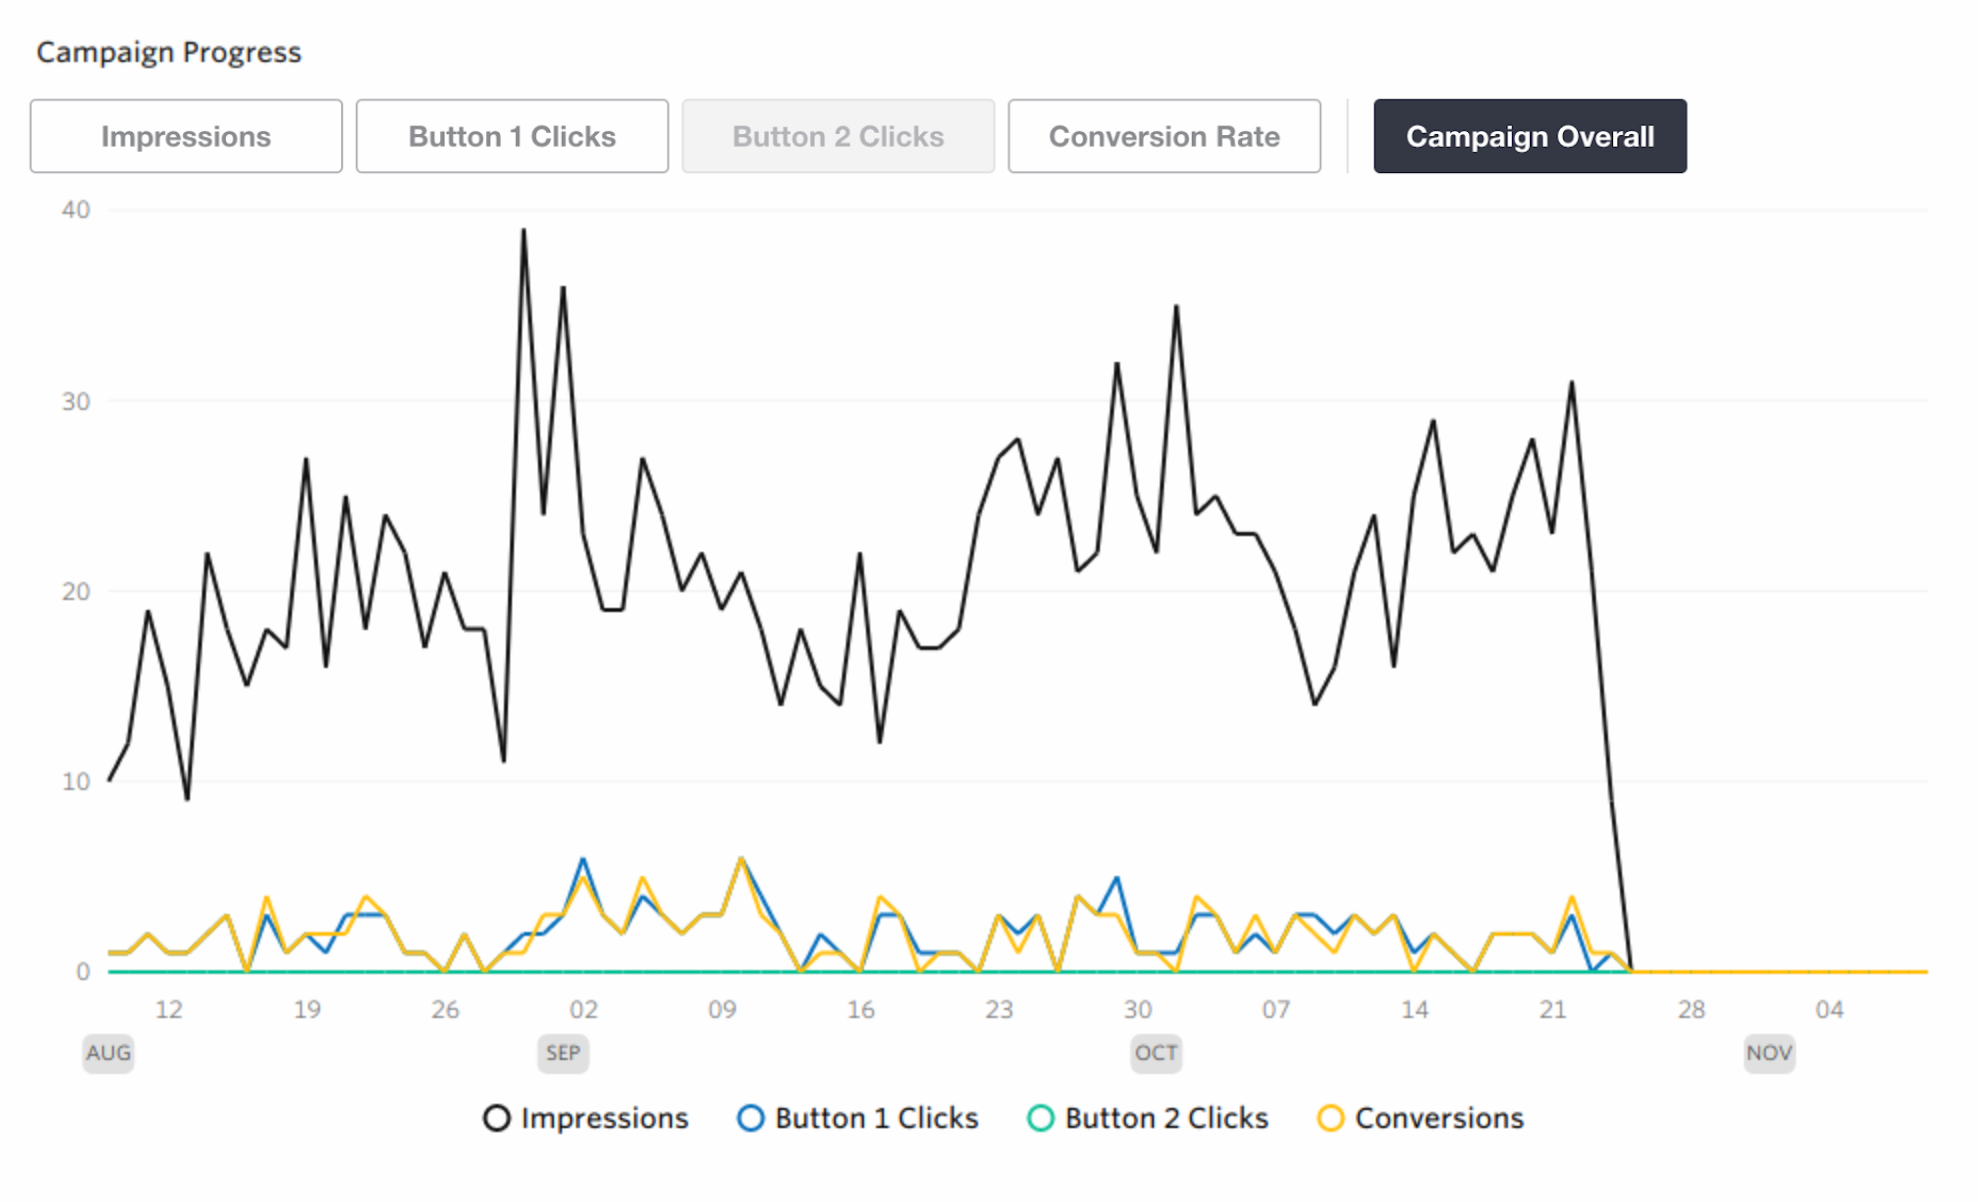
Campaign Progress
The graphs show patterns of Button1 CTR, Button2 CTR, Main CVR, Sub CVR for in-app message.
Status List Screen
You will be able to check the status of the A/B test for each campaign here, when the operating campaign is either live or not. Icon display conditions are as follows.
Icon |
Display conditions |
|---|---|
|
A significant difference exists, and the results of the pattern exceed the baseline at least once |
|
A significant difference exists, and the results of the pattern are only of ones that fall below the baseline |
|
Only patterns without significant difference |
|
If all patterns can’t be calculated |
|
If winning pattern is already selected |
|
When either the targeted indicator or the baseline pattern of the A/B test is not set |
ー |
When the campaign is not conducting A/B test |


Note
In the instance of a campaign that has a significant difference with the baseline having both exceeding and falling below results, it will be displayed as the results of the pattern with at least one exceeding the baseline.
For questions, please visit the FAQ.
Select the winner
Once you select the winner, all after deliveries of the same in-app message will be using the selected pattern to all target users.