Push Notification
Push notifications are a feature that allows notifications to be sent even if the user does not have the application running. This makes it suitable for use in improving retention rates and returning dormant users.
Enable Push Notification
Before push notifications can be sent out, you must configure settings to use push notifications. The settings will vary depending on your environment.
iOS
Android
Unity
Cordova
Monaca
Cocos2d-x
React Native
Flutter
Create Push Notification
Now create a push notification. Click on [MARKETING] > [PUSH NOTIFICATIONS].

When the Push Notification List screen appears, click [CREATE NEW]

The Scenario Creation screen will appear.

The following is a description of each setting item.
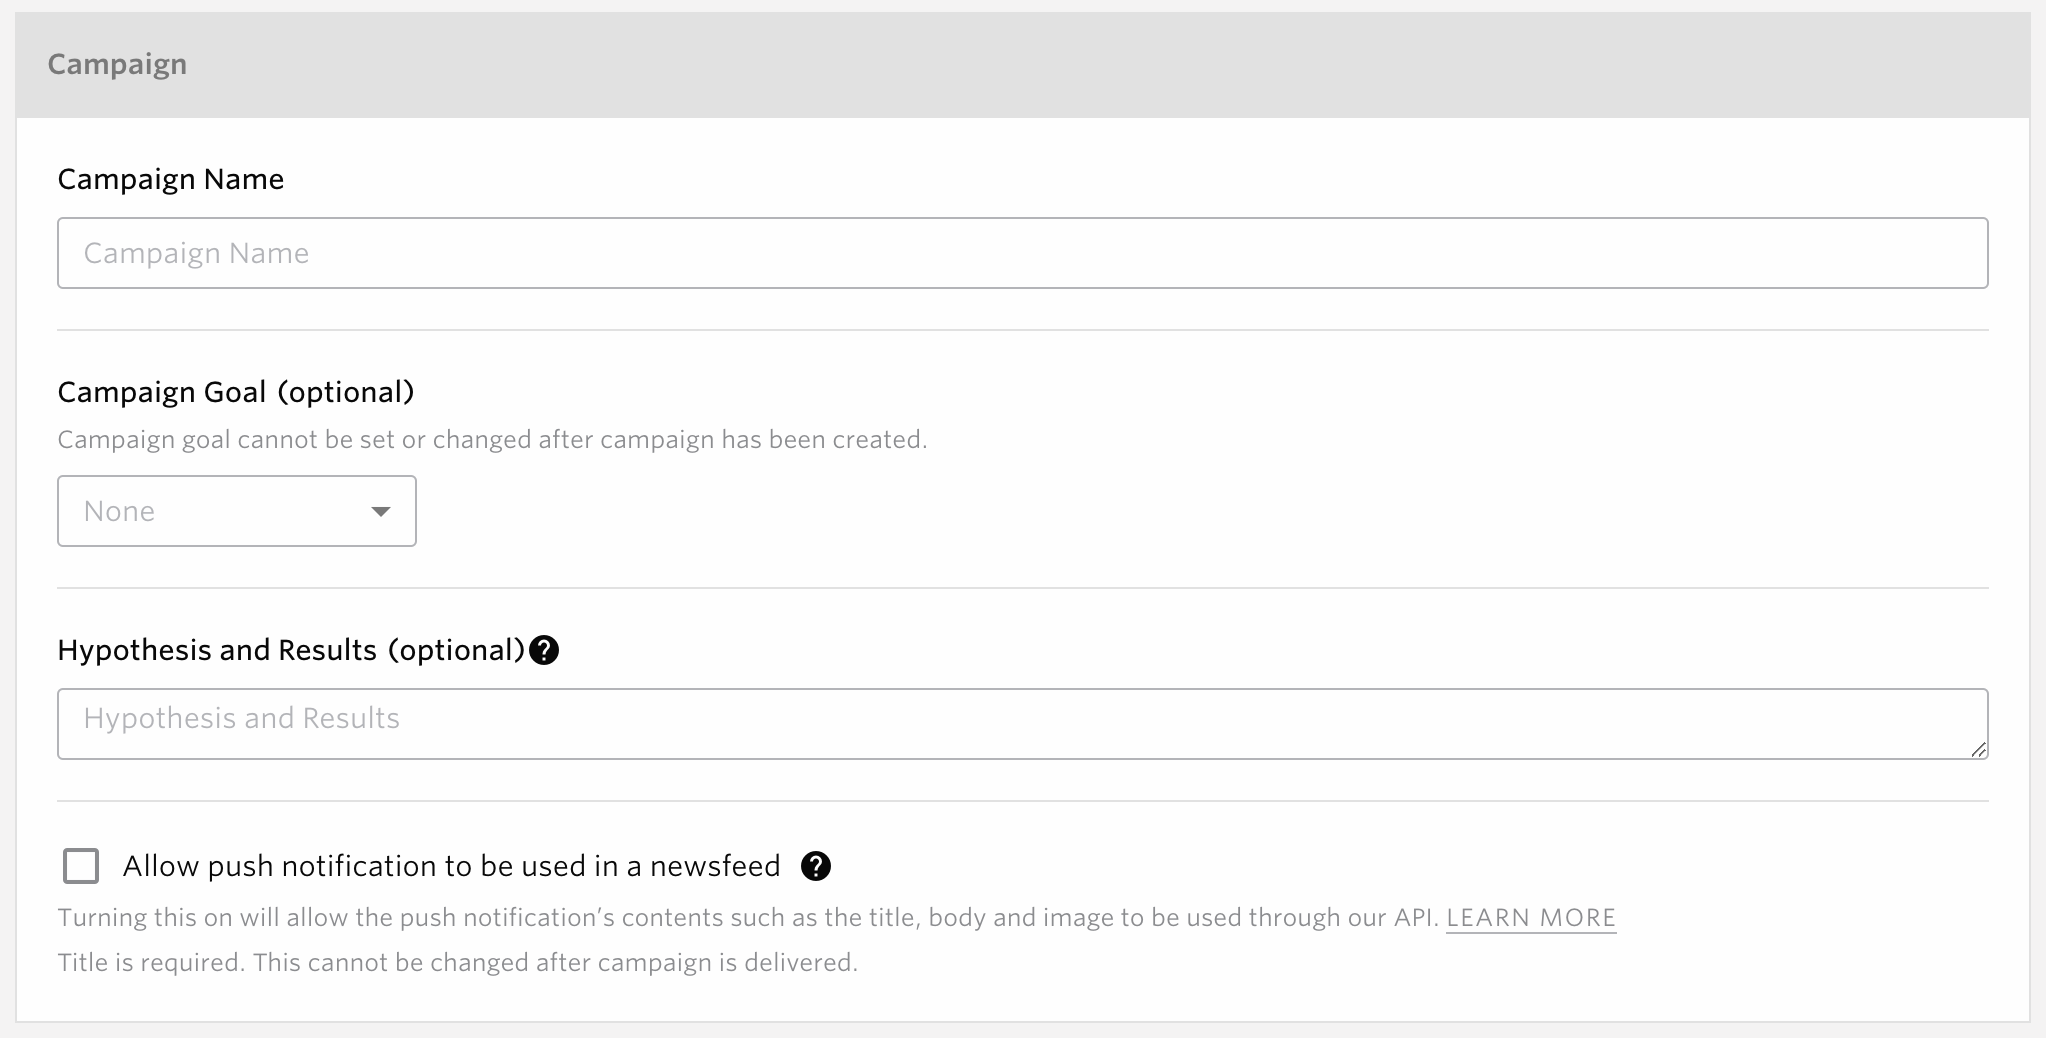
Campaign
items |
Description |
|---|---|
Campaign Name |
Set the name for the new campaign. This name can be seen from the list of push notifications. |
Campaign Goal(optional) |
Designate an event as your campaign goal. This will represent the number of users who have participated in the event within one hour from the time of Delivery Result the push notification.
When using the Original template, select the display type. See web-message-position for more details.
|
Hypothesis and Results |
Enter the aims of the campaign and the results after implementation. This information can be viewed as a memo on the Effectiveness Measurement screen.
|
Allow push notification to be used in a newsfeed |
If checked, the created campaign can be used as a news feed.
The Newsfeed is a history of campaigns which each user has ever received. Using those histories, for instance, you can show the contents of push notifications which you have sent to users so far in your app’s notification screen.
The application needs to be implemented for use. See NewsFeed for details.
|
Message
There are two patterns of message settings depending on the Push notification type selected. Each is described below.
Message(Standard)

items |
Description |
|---|---|
Variants |
Select a variants.
Click [Add] to add and duplicate variants.
Variants are used to perform A/B testing. See Use case: Implementation of A/B testing for details.
|
Title(optional) |
Set the title of the message. The name of the app will be shown when this is left blank.
If you check “Allow push notification to be used in a news feed”
Title is required.
|
Message |
You can create common, generic message with this option. |
Rich Notification Media(optional) |
You can attach rich media content such as image, video or audio to the message.
Image
Supported file formats: JPEG, PNG and GIF
File size
Image size
Aspect ratio: 2:1
Width: Between 1280px and 3000px
Animated GIF is only supported for iOS.
Either upload image file, or select an image file URL that is hosted by your original server
Video
Either upload image file, or select an image file URL that is hosted by your original server
Videos can only be delivered on iOS.
Audio
Either upload image file, or select an image file URL that is hosted by your original server
Audio is only supported for iOS.
Points to note when filling in the URL
URLs that start with
https:// are allowed. Please note that we do not support URLs that start from http://. |
Deep Link or Web URL(optional)** |
If you set up a deep link or URL, the SDK will automatically open that address when the end user taps on the notification.
If a deep link is specified: Opens a specific page in the app (requires implementation on the app side).
If URL is specified: Open the web page in a browser.
If not specified, the application is launched normally.
The maximum string length is 1000 characters.
Deep Link
The following three types of deep linking are supported.
Universal Link
App Link
Custom URL Scheme
If you want to specify universal and application links, please check When using Universal Link (iOS) or App Link (Android) for deep linking
|
Additional Options |
Show badge icon
If you want to show a badge which indicates that the app has received a notification, turn on Show badge icon checkbox. Note that the badge can only show the number 1 using this feature. If you want to customize the numerical value of the badge, please use the Custom JSON format. You need Removing the push notification badge from your app icon if you wish to clear the badge after it’s shown.
Use custom sound for this push notification
If checked, custom sounds are available for notifications.
Enter a sound file name in the text field that appears when the checkbox is checked. If no file name is entered, the iOS system sound will be used.
|
Preview Type |
Choose iOS or Android preview. |
Preview |
Displays the preview selected in Preview. |
When using Universal Link (iOS) or App Link (Android) for deep linking
Universal links (iOS) and application links (Android) can also be used for URL destinations. If you wish to use them, please take the following actions.
Update Repro SDK to iOS SDK 5.9.0/Android SDK 5.7.0 or higher.
If the version is old, please update to the latest version with reference to the following.
Android:Android SDK Upgrade Guide
Implement processing for universal/application links in the SDK.
To add universal link/application link processing in your app, you must implement it. Please refer to the following document for implementation.
Android: Option: Using App-Links
For apps that have completed the above implementation, universal links and app links can be used as transition destinations by describing the universal link/app link in the Deep Link or URL field.
Note
For more information, see Support Site
Rich notification media
Please note the following when using rich notification media.
Note
Rich notification media attachment is only available for iOS 10 and above and Android 4.1 and above. OS versions older than this will only show the message of the campaign.
iOS: Additional setup is required to deliver notifications with rich media attachment. Please see Option: setup to receive Rich Notification for more details.
Android: The message may be truncated when delivered with media content.
Warning
Media attachments will be downloaded after the device receives the notification.
iOS: Only text will be displayed when the media download takes more than 30 seconds.
Android: The notification will not be displayed when the media download takes more than 5 seconds.
Message(Custom(JSON))
Use Custom (JSON) notification if you wish to delivery message with additional features such as notification badges, silent notifications or using custom payload.

items |
Description |
|---|---|
Custom Payload (for iOS) |
Enter JSON for iOS |
Custom Payload (for Android) |
Enter JSON for Android |
Note
Android : Your application can receive Custom (JSON) format messages by using Option: customize the behavior when receiving messages.
Android: For Android, within “data” in JSON, you can specify only strings for key-value pairs. For more details, please check the FCM documentation
Customize icon
The icon shown in preview page is taken from the one you set in the [SETTINGS] > [PROJECT SETTINGS] > [General]. This won’t be used in your app actually.
iOS : The default icon of your app will be used.
Android : You can specify the icon for Android app. See Customize Icon and Background Color for more details.
Note
For items with the “INSERT VARIABLE” button, you can insert user profile values using Liquid notation. For details, see Personalization with Liquid.
Distribute Users Among Variants
Target Users are allocated to the control group and Pattern 1.

items |
Description |
|---|---|
Control Group |
Can be specified in the range of 0% ~ 99%. |
Pattern 1: |
The scroll rate can be specified from 1% to 100%. |
Distribute evenly |
Click to evenly distribute the control group and pattern 1 by 50%. |
Distribute evenly (without control group) |
Control Group’s percentage can be anything between 0% and 99%. |
For example, when sending to Existing Users with Control Group set to 20% and Variant 1 to 80%, 80% of the users randomly chosen from all of the existing users will receive the notification while the 20% rest will not.
Note
Only integers can be set.
Changing the distribution settings is not possible after a campaign has been saved.
The actual number of message delivery may fluctuate depending on the volume of the target user.
See Use case: Implementation of A/B testing for information on how to set up a situation where the number of patterns is increased to three or more.
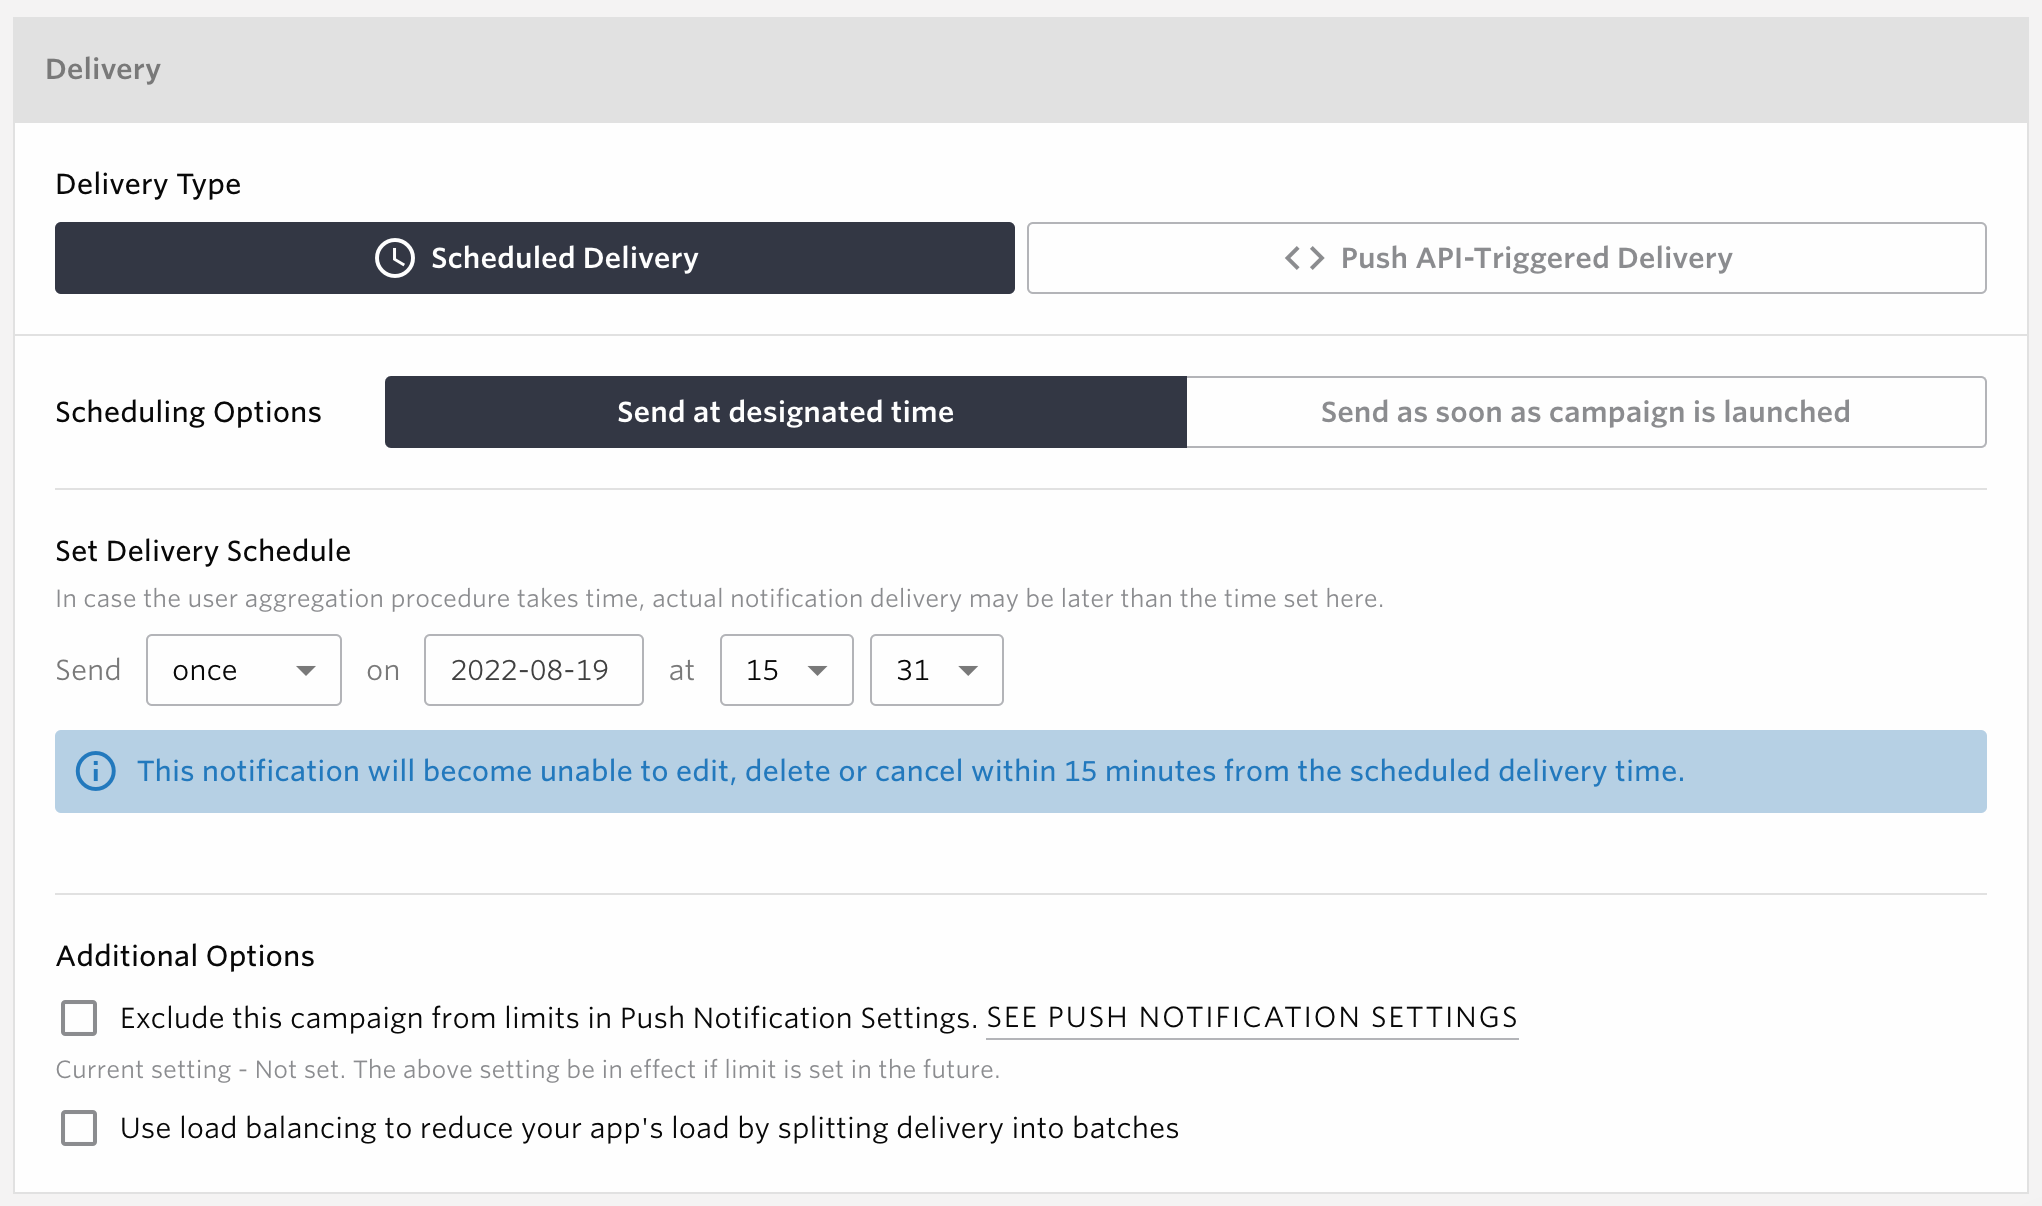
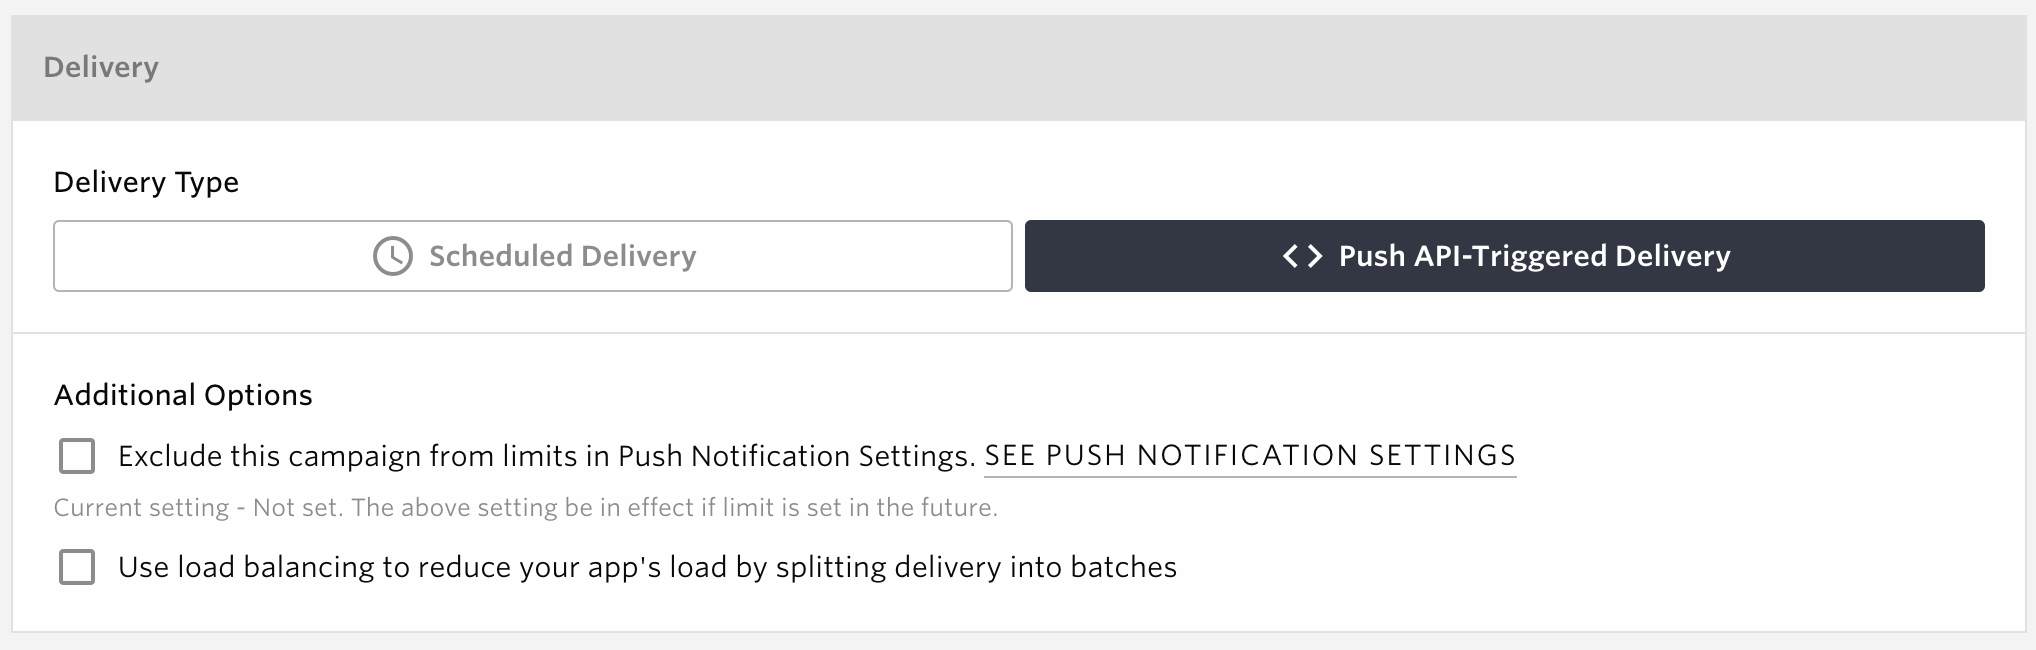
Delivery Type
There are two types of delivery, each is described below.
Delivery
Deliver push notification from dashboard. You can specify the schedule Delivery.
items |
Description |
|---|---|
Scheduling Options |
Select either Send at designated time or Send as soon as campaign is launched. |
Set Delivery Schedule |
This can be specified only when Send at designated time is selected.
Set the delivery period.
|
Additional Options |
If checked, notifications will be divided and delivered at regular intervals. |
Scheduling options are as follows:
Type |
Feature |
Usage |
|---|---|---|
Once |
Send a one-time notification as soon as possible |
Choose Send as soon as campaign is launched
|
Once |
Send a one-time notification at designated time |
Choose Send at designated time
Set delivery schedule as “Send once at 2016-05-23 10:00”
|
Recurring |
Send a recurring notification daily at designated time |
Choose Send at designated time
Set delivery schedule as “Send daily at 10:00 Starts on 2016-05-23 Ends on 2016-06-23”
Turn the No End Date checkbox on if you do not wish to specify the end date.
|
Recurring |
Send a recurring notification weekly at designated time |
Choose Send at designated time
Set delivery schedule as “Send weekly on Monday at 10:00 Starts on 2016-05-23 Ends on 2016-06-23”
Turn the No End Date checkbox on if you do not wish to specify the end date.
|
Recurring |
Send a recurring notification monthly at designated time |
Choose Send at designated time
Set delivery schedule as “Send Monthly on 1 at 10:00 Starts on 2016-05-23 Ends on 2016-06-23”
Turn the No End Date checkbox on if you do not wish to specify the end date.
|
Delivery(Push API-Triggered Delivery)
Deliver push notifications using our Push API. The API token will be generated after you save the push notification. Please read Push API for more details.
Target Users

You can target all users or a segment of users by filtering with events or user profiles with the filters. The filters can be combined as either and , and not, or condition up to 5 in total.
items |
Description |
|---|---|
and |
and: Add the users to the delivery target who match all the specified condition. |
and not |
and not: Exclude the users from the delivery target who match the specified condition. |
or |
or: Add the users to the delivery target who match any of the specified condition. |
Note
The delivery target setting can be set only when Send at designated time is selected in the delivery settings.
Filters
The available filters are as follows

items |
Description |
Caution |
|---|---|---|
Audience |
You can segment the target by using existing audiences created as explained in Audience |
|
Custom Event |
You can segment the target by the usage of the events, specifying how many times an event has been done within certain period. |
|
Event Property |
You can segment the target by the usage of the events and its associated properties, specifying the property value within certain period.
You can specify the name of the property, its value, how many times it has been run, and the period of time during which it was run.
|
|
User Profile |
You can segment the target by registered user profile data. If you specify a numeric value for the profile type in SDK, you can use ‘greater than, less than’ etc. to specify the conditions under which the values are compared. If you specify characters, you can specify conditions for comparing values using ‘match, not match, include’ and so on. If a date is specified, the condition can be specified using ‘before Fat day, Fat day to day, before specific date,’ etc.
Please refer to the FAQ on the Support Site for a detailed explanation of date specifications.
|
|
Existing Users |
The campaign will be delivered to all the existing users registered to Repro. If you wish to exclude users who match special conditions, please add desirable filters using combined as and not. |
Filter Usage Examples
Here are some examples of filter usage.
When delivering to users who have used the app 3 days ago, but have not done so for 2 days since then

When delivering to users whose gender is female and have performed either Event A or Event B within the last 3 days

SAVE AS DRAFT, LAUNCH AS PRIVATE, LAUNCH

items |
Description |
|---|---|
SAVE AS DRAFT |
Clicking Save as Draft will save the push notification you created without delivering it.
To save an incomplete campaign, such as when all the required fields have not been filled out, please click the SAVE AS DRAFT button. For campaigns that are saved as draft, it is still possible to change all fields including the Campaign Goal and Variants.
If you save as a draft, you can change the campaign goal or message pattern later.
You can access your drafted campaigns from the Draft tab on the Push Notifications homepage.
|
LAUNCH AS PRIVATE |
Make the created push notification private. Push notifications will not be sent when private. |
LAUNCH |
When you publish your campaign, push notification delivery starts at the specified date and time. |
Note
Before clicking the “LAUNCH” or “LAUNCH AS PRIVATE” button, please carefully check the contents of the campaign. After a campaign has been launched or launched as private, it is no longer possible to change the Campaign Goal or Variants.
Once your campaign is ready to be launched, please click the LAUNCH or the LAUNCH AS PRIVATE button.
Warning
When the delivery of push notifications is delayed by more than 30 minutes, because of excessive server loads or critical server site problems, then the processing will be automatically stopped to prevent the sending of notifications at unexpected times.
When the delivery of push notifications is interrupted, you will receive a notification via email. The delivery of push notification will be interrupted in the following cases:
When a invalid APNs certificate or FCM / GCM API Key was entered.
When the data point usage reaches the upper limit.
Whe the delivery is delayed by more than 30 minutes, because of excessive server loads or critical server site problems.
When the delivery process is stopped, the delivery results will be 0.
FCM has a default quota of 600,000 messages per minute, which limits the delivery rate. If you need to send messages beyond this quota, please review the requirements in the official FCM documentation and submit a quota increase request.
https://firebase.google.com/docs/cloud-messaging/throttling-and-quotas?hl=en
Push Notification Result
You can check the results of push notifications.
Click on [MARKETING] > [PUSH NOTIFICATIONS] and click on the campaign name displayed in the push notification list screen.

Delivery Result
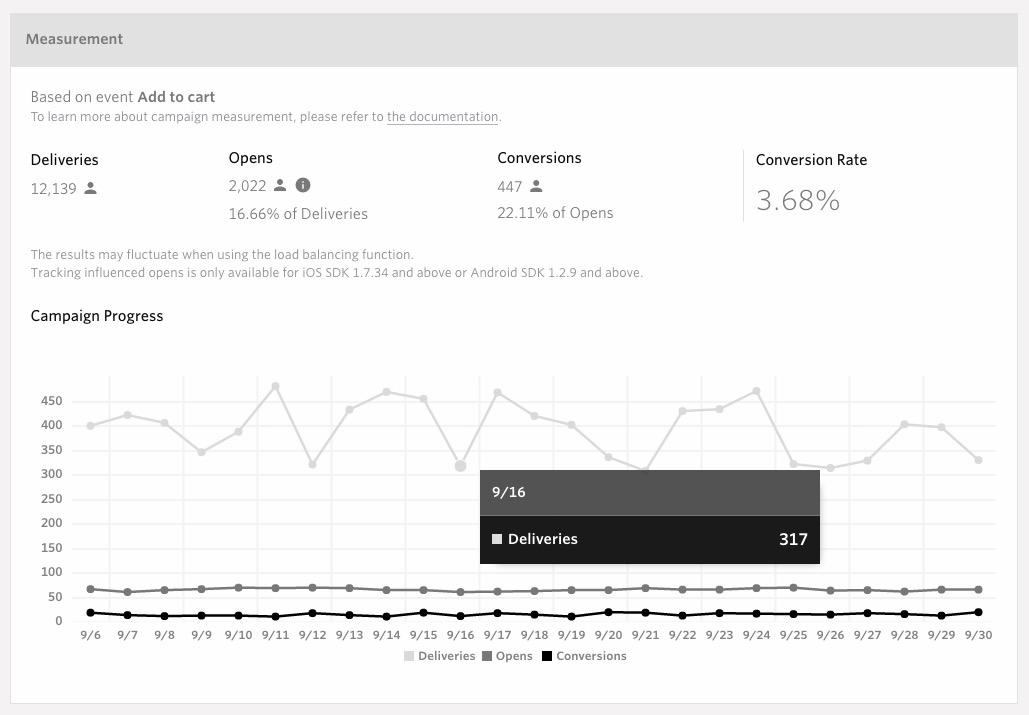
You can check how effective the push notification was by confirming the number of openings and conversions.
items |
Description |
|---|---|
Send Count |
The number of requests from the Repro server to APNs and FCM that were successfully accepted among push notifications forusers with push notification permission ON.Aggregates the number of unique users on a daily basis. |
Open Count |
Number of total users who have opened the campaign on a daily basis. This includes both direct and influenced opens.
Influenced Opens
Number of users who have activated the app within 1 hour from the delivery of the notification.
Direct Opens
Number of users who have activated directly from the push notification.
|
Conversions |
The number shows the daily total of users who have achieved the goal designated in the creation page within one hour of “opening” the push notification.
“Opening” can mean two things: influenced opens and direct opens.
|
Conversion Rate |
Number of conversions divided by deliveries. |
Campaign Progress |
Results of the deliveries, opens and occurrence of the conversion event on a daily basis: Note that the results represent number of users. |
Note
If the app is launched when the notification is tapped within an hour of delivery, it will only be counted as a direct open and not an influenced open.
Use case: Implementation of A/B testing
Next, we will show you an actual example of using push notifications. This time, we will explain how to implement A/B testing.
A/B testing allows you to see what kind of content drives better open rate or conversion rate by delivering different patterns of the message to divided group of users.
You can also keep the most effective pattern from the A/B testing as the winner of the campaign and only delivery the selected variant with recurring push notifications.
Create Message
By composing a message with two or more variants, an A/B-Test can be performed.
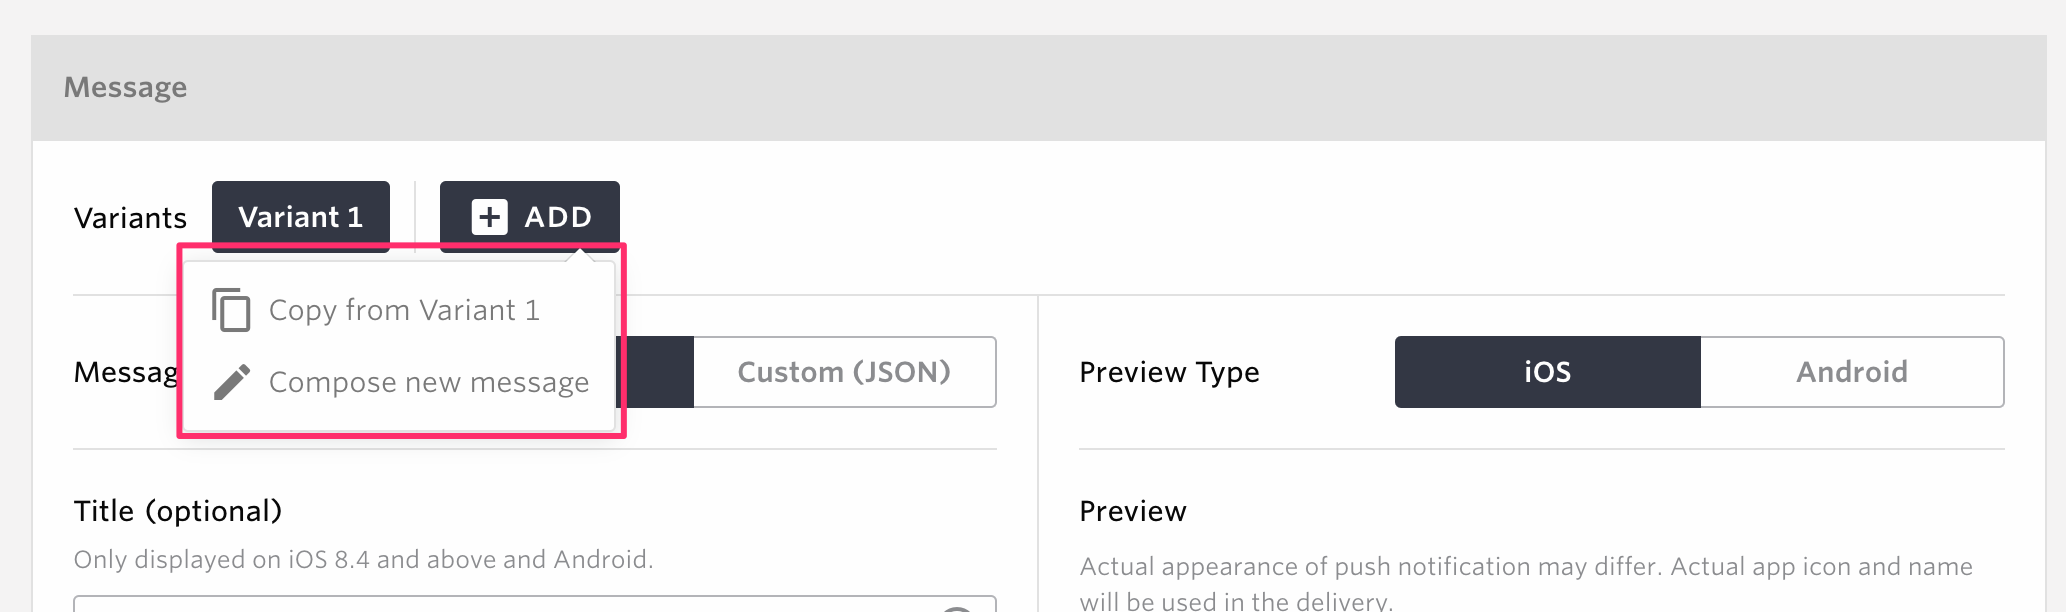
From the Create Push Notification screen, click Add for the pattern.

opy from Variant1 and Compose new message” will appear. Click on the desired creation method.
items |
Description |
|---|---|
Copy from Variant1 |
Duplicate the same content as in Variant1. |
Compose new message |
Create Message |
Variant2 will be created.

Click the X on the right side of Variant2 to delete the pattern.
Note
You can create up to 4 different patterns.
Please note that A/B testing can’t be used together with API Push.
Adding or removing message variants is not possible after a campaign has been saved.
Distribute Users Among Variants

Distribution percentages can be individually adjusted when having more than 2 variants making the total 100%.
Note
Control Group’s percentage can be anything between 0% and 99%.
Each of the variants’ percentage can be anything between 1% and 100%.
Only integers can be set.
Changing the distribution settings is not possible after a campaign has been saved.
The actual number of message delivery may fluctuate depending on the volume of the target user.
Campaign Measurement (A/BTest)
Delivery Result
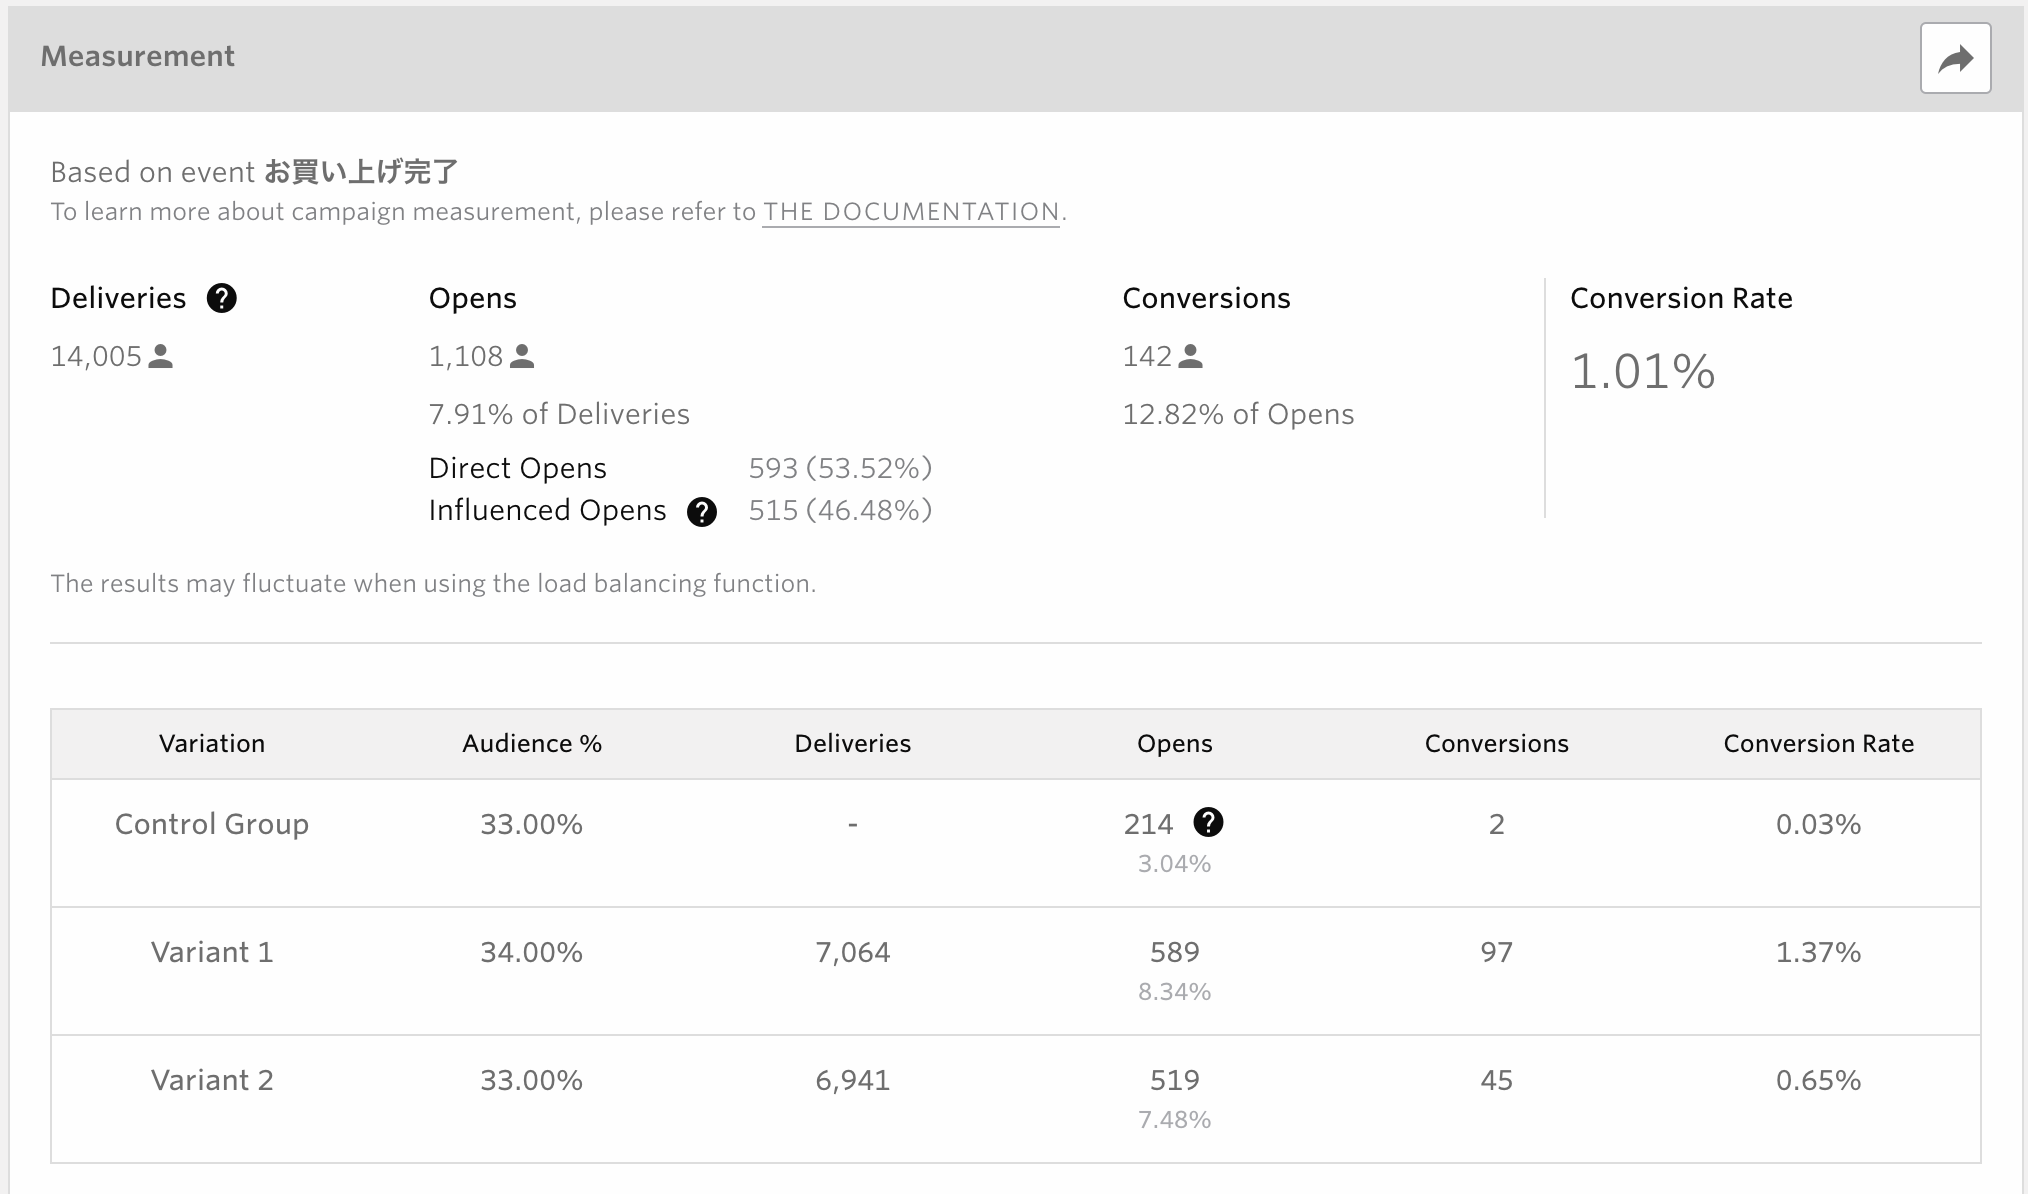
You will see the results after a while from the delivery. The charts will show the open rate and the conversion rate of each of the patterns.
items |
Description |
|---|---|
Variants |
Displays the Variants name. |
Audience |
Number of audiences in %. |
Send Count |
Displays the number of deliveries. |
Open Count |
Displays the number of openings. |
Conversions |
Displays the number of conversions. |
Conversion Rate |
Display the conversion rate. |
Note
The overall numbers of Deliveries, Opens, Conversions and Conversion Rate will exclude results of Control Group to make it easier to see how effective the campaign itself had been.
Users who belong to Control Group will not receive the notification, so the results of Delivery will always be shown as -.
The number of Opens of Control Group shows how many users launched the app within an hour from the notification delivery.
The number of conversions in the control group displays the number of app launches within one hour of the push notification delivery and the number of goal events set for the campaign that occurred within one hour of the app launch.
The numbers of Open Rate and Conversion Rate of Control Group are calculated dividing number of Opens or Conversions by the number of users who belong to Control Group.
A/B Test Significant Difference Measured Results
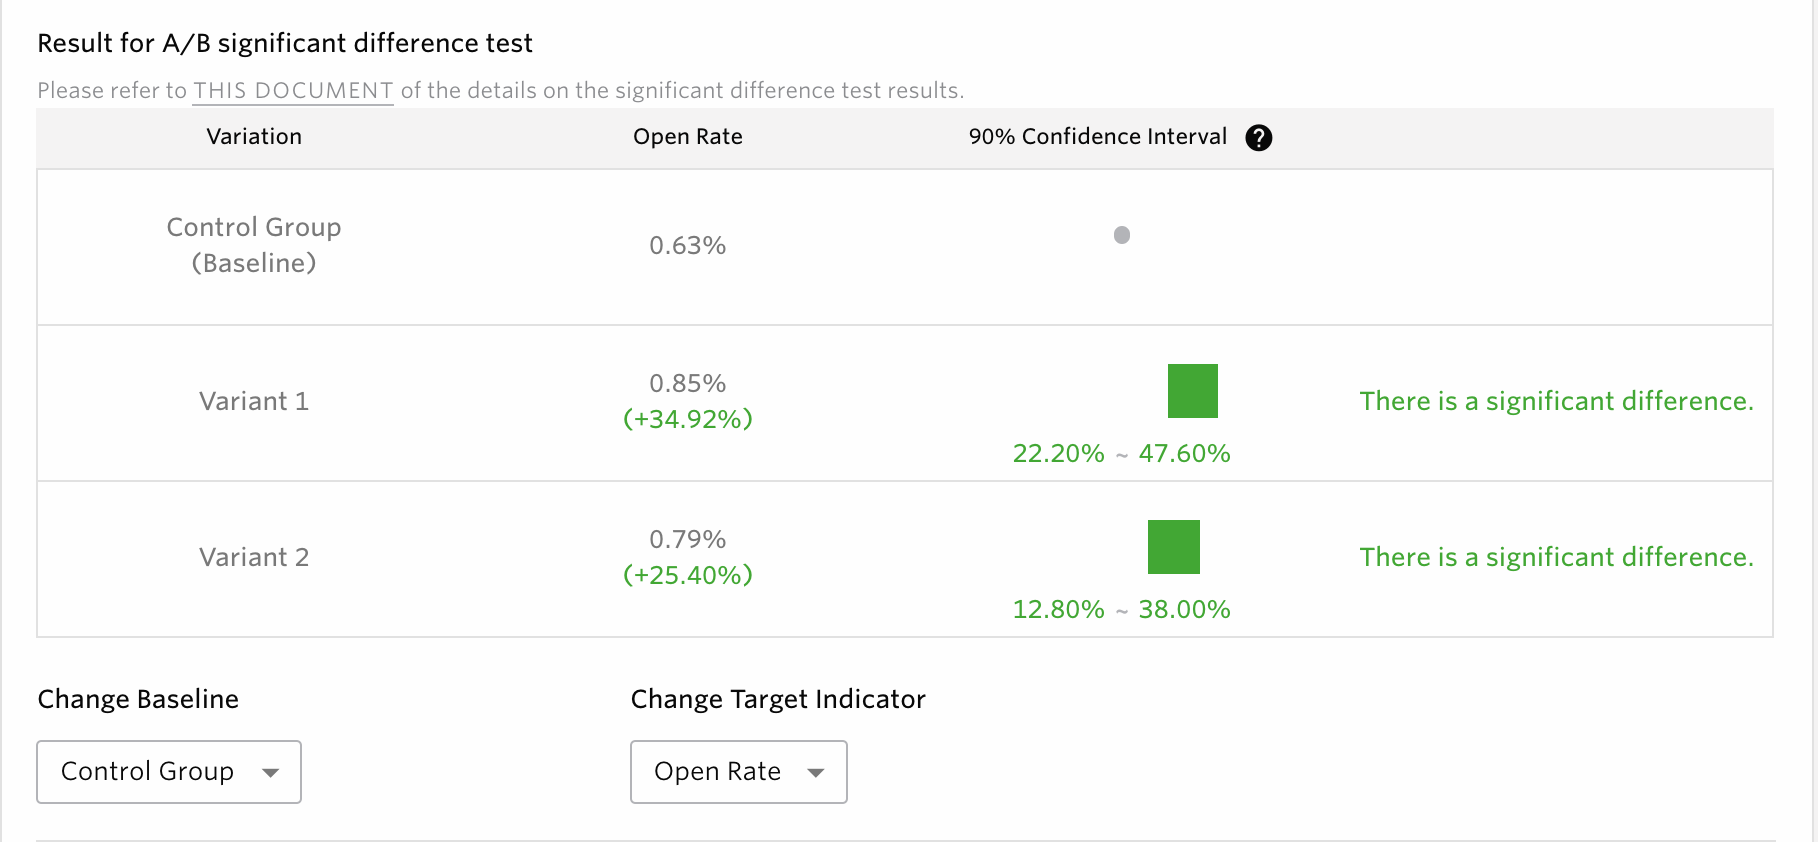
During the A/B test, the results of the test will be displayed. Here, you will be able to compare the markers (CVR, open rate) that have selected different patterns, including the control group.
items |
Description |
|---|---|
Variants |
Each pattern used to deliver the A/B test, including the control group, will be displayed here. |
Open Rate |
Displays the percentage of openings. |
90% Confidence Interval |
The 90% confidence interval will be displayed when each pattern is compared to the baseline. For the definition of 90% confidence interval, please see the FAQ. Here, we will talk about the most common ways to recognize patterns. |
Change Baseline |
Here, you will be able to select the baseline pattern that will be used as the standard when comparing each pattern. By changing the baseline, you will be able to compare between a variety of different patterns. |
Change Target Indicator |
An indicator is used when comparing patterns to baselines in A/B tests. You can select a ratio value (i.e. CVR, open rate) as the indicator. Also, the indicators listed can be changed through the editing page. |
Reference: Example of typical pattern reading of 90% confidence interval
This section shows how to read a typical pattern of 90% confidence intervals.
Example 1: Significant difference

When displayed as such, it means that the difference between the pattern and the baseline is significant. We recommend moving onto the winner pattern if enough time has passed since delivery.
Example 2: If there is still no significant difference

When displayed as such, it means that the difference between the pattern and the baseline is not significant. Either wait until the results appear or consider moving on to the next campaign if enough time has passed since the delivery.
Example 3: When there is a significant difference and a winning pattern is determined

When displayed as such, it means that the difference between the pattern and the baseline is significant. If this is the only window displayed, we recommend determining the baseline pattern as the winner pattern.
Note
Below is an example of when the winner pattern is selected from the A/B test significant difference results. The comparison results of the rest of each pattern will not be displayed.

Campaign Progress
Trends in A/B test results are displayed in graphs. Open Rate and Conversion Rate are displayed for each pattern.

Push notification list screen icon
You will be able to check the status of the A/B test for each campaign here, when the operating campaign is either live or not. Icon display conditions are as follows.
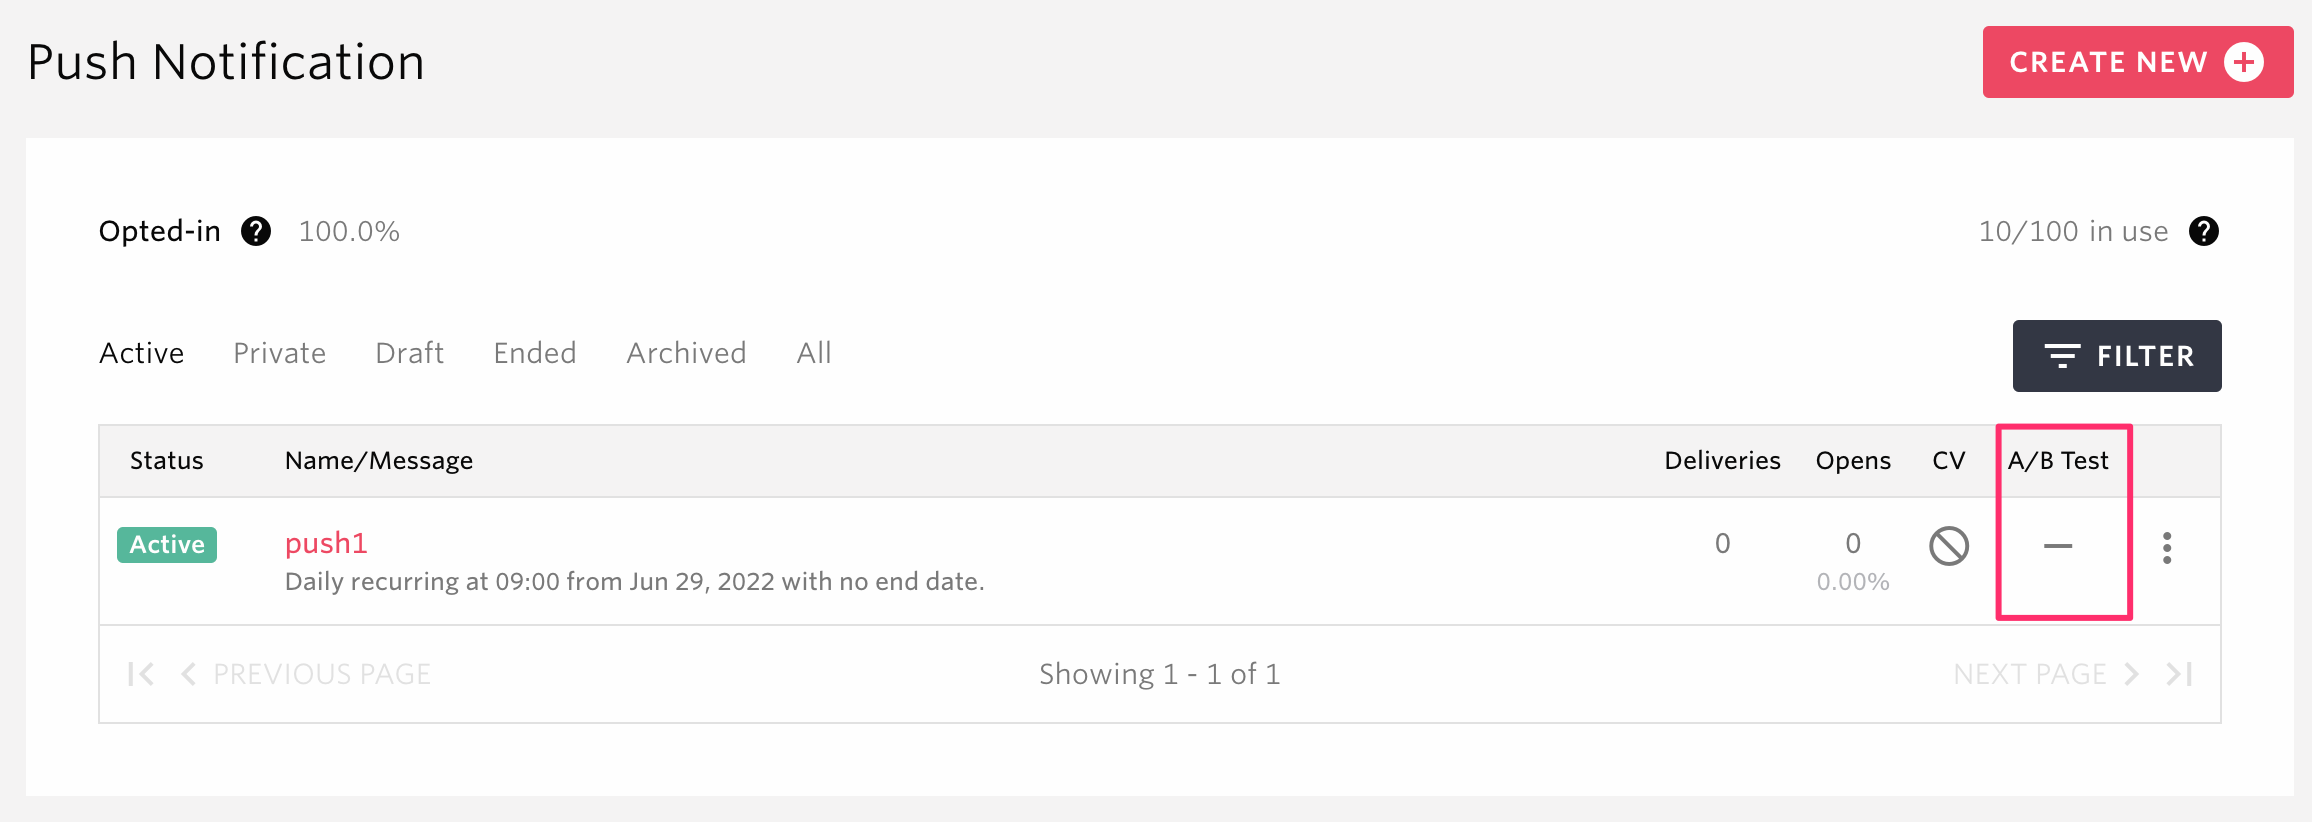
The conditions for displaying icons are as follows.
Icon |
Display conditions |
|---|---|
|
A significant difference exists, and the results of the pattern exceed the baseline at least once |
|
A significant difference exists, and the results of the pattern are only of ones that fall below the baseline |
|
Only patterns without significant difference |
|
If all patterns can’t be calculated |
|
If winning pattern is already selected |
|
When either the targeted indicator or the baseline pattern of the A/B test is not set |
ー |
When the campaign is not conducting A/B test |


Note
In the instance of a campaign that has a significant difference with the baseline having both exceeding and falling below results, it will be displayed as the results of the pattern with at least one exceeding the baseline.
For questions, please visit the FAQ.
Select the winner
Once you select the winner, all after deliveries of the same push notification will be using the selected pattern to all target users.
Keeping the pattern with the highest open rate is likely to be effective to improve retention rate. Choosing the one with the highest conversion rate will also be good for increasing overall KPI.
See the Push Notification Opt-in Rate
You can see how much of your users have opted-in push notification on top of the push notification list. Maximizing opt-in rate is important to make the campaigns more effective and bring better retention and conversion rates.

Push Notification Opt-in Rate is calculated as the following:
Push Notification Opt-In Rate = Number of devices used within the last 30 days that opted-in push notifications / Number of all devices used within the last 30 days
Note